 Previous section
 Return to TactileView manual overview
With the 6 dots of regular braille, only 63 different combinations can be made (not including the space character). However, the languages from around the world use a far larger amount of letters and punctuation marks. To accommodate these differences using only the 63 available braille characters, each language or country uses a specific braille table (sometimes called rule-set, braille code or mapping).
This way, a braille character in one language can have a different meaning in another. It is crucial, therefore, to select the correct braille table for the visual impaired reader.
Once the braille table is chosen, TactileView will automatically produce the correct braille for text labels according to the inherent properties of braille script.
Via menu Settings > Braille tables, you can select your braille table of choice. There are three sets of braille tables:
– TactileView braille tables: these tables are currently only used for uploading designs to the TactileView catalog, but will be replaced completely in future releases;
– Liblouis braille tables: an open-source braille translator that contains a large number of languages and braille codes.
– Japanese braille table from Extra: a translator for Japanese braille that can be purchased from Extra.
The selected braille table will be your main braille table, which is used as a default for all new text labels that are placed in your design (including the title label). When you change your main braille table, all labels that are designated as such will be changed to the new table.
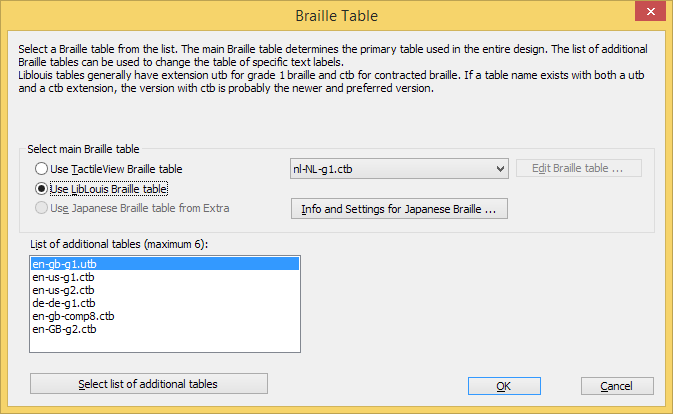
Figure 1. Braille tables settings dialog; click on the image to enlarge.
The large list of Liblouis braille tables is recommended over the TactileView tables, as they are now only used for uploading designs to the TactileView catalog or in cases where personal adaptations of a braille table are required.
Liblouis is an open-source braille translator containing an extensive list of braille tables for a wide range of countries and languages. For some there is just a single braille table available, whereas others (most notably English) have several alternatives. In general, they use the following elements in the table names to distinguish them:
– g0 or ‘comp’ for computer braille;
– g1 for uncontracted braille (letter by letter transcription);
– g2 for contracted braille (using abbreviations and contractions);
– g3 for non-standardised personal shorthands (rarely used).
Most of the braille tables without a specified grade will either be grade 1, or a specialised braille table such as mathematical braille notation.
The Japanese braille from Extra is only available once this package has been bought separately.
Once you have chosen your preferred braille table, click ‘OK’ confirm to save the selected main braille table. The main table is also recorded in the document when saved.
By default, your main braille table is selected for new text labels. However, you can choose to use another braille table for individual text labels. This is useful for example when combining regular text with mathematical equations, or texts in different languages in their corresponding braille tables.
There are two ways of changing the braille table for a selected text label:
– From the properties toolbar or context menu, choose ‘Select braille table’ and select your preferred table from the list; you can choose from your main table, the 5 most recent tables or the complete list of Liblouis tables via ‘More braille tables’;
– Choose the braille table from the list of Liblouis table in the ‘Text and position’ dialog.
To get an overview of all the braille tables that are used in the document, first make sure nothing is selected. Next, choose ‘Show used braille tables’ from the properties toolbar; this option can also be found in the context menu that opens when right clicking in an empty part of the design. When this option is selected, the colour of the markers of all text labels in your design will signify the used tables; the legend near the top left corner shows which colour corresponds with which table.
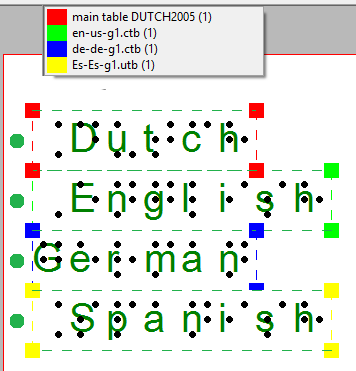
Figure 2. Overview of the braille tables that are used in the design.
When it comes to mathematical notation in braille, there is a number of additional aspects that come into play. These are also supported in TactileView. For a full overview, read the manual sections ‘Introduction on mathematical notations‘ and ‘Add mathematical label (equation)‘.
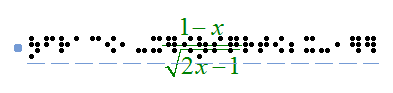
Figure 3. Mathematical text label.
By default, the braille characters are shown on screen on top of the entered text to give the designer an idea of the occupied space. For better readability, the braille can also be disabled on screen by selecting ‘Hide braille dots on screen’ from the properties toolbar or context menu of the design or a selected text label. Choose ‘Show braille dots on screen’ to make them visible again. Alternatively, the braille can also be disabled via menu Settings > Text label presentation: on screen. See manual section ‘Editing text labels‘.
‘Show braille dots on screen’ icon:
When opening a document that was saved using a main table that is different from your current one, you can choose between:
– applying your current braille table to the document;
– use the original braille table in the document;
– use the original braille table and make this your default main braille table.