
 This is the first section
 Return to MDA manual overview

Quick Tour
This is a quick overview of the actions to take in order to create a tactile map. For a full understanding of the RouteTactile map creator, we recommend that you have a look at the other manual sections, Preferences and Settings, too. This will increase your awareness on how your preferences, the map data and other characteristics can influence the usability of a tactile map.
Preferences
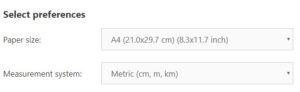
Before starting with the actual map creation, make sure you have checked/ set the preferences for measurement system and paper size. Choose A4 paper size when sketching the map on the motorized drawing arm (MDA).
After choosing the scope of the map you will be taken automatically through the phases as listed below.
Phase 1. Determine and refine the area
The whole world, a continent, country, province, city (detailed map or just the contour) and street can be chosen as the scope for your map. The difference in scope determines the type and relevance of the information that can be presented on the map.
Maps of states/provinces, cities and streets can be refined by zooming or panning. The world, continent and country maps don’t have panning and zoom capability.
You can pan around by clicking on the arrows around the map preview. You can zoom using the buttons below the map preview. The selected percentage determines the amount the map will be panned or zoomed. For example, zooming by 100% will double both the width and height of the area on the map, whereas 5% will only slightly increase the map area.
The dimensions (distances) of the area that will be presented on the map are shown to the side and also in the lower left corner of the tactile map in the selected units of measurement (kilometre/metre or mile/yard).
For screenreader users the pre-sets for zooming and panning will help to understand the effect of the operations.
Phase 2. Add/remove topographical or geographical details
When you’re satisfied with the area you want your map to show, you can click on “Create Tactile Map” to proceed to produce and download the map.
Alternatively you can add topographical or geographical details to the map. Each map type has specific types of details that can be presented. Details of the same type are grouped in layers. Layers are activated or deactivated by checking or unchecking the respective box. Some detail types, such as cities or streets, are marked with numbers. Their actual positions on the resulting map are cross referenced in an index file in the selected units of measurement (centimetre or inch ). You may want to keep an eye open for the number of layers you have activated in order to maintain the tactile usability of the map. It might be better to produce multiple versions of the same area.
As an example, for a continent you can add/remove country contours, country capitals and reference numbers for a printed index. In this case, activating all three layers will result in a tactile mess. Even more so when the map is produced on a relatively small sheet of paper, A4 or Letter size.
Each time you add or remove details by checking or unchecking a checkbox, a new map and index file has to be generated before it can be downloaded.
Phase 3. Download and produce the map
Click “Download Tactile Map” to download the map as an SVG file. The name of the file and related index both reflect your search area.
For sketching on the MDA: Upload the SVG file to the MDA’s upload folder, and click the newly uploaded map to start sketching. Alternatively, upload the SVG file to the auto-sketch folder and the MDA will start sketching immediately. If you’re using TactileView to produce the tactile map, open the SVG file with TactileView.
Once the map is loaded in TactileView, the map can be enriched with text labels or graphical elements as needed.
Make sure you did select the paper size from the preference that your braille embosser or other production media can handle as well.
Notes
1: In case you have remarks, please use the feedback form to let us know.
2: Over time changes and additions will be made. You may subscribe to our newsletter to stay informed.