Global description
The 10 pushpins are stored in a cushion in the carrying bag. The length is about 2 centimetres. The head of the pushpin is ball-shaped. The pin is made of metal.
To description section
To manual section
Consideration
Generally speaking, the use of pushpins will increase the overall accuracy of the drawing operations. On the other hand it takes time to handle the pushpins safely and efficiently. Throughout the various manual sections the use of pushpins is explained. The usage of pushpins is based on your experience and preference and also on the accuracy you can get with or without the pushpins. Over time, your drawing skills will increase.
Pushpin manual
Storing
The pushpins are stored horizontally in their cushion. Take the head between thumb and pointing finger and stick it through the drawing paper into the rubber mat. Due to the flexibility of the rubber, the pushpins can waggle, but they won’t fall out. Don’t be afraid, they do not damage the rubber.
Markings and pushpins as reference points
By pressing with the pen on the drawing paper a raised dot will appear. In many cases this is sufficient as a reference point. In addition you can place a pushpin as reference point on the desired position or in the pre-made marking. Tools can lean against the pushpins. While drawing, also serve as pen blocker; the tip will bump into the pushpin. During measuring a distance certain points can be marked with the pen and/or equipped with a pushpin.
Pushpin markers
Many of the tools that come with the TactiPad or come as extensions, have so called pushpin markers. These are indented circles with a tiny hole in the middle at the top surface of the tools.
When one or two pushpins are stuck into the pushpin markers, the tools are fixed on the drawing board. For this approach the drawing process requires extra time, but the tools will for sure stay in their position.
Organising pushpins
You can take them one by one from the cushion. You could also use a magnet to organise them. A spare magnet can be stored in the small pocket in the carrying bag. The base of the compass is magnetic, so you can use this part to organise the pushpins.When holding the drawing board in landscape, in the middle of the left and right side and in the middle of the rear side cavities can be found. Here, magnets are located that can also hold the pushpins.
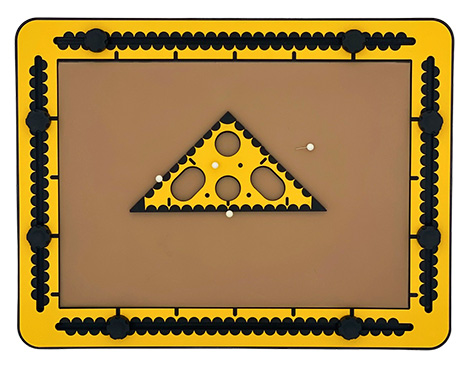
Create a triangle with markings and pushpins exercise
To experience the difference: Mark three positions somewhere on the drawing area with the pen. Use the slick side of the 45Triangle to connect the positions. An irregular triangle will appear. Measure the longest side of the triangle and mark the halfway position. Place a pushpin here. Place a pushpin in the opposing corner and draw the line between the two pushpins.
 Previous section

 Table of content