Global description
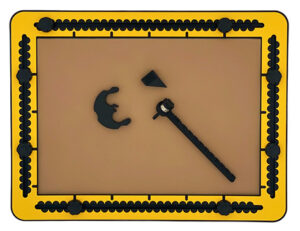
The compass is made up of two main parts: a beam and a base. The beam has a needle shaped turning point on one side and a pointy shape, the spike that can move along the beam. The spike produces the raised line of the circle. The needle slides into the centre of the base. The beam can move around the base in horizontal orientation clockwise and counter clockwise just above the drawing area.
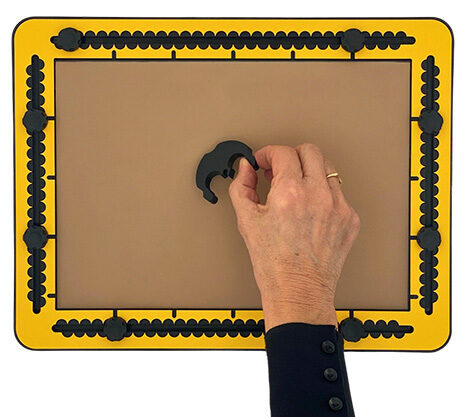
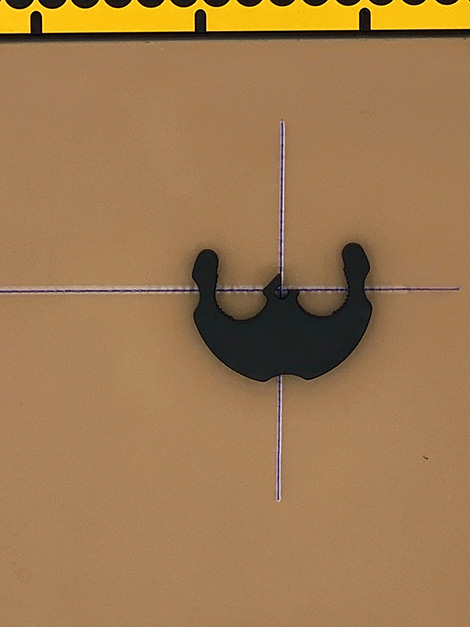
The base has a semi-circle shape with a diameter of almost 6 centimetres. If you want, you can see a rabbit face with two ribbed ears, two eyes, a mouth, a nose, and a arrowhead shaped hat, where one corner has been cut out.
In the centre of the base is the nose, the hole that holds the needle/beam upright. Along the outer edge of the base, three semi-circular hollows have been made. According the face analogy; one at the bottom, the mouth and the eyes near the ears. One half of the arrowhead is cut off. At the bottom side the base has three strong magnets and five anti slip feet. With this combination the anti-slip effect is really high.
Compass beam
The beam has a total length of about 13 centimetres. Three small ramps at the top side are present to indicate the smallest radius of three centimetres. From here on indents per half centimetre can be found. The maximum radius of the circle can be set to 12 centimetres. The beam has a ring on one side that encloses the needle in a ball mount. This enables the beam to be lifted or tilted during rotation.
The needle could be described as a mushroom. The ribbed head on top is sitting on a metal ball that is surrounded by the ring. The needle continues below the ball. At the end three small spikes can be found.
Spike
A ribbed, open block can move along the beam. It will click into the indents so it stays in position. Underneath the block is a triangular shaped that is the actual ‘pen’ that draws on the paper.
Compass manual
The beam and spike are assembled together in an elastic tube. Remove the spike from the beam so you can take the beam from the tube. Re assemble the two parts. Make sure the right side of the spike is facing the needle. For now, move the spike fully over the beam towards the needle. The compass base is stored separately. It is held in place with two elastic bands over the ears. Fetch the band and enlarge the opening to take out the ears one by one.
Magnetic force
The base has strong magnets so it adheres to the metal plate underneath the rubber mat of the drawing board. When placing the base on the drawing board you will experience the magnetic effect right away. The base will slide not easily.
Removing the base from the drawing board becomes easy when lifting the base at one ear. Be aware, it can attach itself to other metal objects whenever the distance is small enough.
Adjusting the radius
Before assembling the compass, play around with setting the radius to particular values. Therefore, hold the needle’s side of the beam in one hand and take the ribbed spike between thumb and pointing finger and move it in steps to the desired position. You will recognise the clicks while moving. Check the radius by counting along the beam, starting at the three centimetre starting block indicated with three small ramps on the beam.
Draw your first circle
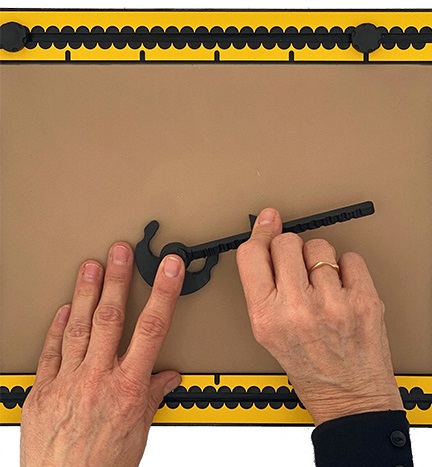
Set the radius for the circle at six centimetres. Choose a position for the base somewhere in the middle of the drawing board. Put the needle in the centre of the base. The spike will rest on the drawing paper.
Lift the beam while rotating so it is pointing away from you. Place the pointing finger of the left hand on the needle’s head and hold it steady. The thumb and middle finger can hold the base. Take the spike between your thumb and pointing finger of the right hand. By nature the beam / spike will tilt towards you when you drag the pointer towards you while pressing down as well. Remember the pull operation for smooth drawing.
The contour of the circle will rise up behind the spike. While dragging/rotating the beam with spike, at some point you will run against the hand that keeps the needle in place. Now take your hands off and let the compass sit in its position. You can change hands now; the pointing finger of the right hand will now support the spike. The left hand will take over. Continue the drawing operation to the point where you started drawing. The magnets in the base ensure the base will stay in its position. It doesn’t matter if you redraw part of the circle.
Indication for the centre of the circle
The bottom end of the needle has three very small spikes. When you press and turn the head on top, without moving the whole beam, a small tactile circle is created, indicating the centre of the circle drawn.
Placing the compass base on a particular position. The arrowhead can be used to precisely place the centre of a circle on a specific point in the drawing.
Mark this position with the pen or place a pushpin. Move the centre hole to the mark and align with the sides of the arrow head. If you place the corners of the arrowhead on two crossing lines, the compass needle is exactly on the crossing.
The alignment indents around the outside of the base can be used to precisely position the centre of the circle on a line. Check with the fingertip if the middle of the two eyes is on the line. The centre is already on the line. Check if the middle of the mouth is also on the crossing line. The centre is now on the crossing.
Fantasy – clock
Draw a circle with a radius of six centimetres. Draw a second circle with a radius of 7,5 centimetres with the exact same centre position. Start with the smaller of the two circles. Leave the base sitting in its position. For the larger one take the base between your finger tips and press it down so when you pull the spike to its next position, it does not move. Draw the circle and check if the distance comes out equally all along. Provide the space between the two circles with small lines by freehand as indicators for the hour positions.
 Previous section

 Table of content