The TactiForma has one rectangle hook tool with two orthogonal rulers of a length of 10 centimetres.
To description section
To manual section
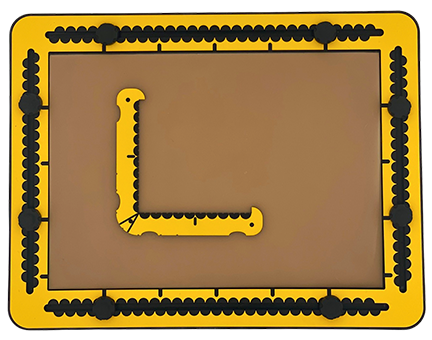
Detailed description of the rectangle hook tool
The rectangle hook tool has the shape of a capital L, where the horizontal and vertical parts of the character have the same length of 10 centimetres/approx. 4 inches. The two parts enclose an angle of 90 degrees. They are equipped as rulers with measurement indications in centimetres at the top surface and indents per half centimetre along the sides. The body of the tool is two centimetres wide. On the outer side, near the rounded corner and the tips, you find finger fitters for easy lifting or extra grip. The corner between the sides is rounded at the outer side. At the top surface there is a groove under an angle of 45 degrees for alignment. The rulers end with a 90-degree hook serving as a pen blocker. Pushpin markers are located near the rounded corner and near the tips.
Rectangle hook tool manual
Right corner
By drawing along the rulers into the enclosed corner, two lines at an angle of 90 degrees are created.
Right corner triangle
When connecting the two endings of the previously created lines, you get a right-angled triangle.
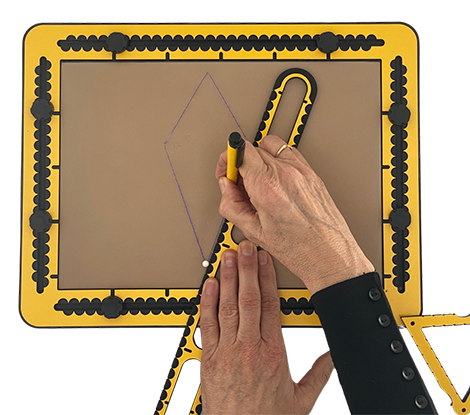
Diamond
- For the centre position, use a pushpin. For high precision you might want to use four additional pushpins for the corners.
- Place a first pushpin at the centre position of the diamond.
- Place the enclosed corner of the rectangle hook against the pushpin in the desired orientation.
- Most logical is to have one ruler pointing left, the other ruler downwards.
- Mark or place a pushpin at the desired horizontal ruler position for corner A.
- Mark or place another pushpin along the vertical ruler for B corner.
- Now the marked positions or the three pushpins are positioned in a triangle.
- Lift the tool and rotate 90 degrees anticlockwise.
- Place the enclosed corner of the tool again against the pushpin that marks the centre position and make sure the ruler touches the B pushpin.
- Place a fourth pushpin for corner C, which is opposite A.
- Rotate again 90 degrees.
- Place a fifth pushpin for corner D in the same ruler position as for corner B.
- Connect the four corners.
Kite
In the kite shape the distance from one pair of opposing corners to the centre position differs. In other words, one of the diagonal lines is cut in two sections with different lengths. Apart from this, the drawing instructions are similar to those for the diamond.
Challenge
Fit a diamond exactly into the eight by six centimetre ellipse. The corners of the diamond are all four exactly on the ellipse outline.
 Previous section

 Table of content