The TactiForma set contains regular polygon tools with five, six, seven, eight or nine corners referred to as pentagon, hexagon, heptagon, octagon and nonagon respectively. The radius of the polygons ranges from three to eight centimetres. The magnetic foot is an essential part of the regular polygon tool, as it holds the tool in place.
To description section
To manual section
Global description
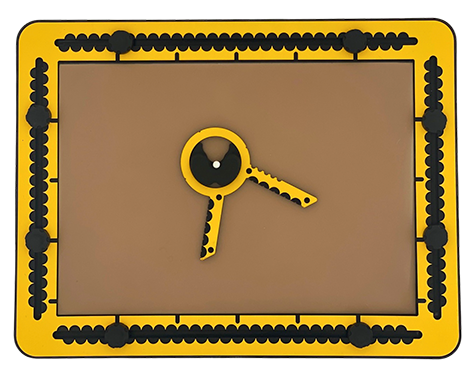
Imagine a line drawing of an isosceles triangle pointing upwards. The top is cut off and replaced by a circle (a ring). The base line does not exist. The length of the two sides that stick out from the circle (the rulers) determine the maximum radius the polygon can have.
Detailed description of the polygon tool
The sides are asymetrically connected to the ring; the right ruler goes along the outer side of the triangle, the left ruler along the inner side. Where both rulers would meet in the top corner, the top is cut off and replaced with a ring, so the rulers are only partly present. The rulers have centimetre indications at the top surface and along the side indents at every half centimetre. The measurement indications point in the same direction. They have a pushpin marker near the ring and at the end of the ruler.
At the outer side of the right ruler, medium sized indents are provided to indicate the type of polygon. E.g. six indents means the hexagon polygon tool. The hole in the ring leaves space to find the centre position of the polygon and is also the fit for the magnetic foot to hold the tool in place during the rotation of the tool.
The ring has an inner radius of nearly two centimetres and an outer radius of nearly three centimetres. This enables a radius for the polygons ranging from a minimum of three centimetres to a maximum of eight centimetres. Three small indents are at the outside of the ring. One of them is placed on the line formed by the bisector. Two others are placed on an orthogonal line that crosses the centre position. The round foot has two magnets fully encapsulated in rubber to hold the body of the tool in place. It is lacking a section so the fingertip can slide in. This open area is called the finger entrance. It enables exploring the drawing near the polygon’s centre area. The vertical groove in the middle of the finger entrance can hold a pushpin and indicates the precise centre position of the polygon.
Remarks
Knowing about regular polygons; a shape based on triangles. A regular polygon is a shape where the individual sides are all of the same length. It can also be described as a circle filled up with isosceles triangles. The sides of two adjacent triangles coinside. However, the sides of the triangles are not present in the drawing. Only the base sides are visible as the sides of the polygon shape. For the drawing instructions: each triangle of the regular polygon is called a segment.
The angles for the respective top corners of the pentagon, hexagon, heptagon, octagon and nonagon are 72, 60, 51, 45, and 40 degrees.
Regular polygon tool manual
Although the corner positions can be marked with a dot only, the use of pushpins is recommended.
For the first segment, place a (pointing) finger on the desired position in the drawing area and move the foot with the finger entrance against the fingertip. Place the ring of the tool over the foot. Determine by rotating the tool, the orientation for the first segment.
Decide on the radius of the polygon and place a pushpin in the corresponding indent of both legs. For the second segment: rotate the tool slightly away from the pushpins, lift the tool and rotate further in either directions until the legs have passed the pushpins. Slide the tool back against the pushpin and place another pushpin in the appropriate radius position in the unmarked leg. Repeat this untill you are back at the starting point.
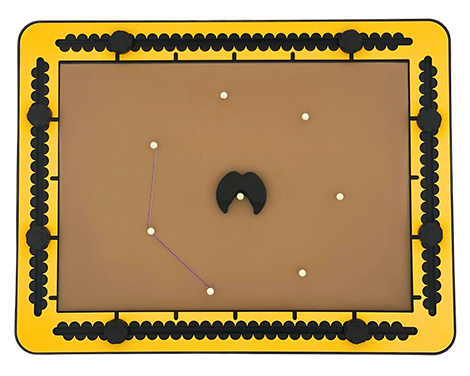
After creating all the segments you can remove the tool and the magnetic foot and connect the pushpins/corners with straight lines. In addition, by leaving the pushpin in the centre, one or more radii can be drawn. The rectangle hook tool placed against the centre pushpin and one of the corners, enables you to draw a radius.
More precision with alignment
Place a pushpin first to mark the centre position, in case this is relevant. Move the magnetic foot so the groove in the finger entrance embraces the pushpin.
Aligning the polygon tool with existing lines
The ring has small indents for alignment of the polygon with a line. Placing the bisector indents on a line, the centre will be on that line. The segment is cut in half. Placing the orthogonal indents on a line puts the centre on the line and ensures the side of the segment is parallel to the line.
Spider web
For a sophisticated spider web use different polygon tools. Create a few – slightly shifted – concentric polygons on the TactiPad and draw lines through the corners. See what happens when the more cornered polygons are at the outside of the web.
 Previous section

 Table of content