Detailed description
The GraphGrid frame is a frame (37 by 28 cm) with a thickness of four millimetres. It needs to be mounted on the TactiPad drawing board like a picture frame. Eight oval holes in the frame fit around the knobs of the TactiPad to hold it in place. Three corners are rounded. The fourth corner is flattened.
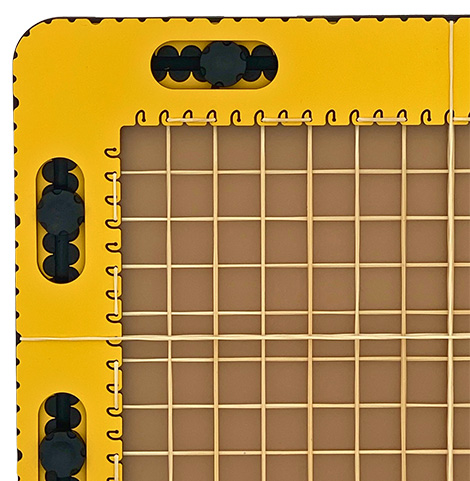
Along the inner edge, small curved hooks are placed at a regular interval of 1 centimetre. Along the outer edge of the frame, indents are made with a spacing of 1 centimetre as well. Slightly wider indications mark 5-centimetre intervals. They exactly match the centimetre scale along the edges of the TactiPad.
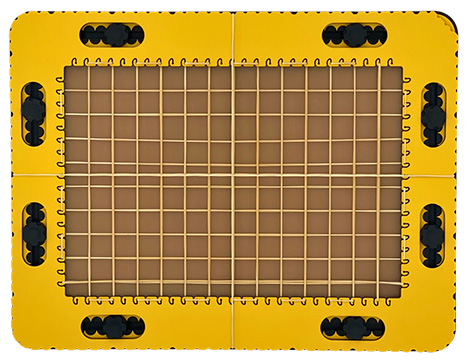
The purpose of the indents is to hold rubber bands so that the measurements system of the TactiPad tangible across the entire drawing area in rows and/or columns. Because of the A4 dimensions of the drawing surface (29.7 cm by 21.0 cm), the centimetre scale is not symmetrical along the GraphGrid. Therefore, the starting point for horizontal and vertical distances is at the upper left corner of the drawing board and GraphGrid frame when in landscape orientation and when the flattened corner of the GraphGrid is placed in the upper right corner.
Note: The frame covers the drawing surface along the edges for one centimetre.
GraphGrid frame manual
Storage of the GraphGrid
The frame of the GraphGrid will sit, or can sit, on top of the drawing board for storage. The additional tools for the GraphGrid have their place in the paper pocket.
Preparation
To begin with, make sure the TactiPad has a landscape orientation with the hinge facing backwards. To position the GraphGrid frame, place the knobs at approximately five centimetres from the corners. To orient the GraphGrid frame correct, place the flat corner in the upper right corner of the TactiPad. Make sure all eight knobs of the TactiPad are inserted into the holes. It is possible that a rubber band coincides with the position of one of the knobs. Therefore, the holes in the GraphGrid around the knobs are extra-long so you can slide the knobs aside for the desired placement of the rubber band.
Initial setup for the rubber bands
The initial setup of the GraphGrid frame has rubber bands every two centimetre in horizontal and vertical direction, so forming a grid in the horizontal and vertical directions. Two rubber bands go around the frame to indicate two axes. Of course, other setups are possible.
Low and high rubber bands – Using differences in height
The framework of the GraphGrid has a thickness of four millimetres. Therefore, there is a well-noticeable difference in height between the bands that run along the top side (outer) part or the bottom side (inner) part of the frame. The lower rubber bands that are attached to the hooks run alongside the inner part of the GraphGrid and can lie flat on the drawing surface. The rubber bands can be placed horizontally and vertically with a minimum distance of 1 centimetre.
Note 1: The inner and outer bands can also be placed at an angle of any number of degrees.
Note 2: The hooks at the inside edge are every centimetre. Adding rubber bands to each hook could result in a (too) dense grid.
Placing the grid lines and axes
The minimum cell dimensions are one by one centimetre. To form a larger grid, you can place the rubber bands two or more centimetres apart by skipping one or more hooks on opposing sides of the GraphGrid. Additional rubber bands for replacing broken ones or creating more grid lines and axes are supplied with the GraphGrid. These are standard, thin rubber bands with a length of 15 centimetres, 6 inches.
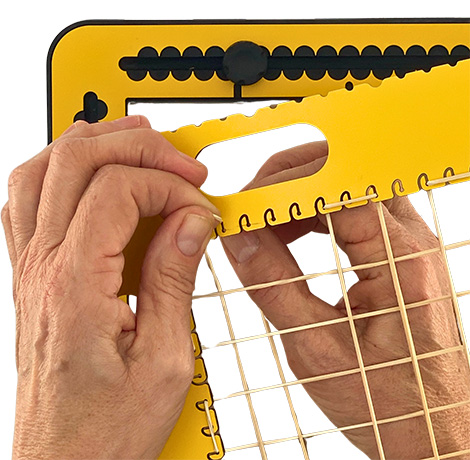
The hooks along the inner side of the frame have a curved shape so the rubber bands cannot come loose if they are positioned properly. Placing a rubber band is easiest if you hold the rubber band with two hands, keeping it perpendicular to the frame so you can slide it through the slot to the end of the hook. First, you stretch the rubber band between two opposing hooks, so that it forms a double line between two sides of the GraphGrid. You then take the upper of these two lines and slide it into the next desired hook in both sides of the frame to form the second grid line.
 Previous section

 Table of content