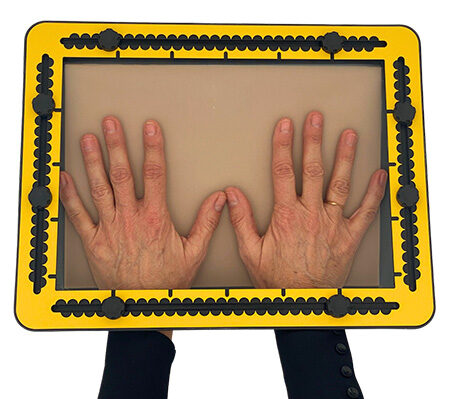
03.1 – Introductory description
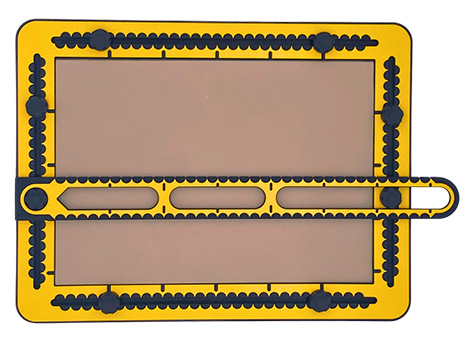
The TactiPad drawing board consists of a top frame that surrounds the A4 (21.0 x 29.7 centimetres) drawing area of the bottom layer. The two parts are connected with a hinge, so the frame can open like a book. The drawing board and tools are made of plastic. The corners are rounded. The total size is 28,0 by 36,7 centimetres. The use of the colours black and yellow for the TactiPad and the related products and tools provides a good contrast between different parts.

To description section
To manual section
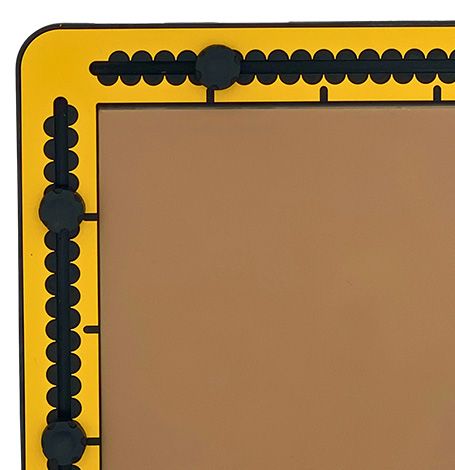
The frame has grooves in each of the four edges. Two knobs can slide in each groove. Measurement indications in centimetres are provided along the grooves. The drawing foil, which is a rather thin plastic foil is placed on the rubber mat, the actual drawing area. Underneath this mat, a metal plate is mounted.
When the frame is fully opened it can stand on its own so the drawing foil can be placed. Magnets pull the top frame and drawing layer together to keep the drawing foil in place. At the front side of the TactiPad, with the hinge pointing backward, the bottom layer is shaped inwards compared to the frame.
03.2 – Detailed description
03.3 – Natural dimensions and tactility
The dimensions of the drawing board and the tools have commonly used values. Knowing about these dimensions will help to get the distances ‘in your fingers’. The drawing area is A4. The width of the frame sides is 3,5 centimetres. The knobs in the grooves are two centimetres in diameter, with a height of eight millimetres. They are placed one centimetre away from the outer edge of the frame. Indents next to the drawing area indicate five- centimetre distances.
03.4 – Origin of the frame/0 centimetre position
Depending on the subject to be drawn, the drawing board may be used in landscape or portrait orientation. In both cases, the measurement indications start at the upper left corner of the drawing area. In landscape orientation, the centimetre indication goes from 0 to 29.7 centimetres horizontally. Vertically, it goes downwards from 0 to 21,0 centimetres. When the drawing board is in portrait orientation, the counting differs, due to the non-symmetrical dimensions of the A4 paper size. From the upper left corner to the right goes from 0 to 21.0 centimetres. Going down, the first indent is at 0,7 centimetre. Beyond this point, the regular centimetre pattern is present.
03.5 – Grooves in the frame
The semi-circular hollows along the grooves indicate centimetre distances. The hollows on the inner side and those on the outer side of the groove have the same width but are shifted 0,5 centimetre. This allows rather precise measurement of 0,5 centimetre distances.
03.6 – Knobs in the grooves
In every groove two movable knobs are mounted. Some of the TactiPad drawing tools, especially the ruler, can be attached to the knobs. While positioning the knobs, the tools can be positioned precisely.
03.7 – Bottom layer/drawing area
The bottom layer has the same size as the top frame. On top of the bottom layer sits the drawing area, exsisting of a 4-millimetre-thick rubber layer. Underneath the rubber is, invisibly, a thin metal plate that pulls the magnets inside the compass base onto the drawing area.
03.8 – Drawing foil
The drawing foil is actually plastic foil. It is also referred to as drawing foil or German film. It measures 34 x 27 centimetres, and is tightened under the frame since it’s larger than the drawing surface itself. The magnets placed on the corners of the drawing board pull the frame and drawing layer together.
Note: Once the lines are raised, they cannot be erased. Also, the foil is sensitive to wrinkling so be careful by taking the foils from their pocket.
Cavities with magnets for the TactileView digital pen
In the middle of three edges of the frame, cavities can be found that are provided with two magnets. These magnets are used to position the frame for the receiver of the TactileView digital pen on the drawing surface. In combination with the TactileView Graphics editor. The TactileView digital pen product is discountinued since October 2022.
03.9 – Drawing board manual
03.10 – Opening the frame
Place the drawing board in landscape orientation with the hinge pointing backwards. Slide your thumb under the top frame and place your fingers on the drawing area. Press on the drawing surface with your fingers. The magnets will release. The frame can be lifted. If you open the frame and let it lean slightly back, it stays in its open position. When closed, the frame exactly surrounds the drawing surface, and is just as high as the drawing surface.
03.11 – Placing the drawing foil
In the open frame position you can place a drawing foil on the rubber mat. The foil is larger than the rubber mat. Make sure that the margins are roughly the same size on all sides. Close the frame and let it rest on the other hand. Smooth out the surface of the foil by moving both hands out from the middle to the sides while pressing the foil. Remove your hands and let the frame drop back into place. For best drawing results the foil should be placed on the drawing surface as smoothly as possible. You may have to practise this a couple of times to get a feel for it.
03.12 – Drawing with the pen
The plastic foil that is used as drawing foil creates the raised line upon applying some force with a ballpoint pen or another pointed device. To acquire good skills for this, perform some practice. Read the manual section ‘Practising drawing raised lines’.
03.13 – Positioning the knobs
The black ribbed knobs can be moved along the grooves by (un)screwing them. They can be removed by completely unscrewing them. To place a knob back in the groove, place it on a random place in the groove, and slide it all the way to the outer corner, dragging the nut along. Here, the knob can be screwed back in place.
03.14 – Determining distances
As measurement indications in centimetres, 9-millimetre-wide semi-circular hollows have been made on a short distance from the edge. They create points between them, each with a distance of 1 centimetre to the next. With those points, it becomes easy to read the exact distance per centimetre. Because the hollows are semi-circular, the distance per 5 millimetres can be read in the deepest point of the hollow. After some experience it is possible to measure even smaller distances in the matter of millimetres.
03.15 – Aligning the tools and frames
The drawing tools have holes and wide grooves to fit around the knobs. By fixing the knob and placing the tool over it, the tools can be tightened. With partially unscrewed knobs, the tools can move smoothly across the drawing surface.
An important aspect to keep in mind is the diameter of the knobs in reference to the centimetre indication. When aligning a tool on a knob, one centimetre has to be added or deducted to compensate for the knob. The CircleFrame and GraphGrid extensions have holes that fit around the knobs as well. The position for the knobs is about five centimetres away from the corner.
03.16 – Drawing board picture frame
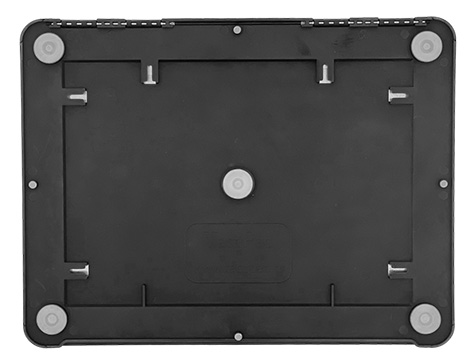
Three times two grooves have been made at the back side to make it possible to hang the TactiPad like a picture frame, portrait or landscape.
 Previous section

 Table of content