Skip NavigationMenu

01. Digital Pen – Introduction


Note: Since summer 2022, the Digital Pen has not been for sale anymore. This manual is for users who still own this former Thinkable product.


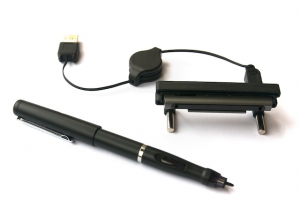
The TactileView digital pen is a special version of a ballpoint pen. The pen writes in ink like a normal pen, but at the same time determines the position of its tip on the drawing surface. In the pen’s tip is a small transmitter, which sends a signal to a receiver. Upon moving or clicking in the drawing surface with the pen, the receiver transmits this position to the TactileView software, just like with a regular computer mouse. Visual impaired people can operate the TactileView software using the TactiPad or TactileView ClickPad.

The pen functions as a drawing tool and transmits to the computer what has been drawn, or as a cursor by transmitting on which location has been clicked. This way, the digital pen enables the user to make a digital version of a tactile diagram or to explore a tactile diagram with speech and sound.

TactileView Digital Pen

02. Digital pen – Parts

The TactileView digital pen consists of three parts: a digital pen, a receiver and a holder for the receiver.
The tip of the digital pen is an exchangeable pin. Upon drawing, the tip gets pushed slightly into the pen, activating a tiny transmitter in the pen. Two small batteries in the pen power the transmitter.
The holder, which keeps the receiver of the digital pen in place, magnetically clicks to the side of the TactiPad or the TactileView ClickPad. The receiver is connected to the computer with a USB cable and sends the pen’s signal to the TactileView software. The software on the computer processes the pen’s position every time it clicks or moves.

03. Digital Pen – Combined with TactileView Drawing Board or TactileView ClickPad

The TactileView digital pen is combined with the TactiPad or the TactileView ClickPad. The TactiPad is mainly meant to enable the user to make a digital version while drawing a tactile diagram, whereas the TactileView ClickPad is only meant to explore audio-tactile diagrams with speech and sound.

This is how it works

The TactileView digital pen’s receiver is attached to the side of the TactiPad or ClickPad, overseeing the whole drawing surface. The pen transmits a signal, and the receiver receives it when there are no obstacles such as fingers in the way. This means that the receiver needs to have a clear sight of the pen’s tip to work properly.
The transmitter only sends out signals when the tip is pressed. The TactileView software calculates and processes the position of the pen’s moves and clicks. Every function in the TactileView software can be operated using the TactileView digital pen. Using the keyboard is not needed.

04. Digital Pen – The holder for the receiver

The holder is made of black plastic, and has two protruding magnets on both sides of the front side of the holder. The receiver is inserted into the holder from the front side. At the back the receiver is held in place by two small blocks. When the receiver is pushed against both of these blocks, the receiver is straight in the holder. The mini-USB cable can then be attached to the rear of the receiver.
For accuracy, the receiver has to face straight forward and has to be placed in the exact same position in relation to the upper left corner of a drawing. The magnets in the sides of the TactiPad and TactileView ClickPad attract the magnets in the holder, pulling it to the correct position. The receiver’s paper clamp is not needed when using the magnetic holder.
The receiver ‘sees’ almost a semicircle to its front side. The receiver cannot see the full 180 degrees, and is therefore placed slightly outside of the drawing surface. This way, the upper edge of the drawing sheet lays a little in front of the receiver.

05. Digital Pen – Specification of the pen

A cover at the end of the pen closes the batteries and can be removed. The batteries have a flat side and a rounded side. They have to be placed flat side up in the battery compartment.
The pen’s filling is replaceable. A plastic filling and a normal filling are included with the pen. These fillings are placed in the pen’s top and firmly lock in place. Quite some strength is needed to pull them out again.
The plastic tip can be used best when exploring an audio-tactile diagram, to prevent ink from spilling on the diagram. The normal ballpoint tip is advisable for drawing tactile lines on the TactiPad, so these lines instantly become visible.
The button on the side of the pen does not have any function. Every option of the TactileView software can be operated with the pen, using only short and long clicks.

06. Digital Pen – TactileView software

Preferably, the receiver is connected to the computer by a USB-cable before the TactileView software is launched. A notification reports this. When the software has informed that the receiver is connected, it does not necessarily mean that the digital pen transmits a signal when its tip is pressed. Place the pen on the drawing surface and lightly press down. A tinkling sound is played when the pen has made contact. This sounds indicates the pen being ‘stand-by’. When there is no sound played while pressing the pen, its batteries could be empty or the receiver cannot receive the pen’s signal.
From the menu ‘Settings > TactileView digital pen’ the pen function can be checked using the option ‘Test’.

07. Digital Pen – Calibration

To draw a digital diagram or to explore an audio-tactile diagram it is strictly necessary to have the physical position matching that same position in the related file in the TactileView software. The process of matching the physical and digital positions is called ‘calibration’. Guided by spoken messages, this calibration process can be executed from the menu ‘Settings > TactileView digital pen’.
Every design is made either in landscape or portrait orientation. Upon opening a new file or switching between design mode and explore mode, the orientation is announced, so that the user can choose the easiest position for the receiver. Depending on page orientation and drawing preferences, the receiver can be placed on one of the three positions on the TactiPad or the TactileView ClickPad. This way, left-handed use of the pen has been taken into account.
The base position for the receiver can be chosen in the menu ‘Settings > TactileView digital pen’.

09. Digital Pen – The pen in stand-by

The software always responds to pen contact when the receiver is connected and the pen functions correctly. Upon starting the software the pen does not have a drawing function yet, to prevent unintentional drawing. The pen stays stand-by until a drawing function is assigned to the pen. The pen’s function can be set at any time, using the context menus.
The basic moves of the pen are those where the pen is pressed down for a long or short time on the same position on the drawing surface. Pressing down and releasing without moving results in a short or long pen click. When the pen is pressed down and the tip is meanwhile moved on the drawing surface, there is pen contact and simultaneous movement (drawing).
The context menu containing the current options for the pen (which options are available depends on the user’s previous actions) is opened using a long pen click, or when the pen does not move whilst pressing down for approximately one second. Short pen clicks are used to select an option in an opened menu. The option to put the pen back to stand-by can be found in nearly every context menu.

10 Digital Pen – Opening a context menu and selecting options

The context menus of the TactileView software can be opened by clicking with the pen on any position on the drawing surface during approximately one second. An ascending piano sound indicates that the menu is being opened. When the pen is released or moved before the fifth note is played, opening the menu is cancelled to prevent interrupting a drawing activity.

For selecting and activating the options in the context menu the software uses the pen’s last clicked (‘current’) position. By using this point as starting position, the next click lands on a certain position related to this point. Every position related to this starting position has a specific result.

By shortly clicking with the pen on the same, ‘current’ position again, the next option in the newly opened context menu is selected. These clicks can be repeated endlessly to cycle through the context menu: after the last option is shown, the first option in the list is shown again.

By clicking about 1 centimetre above the current position, the previous option in the list is shown, and the presentation sequence is inverted. Clicking on this higher position again then shows the previous option, instead of the next. By clicking on the initial position, about 1 centimetre below this current higher position, the next option is shown again and the presentation sequence is changed back to normal.

By clicking 1 centimetre to the right of the last clicked position, the selected option in the menu is activated, just like using the ‘enter’ key. When the chosen option also includes a list of options, you can click on the current position to show all options of this submenu. Once more, clicking 1 centimetre to the right activates an option from the submenu.

By clicking left of the current position, the menu or submenu is cancelled, just like using the ‘escape’ key.