
Layout
The top layer of the MDA is made of the same material as the TactiPad. It has the same tactile properties and rich contrast colours: yellow and black.To give it its sturdiness, an aluminium plate forms the foundation for the mechanical parts. Two motors that move the arm forwards and backwards are housed underneath the bed of the MDA. The two motors that operate the stylus up and down and from left to right are housed inside the moving arm. The unit is highly suitable to be used on a table/desk. The user can sit in front of the MDA even while the motors are running; they create only little noise. Caution is required when the arm is moving. Make sure that no objects or hands are obstructing the path of the arm.
Placement of the TactiPad
The MDA’s bed is just as wide as the TactiPad is in landscape position. The rounded front corners of the MDA line up with those of the TactiPad, making it easy to confirm, by touching, the placement of the TactiPad. Lifting the TactiPad up is easy due to the indentations along the front, left and right side of the bed. Six black anchors can be found on the bed. They are shaped in such a way that the TactiPad will naturally slide into one of two fixed positions. The four anchors nearest to the front panel hold the TactiPad in the horizontal position, while all six are covered when the TactiPad is in its vertical position. The front side of the MDA aligns with the TactiPad in both cases. When the arm has fully moved backwards, the frame of the TactiPad can be opened to replace the drawing paper
TactiPad position detection sensors
The recommended placement of the TactiPad is to have the hinge to face backwards for landscape oriented images or to the left for portrait oriented images. Nevertheless, the built in sensors will detect any of the four possible positions of the TactiPad. The MDA can sketch the image in the correct orientation, also ensuring that the measurement indications surrounding the TactiPad and the internal measurements system of the MDA will match. In addition a right up marker is always sketched in the upper right corner of the image. To ensure a maximum of tactile recognisable details in the image, the MDA will, when necessary, scale an image to fit on the TactiPads A4 sized drawing area.
TactileView digital pen dock
Almost to the rear of the MDA a black ridge protrudes from the MDA’s bed. This is the dock for the receiver of the TactileView’s digital pen. This product is no longer available.
Back panel and connectors
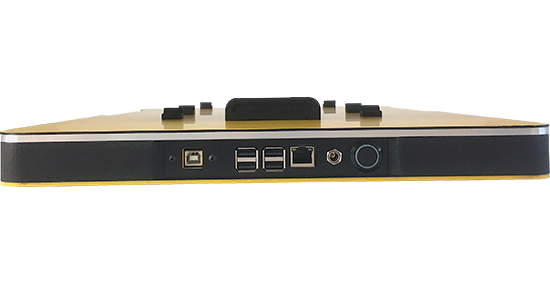
The back panel holds, besides the on/off push button and the power plug, the connectors for Ethernet an USB Type A en B . Not visible is the WiFi transmitter that operates the wireless connection for the hotspot or connecting to a local network.
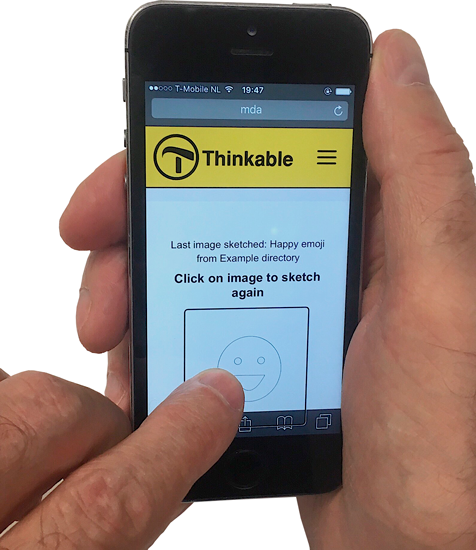
Built-in website/pages
The on/ off switch on the back panel is the only push button on the MDA.
All further operation of the MDA is controlled from a browser through the pages of the built-in website. The website is accessible from any browser. The default address is http://mda/. The home page presents a general description of the device, details for the network configuration and the owner/managers data.
The setup page offers password protection, WiFi/network configuration, selection of user interface language and the choice of the measurement system (metric / Imperial (USA). On the Examples page pre-made images can be found. Just select one of them and click to start sketching. The page Interactive contains a variety of dedicated drawing tools for specific content.
On the Upload page the images from external sources are listed. Files can be deleted from this folder for storage management. The USB-drive page allows the reading and sketching from a USB drive. The MyImages page allows users to submit a design request.
TactileView software
With the rich toolset, including the graph module and the map maker module of TactileView software it is really easy to create tactile diagrams. The designs can be sent via USB or over a local network connection to the MDA.
Third party programs
For Windows and Mac based computers as well as for IOS and Android tablets and mobile phones numerous apps are available to convert existing images (JPG or PNG) to SVG or create new ones in this file format. The files can be transferred to the MDA; send them to the upload folder or to the auto-sketch folder for immediate sketching.
Connections and user scenarios
1. USB – the MDA is connected via USB cable to a computer
The designs made with the TactileView software can be sketched directly on the MDA, similar to using a regular printer. However, no printer driver has to be installed.
Notes:
- TactileView offers no access to the MDA’s Web Interface.
- When connected via USB, wireless or wired access via hotspot or local network can be established for simultaneously accessing the MDA’s internal website/user interface from a browser.
2. Hotspot – direct Wifi connection
The MDA can broadcast its Wifi network: mda-hotspot. Multiple devices with Wifi access can connect to this network. With a browser, the MDA internal website/user interface can be accessed.
The owner/manager can visit the Setup page of the internal website for advanced network configuration of a local network, wired and wireless.
Notes:
- A browser has no internet access anymore (no throughput).
- The functions in the internal website that rely on internet services are not available.
- TactileView designs can be sketched (via HTTP protocol) or via USB connection.
3. Local network – wireless or wired
The MDA can be connected to a local network, either via Wifi (A) or via an Ethernet cable (B); access via the hotspot to configure the Wifi network is required, while the wired connection will automatically be configured upon pressing the on/off switch.
Notes:
- All pages/ functions of the user interface are available.
- With the local network connected to the internet, the MDA will have internet access as well, which is required for updates of the MDA software.
- The USB connection remains available.
A. Local network; wireless.
- Access via the hotspot is not available. MDA’s Wifi connection is occupied for accessing the local network.
- The internal website and internet access for browsers are available (throughput).
- The USB connection is available.
B. Local network; wired.
- The hotspot and the USB connections are accessible as well.
4. USB drive
SVG documents stored on a USB drive can be selected and sketched only from the internal website. A hotspot or network connection is required for a browser to activate the functions on the upload page.
Miscellaneous
When connected via hotspot or network, wired or wireless, SVG files created with third-party applications (Windows, Mac, IOS Android) can be sent to the MDA via a browser, via dedicated file transfer software, or by mounting the MDA file system directly to the PC/Mac (like a NAS server) to:
A. The upload folder; user controlled sketch process on the Upload page
B. The autosketch folder; start immediate sketching with no further user input
For developers: The MDA provides direct access from their application or website. Via the HTTP protocol files can be transferred.