This section introduces the design of the MDA, how it works during operation, and the main terms used throughout the manual.
You will also learn how the TactiPad fits onto the device and how the MDA is controlled.
Contents
03.1 – Overview of the MDA
03.2 – Physical layout of the MDA
03.3 – Positioning the TactiPad
03.4 – Back panel and connectors
03.5 – How the MDA operates
03.6 – Electronics, software and control
03.1 – Overview of the MDA
The Motorised Drawing Arm (MDA) is a computer-controlled stylus system that creates raised-line drawings on a TactiPad.
Drawings can be:
- Pre-made static images stored on the MDA.
- Dynamic drawings generated from user input.
- Images sent from third-party software.
The MDA creates drawings by combining several motor movements:• The stylus is lowered onto the paper at the start of a line.
- The arm moves forwards and backwards.
- The stylus moves left and right.
- When a line is complete, the stylus lifts. The arm then moves to the next starting point or returns to the rear home position.
How the MDA is controlled
All MDA functions are controlled through the built-in accessible web interface, which can be opened in a browser using a screen reader.
The MDA can be used:
- As a stand-alone device.
- Connected to a wired network.
- Connected to Wi-Fi.
In shared environments, the person responsible for managing the device is referred to as the administrator.
Key terms used in this manual
To keep instructions clear, the following terms are used:
- Drawing = the finished raised-line result on the TactiPad
- Sketching = the movements of the arm and stylus while drawing.
- Sketch utility = an MDA software tool that creates or processes a drawing.
The MDA analyses SVG image data and converts it into precise motor movements.
Digital and manual drawing combined
The MDA combines digital precision with the flexibility of manual editing.
Because it adds on to the TactiPad, you can continue drawing by hand using your existing TactiPad tools.
You may:
- Leave the TactiPad on the MDA while editing.
- Remove it once the arm has returned to the home position.
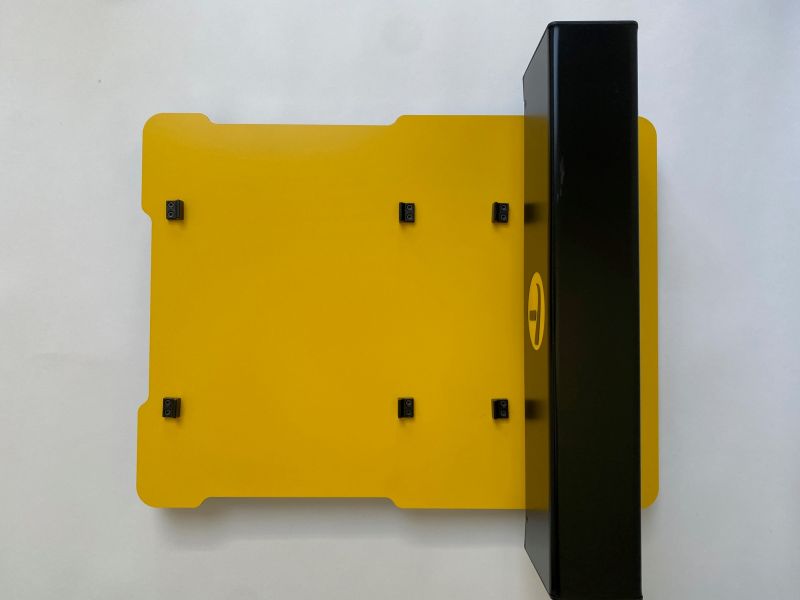
03.2 – Physical layout of the MDA
Place the MDA so that the short side with the power button and connectors faces away from you.
This provides the correct working position and helps with cable management.
The MDA uses the familiar high-contrast yellow and black Thinkable design.
Main structure
The upper surface of the MDA consists of:
- A tactile top layer similar to the TactiPad.
- A rigid aluminium base plate underneath.
Dimensions of the drawing bed:
- Width: 37 cm.
- Depth: 49 cm.
- Height above desk: 3 cm.
Anchors and sensors
Six black anchor blocks are fitted to hold the TactiPad in position.
The bed also contains magneto sensors that detect how the TactiPad is placed.
The moving arm
The top of the black arm sits approximately 14 cm above the bed.
It contains motors that control:
- Stylus up and down movement.
- Stylus left and right movement.
Two motors beneath the bed move the arm forwards and backwards.
When switched off, the arm can be moved manually using both hands.
The stylus
Inside the underside slot of the arm (only when powered off), you can feel:
- A circular magnet.
- A small centre point, the drawing tip that creates the raised lines.
Side openings
The left and right sides of the MDA bed are open where rails and timing belts can be found.
03.3 – Positioning the TactiPad
The anchor blocks guide the TactiPad into the correct position.
Landscape position
Use the four anchors nearest the front.
Portrait position
Use all six anchors.
The width of the MDA bed matches the TactiPad in landscape orientation, helping secure placement.
Indented areas at the front and sides make lifting the TactiPad easier.
Opening the TactiPad
When the arm is fully at the rear position, the TactiPad frame can be opened to:
- Replace drawing paper.
- Continue drawing manually.
Automatic orientation detection
For best results:
- Place the hinge at the rear in landscape mode.
- Place the hinge on the left in portrait mode.
If positioned differently, the MDA will automatically detect orientation and rotate the drawing correctly.
The MDA also scales images when needed to fit the A4 drawing area.
A tactile marker is always drawn in the upper-right corner to help orientation.
TactileView digital pen dock
Near the rear of the bed is a raised black ridge.
This was designed as a docking point for the receiver of the TactileView digital pen.
Note: this product is no longer available.
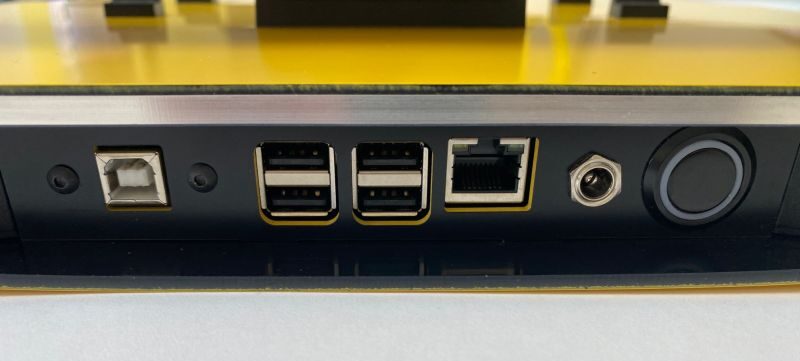
03.4 – Back panel and connectors
The rear panel contains the power controls and connection ports.
A built-in Wi-Fi transmitter is also included (not visible externally).
Ports and controls
From left to right:
USB-B port
Connect directly to a PC or laptop using the supplied cable.
Used when sending drawings from TactileView or other compatible software.
USB-A ports (4)
Used for USB-drives containing files.
These ports are not for direct computer connection.
Ethernet port
Connect to a local network or the internet.
LED indicators show activity.
Power socket
Connect the power supply here.
Power button
Press to switch the MDA on or off.
- On: button recessed with illuminated yellow ring.
- Off: button flush and unlit.
03.5 – How the MDA operates
Start-up
After switching on, the MDA takes approximately 15 seconds to start.
During start-up:
- The arm moves to the home position.
- Wired and wireless networks initialise.
- The system checks for software updates (if internet is available).
- Updates may download and install automatically.
Before sketching starts
When a sketch command is given, the MDA first checks whether the TactiPad is positioned correctly.
If placement is incorrect, the motors will not start.
During sketching
The TactiPad remains stationary while the arm moves above it.
At the start of each line:
- The stylus lowers onto the paper.
- The stylus lifts at the end of the line.
- The arm and stylus move to create the line.
The arm then moves to the next line or returns home.
Important safety notice
Never obstruct the arm while the MDA is operating.
Ensure:
- The drawing area is clear.
- At least 5 cm of free space surrounds the device.
If movement is obstructed, switch off the MDA immediately using the rear power button.
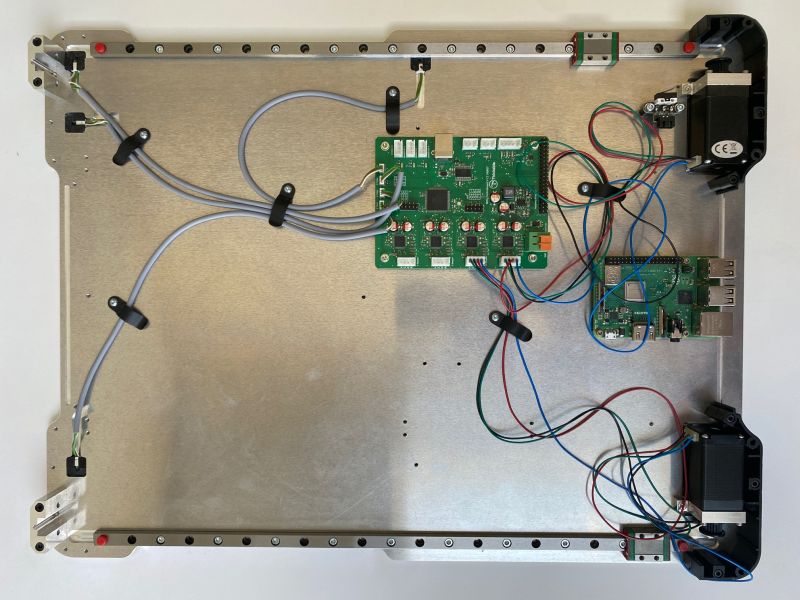
03.6 – Electronics, software and control
The power switch is the only physical control on the device.
All other functions are managed through the built-in web interface
Internal computer
Inside the MDA is a Raspberry Pi minicomputer which:
- Manages wired and wireless communications.
- Hosts the built-in website.
- Runs setup tools.
- Runs sketch utilities.
- Converts SVG files into motor instructions.
A separate motor control board beneath the bed powers all four motors.
File format support
The MDA uses SVG (Scalable Vector Graphics) files to create a drawing.
More information can be found in the section Third-party software and SVG file format.
 Previous section

 Table of content