Skip NavigationMenu

05. Digital Pen – Specification of the pen

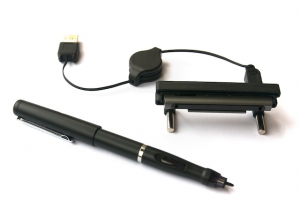
A cover at the end of the pen closes the batteries and can be removed. The batteries have a flat side and a rounded side. They have to be placed flat side up in the battery compartment.
The pen’s filling is replaceable. A plastic filling and a normal filling are included with the pen. These fillings are placed in the pen’s top and firmly lock in place. Quite some strength is needed to pull them out again.
The plastic tip can be used best when exploring an audio-tactile diagram, to prevent ink from spilling on the diagram. The normal ballpoint tip is advisable for drawing tactile lines on the TactiPad, so these lines instantly become visible.
The button on the side of the pen does not have any function. Every option of the TactileView software can be operated with the pen, using only short and long clicks.

04. Digital Pen – The holder for the receiver

The holder is made of black plastic, and has two protruding magnets on both sides of the front side of the holder. The receiver is inserted into the holder from the front side. At the back the receiver is held in place by two small blocks. When the receiver is pushed against both of these blocks, the receiver is straight in the holder. The mini-USB cable can then be attached to the rear of the receiver.
For accuracy, the receiver has to face straight forward and has to be placed in the exact same position in relation to the upper left corner of a drawing. The magnets in the sides of the TactiPad and TactileView ClickPad attract the magnets in the holder, pulling it to the correct position. The receiver’s paper clamp is not needed when using the magnetic holder.
The receiver ‘sees’ almost a semicircle to its front side. The receiver cannot see the full 180 degrees, and is therefore placed slightly outside of the drawing surface. This way, the upper edge of the drawing sheet lays a little in front of the receiver.

03. Digital Pen – Combined with TactileView Drawing Board or TactileView ClickPad

The TactileView digital pen is combined with the TactiPad or the TactileView ClickPad. The TactiPad is mainly meant to enable the user to make a digital version while drawing a tactile diagram, whereas the TactileView ClickPad is only meant to explore audio-tactile diagrams with speech and sound.

This is how it works

The TactileView digital pen’s receiver is attached to the side of the TactiPad or ClickPad, overseeing the whole drawing surface. The pen transmits a signal, and the receiver receives it when there are no obstacles such as fingers in the way. This means that the receiver needs to have a clear sight of the pen’s tip to work properly.
The transmitter only sends out signals when the tip is pressed. The TactileView software calculates and processes the position of the pen’s moves and clicks. Every function in the TactileView software can be operated using the TactileView digital pen. Using the keyboard is not needed.

05. TactiPad – Drawing tools – Compasses

Compasses

The compasses are made out of two main parts: a beam and a base. The beam has a turning point on one side and a pointy shape for drawing circles on the other. You can put the turning point, which will be the center of the circle in the base. The base, which has three strong magnets, keeps the compass in place on the TactiPad board, which has a metal layer below the drawing surface. The beam can be moved around the base clockwise and counterclockwise just above the sheet. The beam has as special ball mounting, so you can slightly tilt the beam. This makes it easier to draw a circle with the pointy shape.

Positioning the center

The base has a semi-circle shape with a diameter of almost 6 centimeters, with three little legs pointing out. It looks a bit like a round capital E. The middle leg has the shape of a triangular arrowhead of which one corner has been cut out. The arrowhead can be used to precisely place the center of a circle on a specific point in the drawing.

The two parts of the compasses: the magnetic base and the beam
The magnetic base keeps the compass in place on the drawing surface

If you place the corners of the arrowhead on two crossing lines, the compass spike is exactly in the middle. Along the outer edge of the base, three semi-circular hollows have been made which can be used to quickly and precisely position the center of the circle on a line.

The compass base positioned on two intersecting lines

Adjusting the radius

The pointy shape which is used to draw the circles can slide along the beam. The beam has a measure designation per 0.5 centimeters. Using this indication you can set the radius with 0.5 centimeter increments. The smallest possible circle you can draw is 3 centimeters, whilst the largest is 12 centimeters.


Measure designation on the beam
.

Tactile center indication

The bottom end of the turning point has three very small spikes. When you press and turn the knob on top, without moving the whole beam, a small tactile circle is created. This way you can indicate the center of the circle drawn.

04. TactiPad – Drawing tools – Protractor

Protractor

The protractor makes half a circle with a 7 centimeter radius. In the middle of the straight side a 2 centimeter wide semi-circular hole has been made, to easily place the protractor on a line, or combine it with the ruler or a knob. On the round side, there are little indication points per 10 degrees. At each 10 degree point around the edge there is also a small notch, to help you precisely place your pen. Little slots on the top surface indicate the usual 30, 45, 60 and 90 degrees angles.
The protractor has five round holes of 0.5, 1, 1.5, 2 and 2.5 centimeters in diameter, to easily draw circles.

You can place the protractor with the semi-circular hole against a knob

03. TactiPad – Drawing tools – The set square

The set square

The rectangular 45-degrees triangle has the same measure designation as the drawing board. The two short sides have a measure designation of 10 centimeters, while the long side has a measure designation of 14 centimeters. An indication on the middle of the long side makes it easy to draw a perpendicular.
There are four holes in the set square for fixing it over the knobs. The round hole in the 90 degree corner fits around a knob.
By putting one of the short sides of the triangle aligned with the edge of the frame, the set square creates two angles on the board, one of 90 and one of 45 degrees.

Met de korte zijde langs de rand van het bord vormt de driehoek hoeken van 45 en 90 graden

On one centimeter distance of the edge, in the middle of the long side of the set square, a round hole is made. To the left and right are two oblong holes. When putting the middle hole and one of the others over a knob, an angle of 30 or 60 degrees can be made by turning the set square to its extreme position.
By alligning the short side with the frame, the set square makes a 45 and 90 degrees angle

02. TactiPad – Drawing tools – The Ruler

The ruler

The ruler’s width is 4 centimeters, and it reaches 43 centimeters long. With this length,  it stretches diagonally all the way over the entire drawing surface. At one end of the ruler, a 2 centimeter wide round hole is made. In the rest of the ruler there’s a 2 centimeter wide groove. The hole and groove function to fixate the ruler in any direction across the drawing surface, by screwing the knobs.

Using the round hole and grooves, the ruler can be fixated around the knobs

The groove gets interrupted twice; for solidity and as recognizable points two little ‘bridges’ have been made which cross the groove each at a distance of 10 centimeters.

Little slots indicate the 5 centimeter distance in between. The ruler has a measure designation on both sides, for a length of 35 centimeters. When horizontally or vertically placed, with the hole over a knob, the zero of the ruler is on the edge of the sheet. For drawing a line at a precise position, take in account that the rulers edge is 1 centimeter wide.

When horizontally or vertically placed, the zero is on the edge of the sheet

01. Digital Pen – Introduction


Note: Since summer 2022, the Digital Pen has not been for sale anymore. This manual is for users who still own this former Thinkable product.


The TactileView digital pen is a special version of a ballpoint pen. The pen writes in ink like a normal pen, but at the same time determines the position of its tip on the drawing surface. In the pen’s tip is a small transmitter, which sends a signal to a receiver. Upon moving or clicking in the drawing surface with the pen, the receiver transmits this position to the TactileView software, just like with a regular computer mouse. Visual impaired people can operate the TactileView software using the TactiPad or TactileView ClickPad.

The pen functions as a drawing tool and transmits to the computer what has been drawn, or as a cursor by transmitting on which location has been clicked. This way, the digital pen enables the user to make a digital version of a tactile diagram or to explore a tactile diagram with speech and sound.
TactileView Digital Pen