Skip NavigationMenu

9.04 Multiple Sketch Jobs

Sometimes it might be necessary to sketch the same design multiple times. This can easily be done through the interface. The interface remembers the last design it sketched and displays this design at the top of every sketch page where it can simply be selected to repeat that sketch.

If you’re connecting to the MDA through the interface and try to start a new sketch while the MDA is still sketching, you’ll notice that the interface prevents you from doing so and displays a warning message informing you that it can’t start a new sketch until the last one is finished. It will not queue the sketch that was ordered last. You will need to reselect the design after the MDA has finished. This however will not happen if you use TactileView to start a new sketch while the MDA is still sketching. We are working on implementing a solution for this. For now, however be aware that you should always wait for the MDA to finish and the arm to return to its home position, before starting a new sketch.

9.05 Auto Sketching

The MDA has the possibility to automatically start sketching an image.

Any SVG image file (or an MDA G-code file) that is copied or uploaded into the MDA-autosketch directory will be sketched automatically. See chapter 7.04 on how to mount this directory to your PC, Mac, tablet or smartphone.

The TactileView software also has the possibility to generate MDA G-code files, and with a single command you can send this file to the MDA-autosketch directory.

Upon completion of the sketch, the corresponding SVG or G-code file will be automatically deleted from the directory.

When the MDA is busy with another sketch, the SVG file will remain into the MDA-autosketch directory until the MDA is ready. However, upon completion of the earlier image, the MDA will start directly with processing the file from the MDA-autosketch directory with the possibility that the image will be sketched on the same foil as the earlier image. So, it is advised to wait with uploading files to the MDA-autosketch directory until the MDA is ready and there is an empty sheet of foil on the MDA.

10.01 USB Connection

TactileView setup and settings

– COM port

Before connecting the MDA’s cables to the computer, first open the Windows Control Panel > Hardware and Sound > Device Manager. In the Device manager, open the section ‘Ports (COM & LPT)’. Next, connect the USB cable from the MDA to the computer. Make a note of which new COM port appears in this list (e.g. COM5). In case you need to double check, simply disconnect and then reconnect the cable; the correct COM port should disappear and reappear from the ports list.

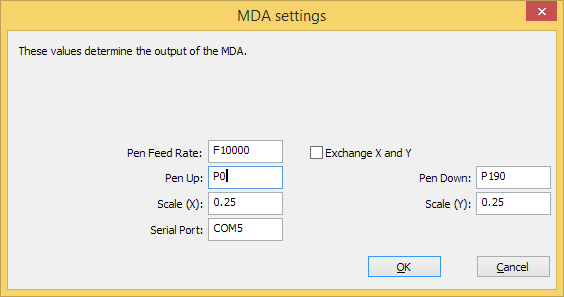
Next, in TactileView open File > Print XY Plotter. In the dialog that opens up, select the ‘Settings’ button and enter the correct COM port in the settings dialog in the ‘Serial Port’ box.

MDA settings

Figure 1. Current settings for the MDA

10.04 Design Limitations

Supported object types

Currently, only a limited number of different drawing tools are supported for plotting with the MDA. Other objects can still be added to the TactileView design, but will not be drawn by the MDA. Support for the other object types, as well as bitmap images and the retouching tools is planned for a future release.

The objects that are currently supported are: Straight line, Square/rectangle, Circle/ellipse, Triangle, Polygon; there is limited support for Path/curved shape, which will be drawn as a polygon with straight line segments between the anchor points.

You can use the example MDA designs to get an idea of what is currently supported.

Object properties

Object properties are either unsuitable for the MDA (such as variable line thickness) or currently not yet supported (such as line style or textures). Overlapping objects will still be drawn completely, without taking transparency into account.

In other words, only the full outline of the object will currently be drawn.

Object drawing order

The objects will currently be drawn on the TactiPad in the order that they appear in the list of objects. In the future, we plan to automatically optimize the drawing order of the elements in the design to minimize drawing times.

For now, you can visualize the order in which they will be drawn by selecting ‘Screen elements’ from the second horizontal toolbar, then enabling Show object stacking. This will show the order in which the objects are drawn, starting with the highest number and ending with object 1. If you wish to change the object order, select the object and choose ‘To front’ or ‘To back’ from the object’s context menu or properties toolbar.

Braille labels

Currently, drawing braille texts with the MDA is not yet supported; further research is needed to determine whether braille characters can be drawn, but the first results are very encouraging.

Curved shapes – workaround

Curved shapes (Bezier curves) are currently not yet supported; instead, the best alternative is to use a polygon (a shape with straight line segments) and use anchor points that are close enough together so the overall shape still feels like a continuous curve.
11.01 Android

There is a free app available from the Google Play store that allows you to create and save a drawing as an SVG: “Simplector“. There are also several programs available on Android that feature exporting images as SVG’s as a premium feature. To name a few: Adobe Illustrator Draw, ScribMaster and Inker. If you have a different sketching app that you prefer, which also allows you to save your sketches as SVGs, please let us know.

Make your sketch, then save the sketch as an SVG file on your Android device. Go to the interface and browse to uploads. Click select file at the bottom of the page. Android should now show you several different actions depending on the software you have installed on your Android device. Click documents, and then images. Browse to the folder that the SVG was saved in, and click on it. Your image should now be uploaded to the upload folder.

11.02 iOS

iOS apps that generate SVG format images can be used to create images which can be automatically sketched on the MDA, or can be saved on the MDA to be sketched later.

There are a number of apps available in the App-Store. As an example on how to create and upload an SVG image from the iPhone or iPad to the MDA, we will show you how to do so with  “Vectornator Pro”. For our purpose an app like “Vectornator Pro” is excellent, as it is easy to work with, has the capability to create images in a number of formats (one of which is SVG), and can be used together with an app that can be used for uploading the resulting image to the MDA, ie. the “FileBrowser” app.

In order to sketch directly from an iPad/iPhone to the MDA, you have to setup the connection from your device to the MDA using the “FileBrowser” app. The setup for “FileBrowser” needs to be done once, as described in chapter 7.04 (section on iPad).

To create and sketch an image with “Vectornator” and your iPad with, do the following:

Start “Vectornator”, select “New Document” and then select “A4”, either Landscape or Portrait (selectable in the top-right corner). “Vectornator” then creates a new empty document on its document overview page. You can modify the document name by clicking on the name and enter a new description. Click on the empty document itself and start drawing with the drawing tools on the left side bar.

Upon completion, select the “share/export” icon  in the top-right-hand corner and then select the “SVG” option, select “Save” and then select “Copy to FileBrowser”.

“FileBrowser” now opens with a popup mentioning that you have to browse to the folder you would like to save the file to. Click OK to close this popup and select “mda” in the left bar (or whatever other name you have used for the MDA in your setup).  You now see two directories of the MDA on the right-hand side. Select MDA-autosketch if you want to have your image being sketched directly and then deleted, or select MDA-upload if you want to have your image being saved in the upload directory, so you can sketch later from the upload page of the MDA interface. After selecting one of the two folders, press “Paste 1 item here…” at the top right corner and then press “Paste 1 item” again.  Your image is now either been sketched directly or available for you to sketch later.

11.03 Windows

Windows applications that generate SVG format images can be used to create images that can be sketched on the MDA, either automatically, or they can be saved to be sketched later.

Examples of this are, applications like Adobe’s Illustrator, or free software like Inkscape or Gimp that run under Windows and can create SVG format images.

In order to sketch directly from those applications to the MDA, you have to setup the connection from your PC to the MDA using the mount option, as described in chapter 7.04 (section on PC). Then save your files to the drive you’ve created as per chapter 7.04.