Skip NavigationMenu

2.03 Advanced Network Configuration

Setting up the MDA in a secured organisational network

Setting up the MDA in an secured network might require some settings to be changed by a network administrator. The MDA’s web-interface communicates with an external website, as well as a ftp server and a sql database server. The external website is the Thinkable website, which hosts the MDA’s manual and help pages. When you register the MDA your user data is send and saved to our database server. Communication with this server is also required if you want to use the image request system “MyImages”, which is part of the MDA web-interface, also access is required to the database server. This is to keep track of image requests, the status of the requests and to provide messages to the requester when a request is completed. The actual file transfer between the designer and requester is handled by a ftp-server, with the designer uploading the completed image to the ftp-server, and the requester having the image automatically downloaded from the ftp-server when the MyImages page is opened. For these external connections, which might use the network’s secured communication channels, the following provisions need to be made:

  • In order to access an external webpage, the network’s firewall should grand access to internet communications, i.e. port 80 should be opened on the firewall and users should have access to use this port for external communications (which is more or less a default in all organisations).
  • In order to have ftp access, ports 20 and 21 should be opened on the firewall, and the MDA interface should have access to use these ports.
  • In order to have database access (i.e. access to an external mysql database server), port 3306 should be opened on the firewall, and again the MDA interface should have access to use this port.

Additionally as a precaution: the MDA’s wired RJ45 network connection has a maximum speed of  100 Mbits. Although almost modern switches to which the MDA will be connected will automatically determine the speed of the device connected to it, some switches are set to a fixed speed of 1 Gbits. Please make sure that the switch port speed to which the MDA will be connected is set to auto-configure, or is manually set to 100 Mbits, otherwise the wired network connection between the MDA and the switch will fail.

For the WIFI network connection, the MDA can be configured in two ways:

  • WPA (home): which uses a pass-phrase connection (only a single pass-phrase is needed for a connection, like for standard home WIFI networks).
  • Enterprise WPA (with radius server): a WPA Enterprise WIFI connection (based on a Radius access control server), requires both a username and password to make a connection. When selecting a WIFI connection from the MDA, the MDA will automatically determine which kind of WIFI network it is connecting to, and will automatically request the single WPA pass-phrase for the single WPA pass-phrase connection, or the username and password for the WPA Enterprise connection.

12.03 Configuring Network

The upper part of the Network setup page shows information on if you have a wired connection or not. It will alsoshow whether you have a WIFI connection, showing the network name (SSID) of the WIFI connection if you do. If not, it will mentionthat the MDA is working as a WIFI hotspot.

In order to establish a wired connection, simply connect the MDA to your network using the ethernet port at the back. Upon turning on (or rebooting) the MDA, the MDA will configure itself to use this wired connection. For this, it is assumed that your router acts as a DHCP-server (which is the default behaviour for a router).

As mentioned above you can see whether the MDA is connected to a WIFI network or not. If so, you have the possibility to disconnect from this network. When the MDA is not connected to a WIFI network, it shows the available WIFI networks. You can select the appropriate network, and by providing the network credentials (either password for a home network, or user name and password for an Enterprise network), your MDA will connect to this network.

On the lower part of the Network setup page you can change the name of the MDA on the network (default is mda) change the name of the WIFI hotspot network (default is mda-hotspot) and change the wifi password of the hotspot (default is 12345678). You also have to provide the two-digit country code here (see chapter 7.03).

Note that there is no need to change the MDA’s name or hotspot name in case of a single MDA. This only needs to be done if there are multiple MDA’s on your network. In this case the MDA’s should not have the same name nor should they broadcast the same hotspot SSID’s.

6.05 Interactive

The interaction page allows the user to quickly create tactile sketches for features such as pie charts, clocks and so forth, without having to create/find the SVG file. The user enters the required information in the interface, and the interface creates the rest of the image. This way you can quickly create a table with 3 rows and 4 columns, without having to manually draw the entire table.

At the top of the page you’ll see the last image that was sketched by the MDA. If you click on this image the MDA will start sketching the image again.

Below this you’ll see the different interactive options. The options currently available are:

  • Clock: By entering and submitting the time the clock should display the MDA will automatically generate an analogue and a digital clock with the supplied time.
  • Table: Here you have to submit the orientation of the table, the number of cells per row and column, and the dimensions of the rows and columns.
  • Coordinate system, scaled to fit page: Here you enter the range of the x and y axis, and the interval with which the indicators should appear on the axis. You can then select whether you want the indicators to sketched and if so, what you want the indicators should look like. Lastly, it will scale the coordinate system so that it will fit on the page. This means that if you enter that the x and y axis should go from -100 to +100, it will scale the image down so the entirety of the coordinate system will fit on the page. It was sketched 1:1 you’d need a page that’d be 200 by 200 cm’s to fit the entire coordinate system.
  • Coordinate system, scale 1:1 : The same as above, only now the coordinate system will not be scaled. If you make a coordinate system that would be too large for the page, you’ll get an error message.
  • Pie chart – 100%: A pie chart where the parts are represented as percentages. It will allow you to fill in the number of segments, and then how much % each segment will be.
  • Pie chart – ratio’s: A pie chart where the parts are represented as fractions. It will allow you to fill in the number of segments, and then which fraction of the whole each segment will be.
  • Measuring cup: A measurement cup will be drawn, and be filled to percentage that you submit. It is possible to first only draw the cup, and then separately draw the filling level with a second sketch.
  • Text: Enter 1-5 lines of text, with a maximum of 12 characters per line. The text will be sketched.
  • Rectangular block: a 2-D representation of a 3-D block. Input the main dimensions and the 3 rotation angles. The block can be sketched with and without hidden lines. There is an option for the sketch to auto-scale the sketch on the drawing foil, and an option to make the dimensions on the sketch be equal to the dimensions given during the input.

11.04 Apple Mac

Apple Mac applications that generate SVG format images can be used to create images that can be sketched on the MDA, either automatically, or they can be saved to be sketched later.

Examples of this are, applications like Adobe’s Illustrator, or free software tools like Inkscape or Vectr that run under MacOS and can create SVG format images.

In order to sketch directly from those applications to the MDA, you have to setup the connection from your PC to the MDA using the mount option, as described in chapter 7.04 (section on Mac). Then save your files to the drive you’ve created as per chapter 7.04.

1.01 Safety Instructions

! Keep clear of the MDA while it is in operation. !
! Do not insert your fingers into the openings at the sides of the MDA, or into the opening in the bottom of the arm.  !
! Do not place items sensitive to magnetism in the proximity of the pen. The pen contains a strong magnet. !

The motors of the MDA are relatively strong and can cause injuries when your fingers are caught between moving parts.

2.01 Unpacking

Place the box with the address labels facing upwards and cut the tape. Fold away the four cardboard flaps. Once opened, you’ll notice the MDA is packed in two large foam parts on top of which two carton boxes are placed. One box can contain the TactiPad inside its bag, if this was included in the initial purchase. The other one contains a pack of 400 drawing sheets, the power supply and the USB-B cable.
Remove the boxes and lift the MDA out of the box by holding it by its sides. Make sure you lift it up by the sturdy yellow top plate, the one that has the six black anchors for the TactiPad. Do not lift it up by the flexible bottom plate.
Once out of the box, you remove the pieces of foam by lifting one side of the MDA and sliding off the foam part on that side. Carefully place the MDA down again, and repeat this procedure for the other side. While packaged, the arm is in its forward position.
Please store the packaging materials in the carton for safe transportation.

2.02 First Time Use

Unobstructed drawing

! It is essential that the movement of the MDA’s arm is never obstructed while it is operating. The drawing area and at least five centimetres next to the MDA should be clear of any pens, drawing tools or other objects that could obstruct the arm during movement. If at any time during sketching the MDA’s movement is obstructed, switch the MDA off using the power button at the back. Once turned off, you can manually move the pen and arm out of the way, resolving the obstruction as necessary. !

Now that your MDA is unpacked you’re almost ready to make your first sketch. Plug the power cord into a power socket and the other end into the MDA. The next step differs depending on if you plan on connecting your MDA to your network using a LAN-cable, WiFi, or connecting directly to the mda-hotspot.

If you plan on connecting the MDA to a network via a wired connection, plug a lan cable into the appropriate socket. Next, take a device that is connected to the same network, open your browser and type in the following URL: http://mda/

If you plan on connecting it to your WiFi you first need to connect to the mda-hotspot with a WiFi capable device. Simply select the mda-hotspot WiFi network and enter the following password: 12345678. Once your device is connected to the mda-hotspot, go to your browser and type in the following URL: http://mda/ . Browse to the setup page and enter the password: admin and click continue. Click network setup and look for the WiFi network you want the MDA to connect to. Enter the WiFi password and click Add WiFi Network. The MDA should now connect to your WiFi network. From this point on you can access the MDA from any device that is connected to the same WiFi Network.

If you don’t plan on connecting your MDA to a network at all, use a WiFi capable device and connect to the mda-hotspot network with password 12345678.

Be aware that if you do not connect your MDA to a network that has access to the internet you cannot automatically download updates or new images added to the examples directory.

After connecting your MDA, take your Tactipad and place it on the MDA. You can place it in one of two orientations: landscape, which leaves the 2 Tactinocks uncovered; or portrait, which covers all the 6 Tactinocks. Your Tactipad is placed correctly if you can’t easily move it around without lifting it and the front most edge of the Tactipad is flush with the front most edge of the MDA.
Make sure that you place a sheet of sketching foil on the Tactipad before you attempt your first sketch.

Take a device that is connected to the same network as the MDA (or directly to the MDA) and go the http://mda/ . Browse to the examples page, pick the emoji category, and click on one of the emoji’s to start your first sketch.

That’s it! The MDA should now start sketching. While the motors in the MDA are not particularly strong, you want to make sure to keep your hands clear of the type while it’s sketching to prevent injury.

3.01 Backpanel

Closeup of MDA's backpanel, showing the ports and power button.

When looking at the back of the MDA you’ll find 4 different port types as well as the power button. The back panel is where you turn on the MDA and plug in your cables and USB devices.

From left to right you’ll find the following features:

  • USB-B port: This port can be used to connect your PC or laptop directly to the MDA using the USB-B cord you received with the MDA. You only need to do this when using TactileView to send sketches to the MDA.
  • USB-A port × 4: These 4 ports can be used to plug in USB drives to upload images to the MDA. These ports do not support a direct connection from your PC/laptop to the MDA. These ports are also known as “normal” USB ports.
  • Ethernet port: Use this port to connect the MDA to your local network, or the internet. The LEDs on the port will light up when data is being send or received.
  • Power socket: Use this port to plug in your power cord.
  • Power button: This button is used to turn on the MDA. When the MDA is turned on, the centre of the button is recessed and a yellow ring will light up. When the MDA is turned off, the centre of the button is level with the rest of the button and no light can be seen.

3.02 Drawing Arm & Sketching Stylus

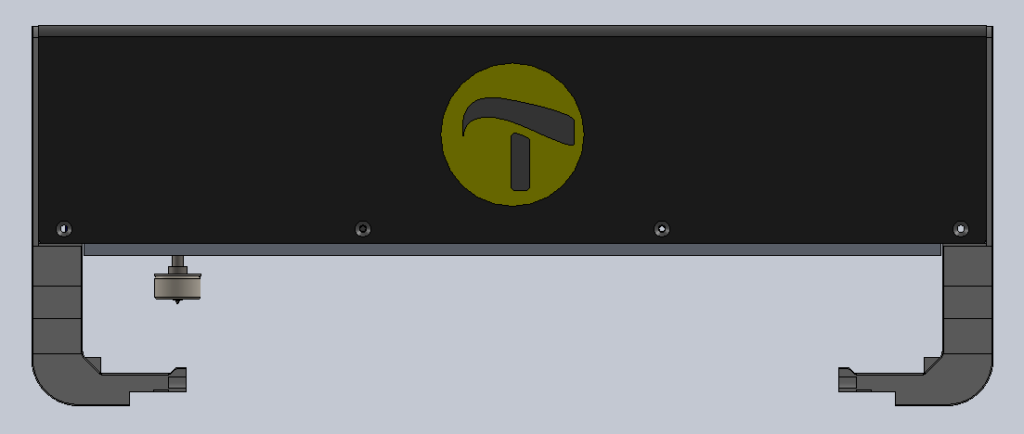
Front view of the MDA's drawing arm with the drawing pen extended.If you move your hands along the longer sides of the MDA you’ll encounter two parts sticking out of the sides of the MDA opposite each other. These are the arm supports. Following these supports upwards you’ll come across the drawing arm which connects the two arm supports to each other. The drawing arm is covered by a black plastic cover which features the Thinkable logo on the front side. The arm moves from the back to the front of the MDA as needed. This is done automatically, so be careful not to get your hands caught by the MDA as this can result in injury.

If you were to reach inside the arm trough the slot in the bottom of the arm (make sure the MDA is powered off) and move your hand from the right all the way to the left you will come across a circular metal object. This is the magnet and part of the drawing stylus. This part moves up and down when the MDA is sketching, so be careful when the MDA is sketching.

If you slide the flat of your hand across the underside of the drawing arm you will feel a small point sticking out. This is the drawing point of the sketching stylus and will be lowered as needed when sketching on the TactiPad.

! Be careful when the MDA is sketching because the arm and pen point will move automatically and can crush your fingers. !