ClickPad setup
The TactileView ClickPad holds both the tactile image, and the holder with the receiver for the TactileView digital pen.
The rubber bands on the corners of the ClickPad make sure the tactile image is always on the same position. The holder for the receiver is placed at the edges, using magnets in the sides. This results in the images always being in the correct position for pointing on them with the TactileView digital pen.
At a click of the pen, the horizontal and vertical distance to the upper left corner is measured and converted by the receiver. The exact position is then transmitted to the TactileView software on the computer. In the file, which matches the tactile image, these positions are used to play the corresponding audible information. When calibrated correctly, the position on which is clicked on the tactile image, always matches that same position in the digital equivalent.
Exchanging the tactile image is very easy, using the flexible paper clamps. Exploring diagrams in portrait can be alternated with diagrams in landscape by accordingly placing the receiver on either the long or the short side of the ClickPad,.
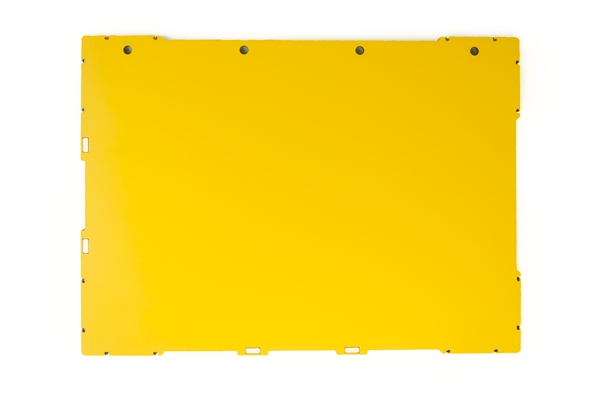
The TactileView ClickPad
The ClickPad is a yellow, 5 millimeter thick plate, with anti-slip material on the underside. The ClickPad is available in A4 and US letter format to match different sizes of tactile images.
The ClickPad is slightly wider at its four edges, and has notches in which rubber bands are placed. The tactile image is held in place by these rubber bands. In one long side are four holes for storing the ClickPad in a two or four ring binder.
Magnets in the sides
Four magnets have been placed in the edges of the ClickPad. Two in one long side, two in one short side. Two magnets are also mounted in the holder for the receiver of the TactileView digital pen. This way, the holder will be attracted to the ClickPad.
Depending on the page orientation the holder is at the long side (landscape) or at the short side (portrait).
The holder can be detached and attached again. The magnets make sure that the holder automatically falls in the right position. The receiver for the TactileView digital pen can then be connected to the computer by a USB-cable.
The right-up marker on the tactile diagram can always be found in the upper right corner. Use this symbol on the diagram to determine the receiver’s position.
Paper clamps of the TactileView ClickPad
At every corner of the ClickPad a rubber band is attached which crosses itself as a result of a rotation.
On 1,5 and 5 centimeter distance from the corners, there are hook-shaped notches in the outer edge for attaching the rubber band.
To attach the rubber bands, put one around the corner in the two notches farthest from the corner. The band now makes a 45 degrees angle from the long to a short side of the TactileView ClickPad. Hook 2 fingers under the rubber band and rotate so that the band is twisted 180 degrees around your fingers. Pull the rubber band outwards and put it around the corner into the notches closest to the corner.
On the upper side of the ClickPad, the rubber band crosses itself. On the underside the rubber band runs parallel; one between the notches closest to the corner, and one between the two notches farthest from the corner.
With the rubber bands in all four corners of the ClickPad, the paper sheet is fastened all around on 16 places. The rubber bands measure around 7 centimeters for the A4 format and 12 centimeters for the A3 format.
TactileView digital pen and software
The digital pen is used to click on the tactile image to listen to any included audio-information, and to operate the TactileView software.
The pen has to be equipped with batteries. In the TactileView drawing software the pen can be tested and calibrated for the ClickPad. To prevent ink from being spilled on the image, it is advised to use the plastic tip included with the TactileView digital pen.
Exploring with speech and sound
With the tactile image placed on the ClickPad, the digital version of the design has to be opened as a file in the TactileView drawing software. The software then has to be switched from design mode to explore mode, using the digital pen (or the option in the View menu or hotkey Ctrl+E). Using the File menu, a design can also be opened in the explore mode straight away.
This mode also has a menu that can be operated with a long click of the digital pen (open context menu). From here a different file can be selected, matching a different printed tactile image.
By clicking on the tactile image, the audio-information is played. In case there is no audio-information on that location in the image, a ‘no-audio’ sound is played.
Activating Text to Speech (TTS)
To be able to listen to the included audio-information, a Text to Speech system has to be installed on the computer. The TactileView software needs to have access to this system. Using the settings menu of the software, the language, speech rate and volume for the audio-information can be set.
More information
For more information about the installation and use of the TactileView digital pen, please read the TactileView digital pen manual.