The body of the tool is symmetrical. It can be seen as a circle, equally stretched in 2 opposite directions. The frame of the tool is one centimetre wide. At the outer side the frame has 2 finger fitters for easy grip.
Pushpin markers are located at 0, 90, 180 and 270 degree angles relative to the centre position. So the markers indicate the longest and shortest diagonal of the tool.
As the TactiForma ellipse is a circle based shape, radii can be drawn from the centre. Indents per 10 degrees along the outside indicate the angles.
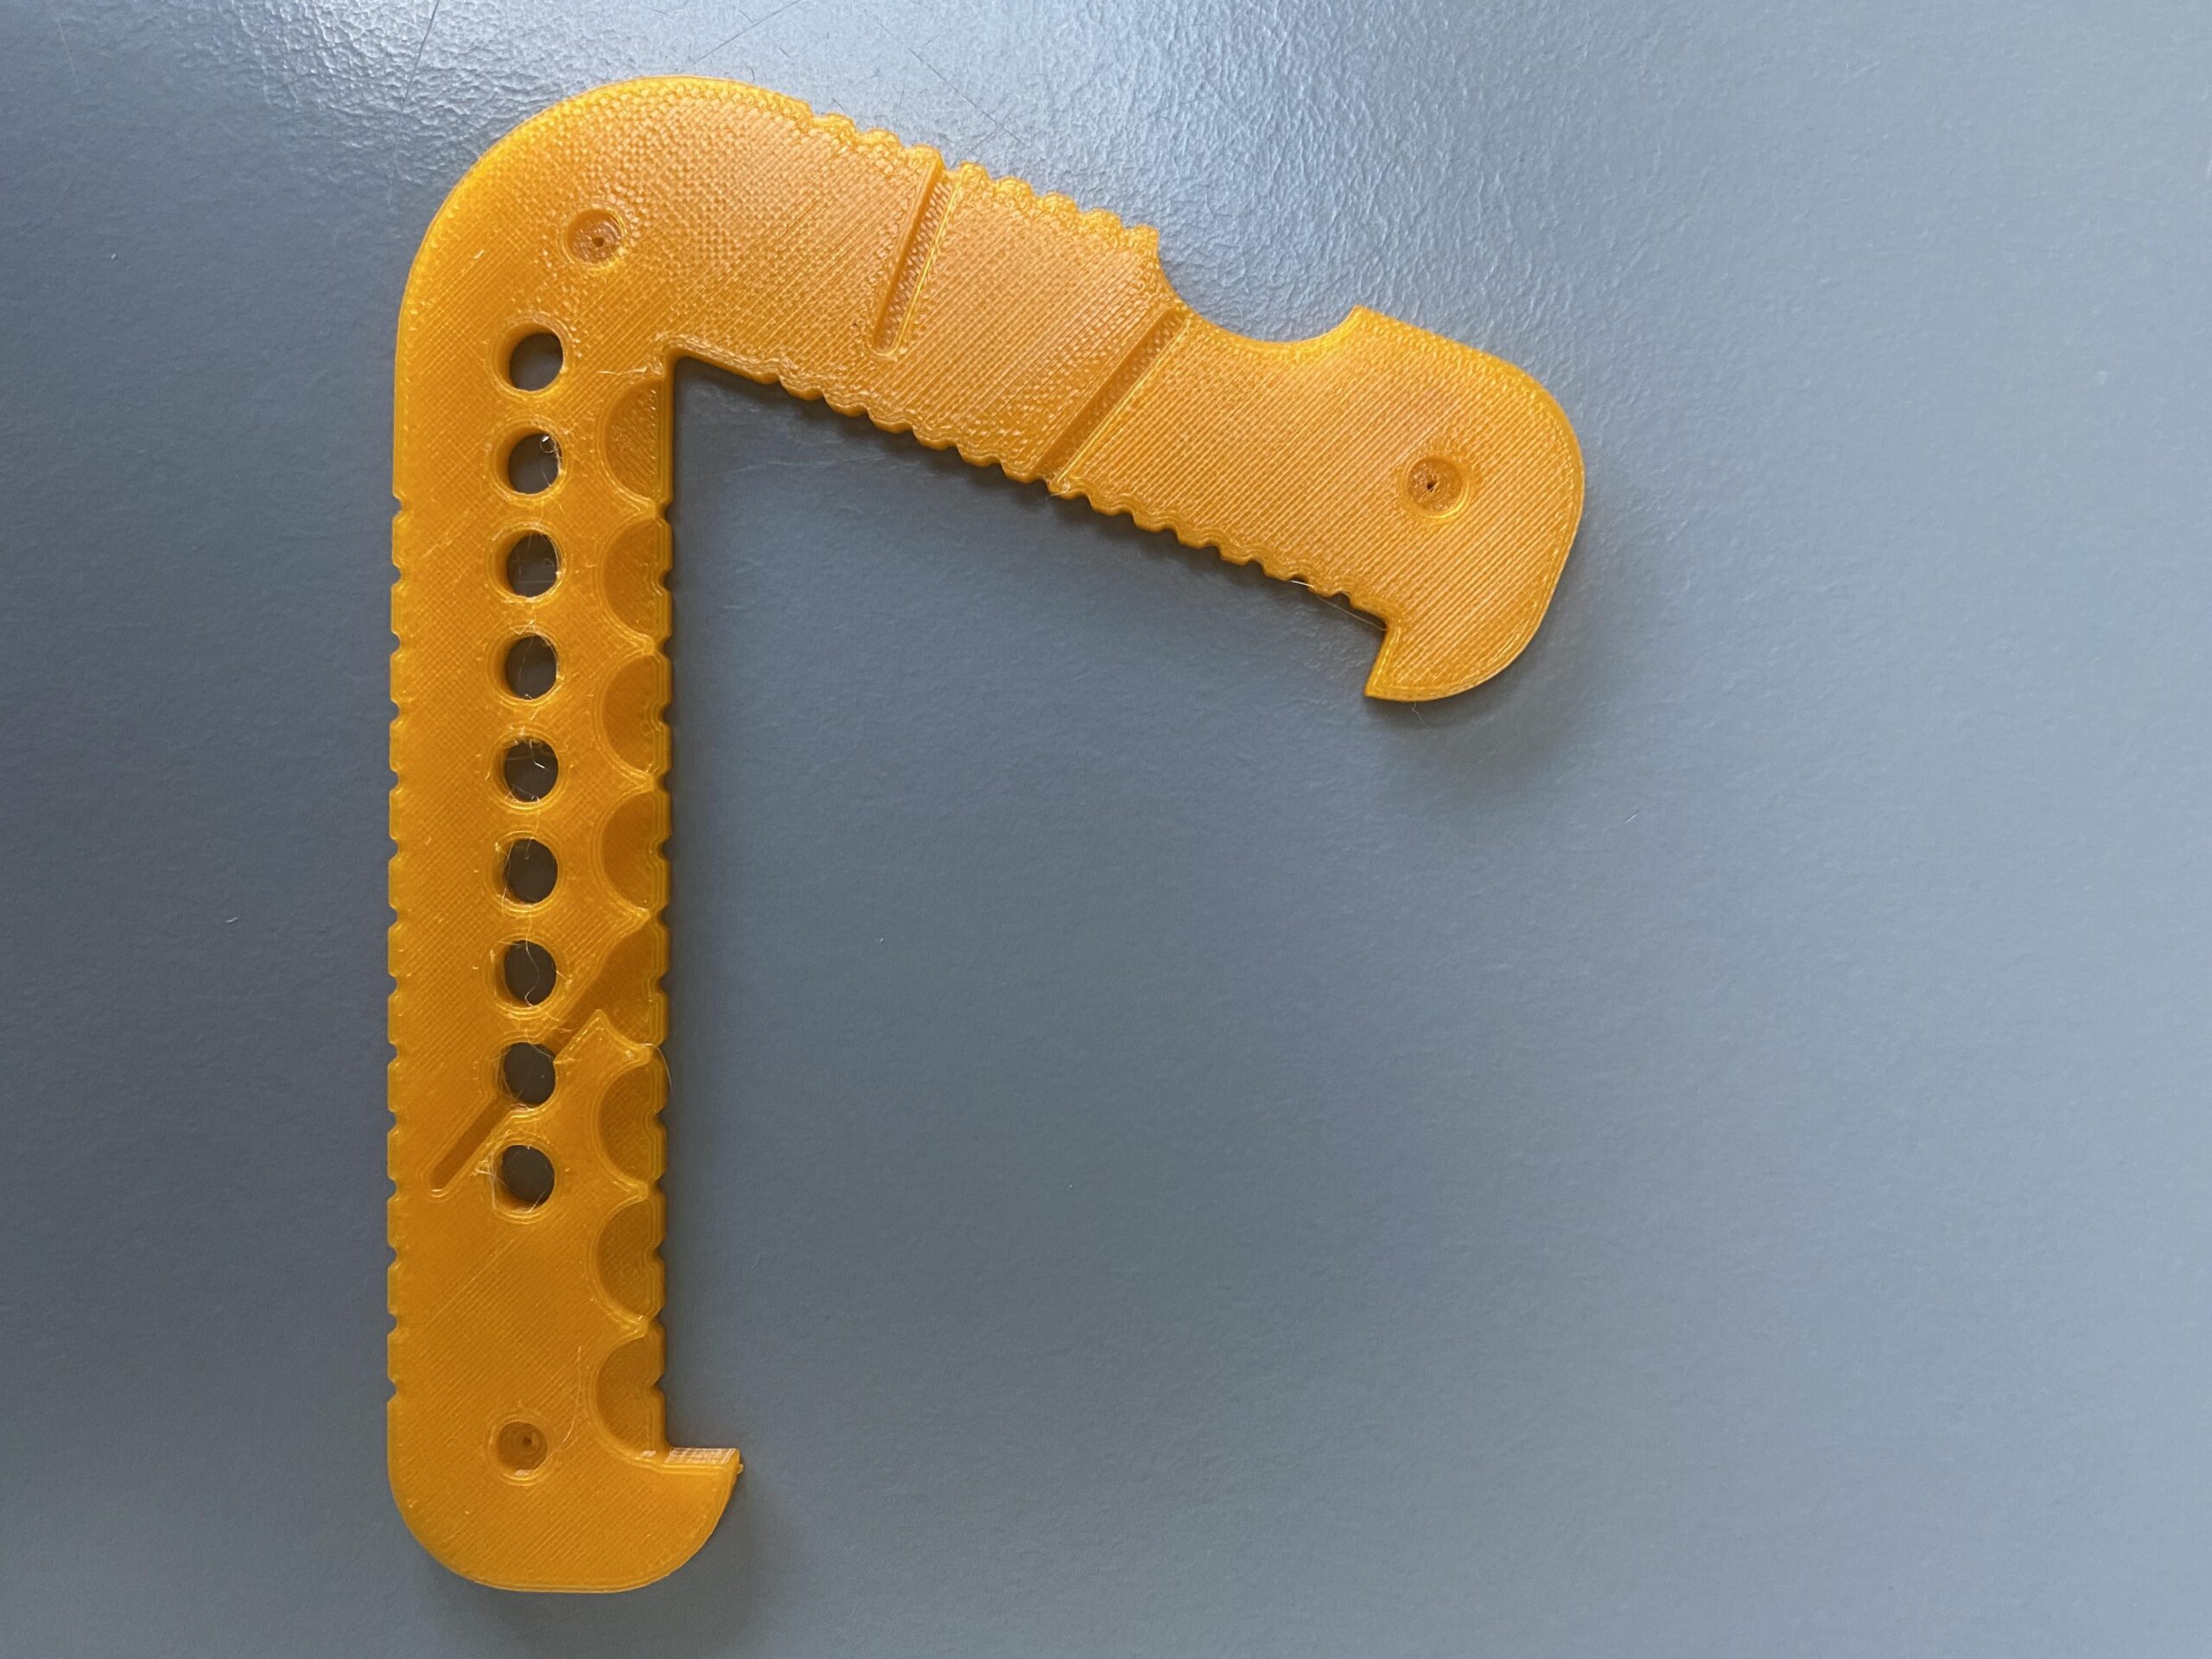
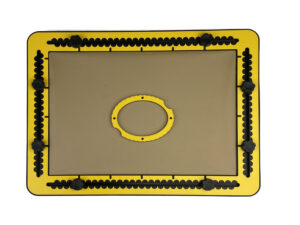
The rectangle hook tool has the shape of a capital l, where the horizontal and vertical part of the character have the same length of 10 centimetres / approx. 4 inches.
The two parts enclose an angle of 90 degrees. They are equipped as a ruler with measurement indications in centimetres at the top surface and indents per half centimetre along the sides.
The body of the tool is two centimetres wide. On the outer side, near to the rounded corner and to the tips you find finger fitters for easy lifting or extra grip.
The corner between the sides is rounded at the outer side. At the top surface is a groove under an angle of 45 degrees for alignment.
The rulers are ending with a 90 degree hook serving as a pen blocker.
Pushpin markers are located near the rounded corner and near to the tips.
Para recibir información acerca de Thinkable por correo electrónico, registrese en nuestro boletín!
Si usted nos visita desde Tifloinnova 2022 le invitamos también a nuestra presentación, el sabado a las 16:00.
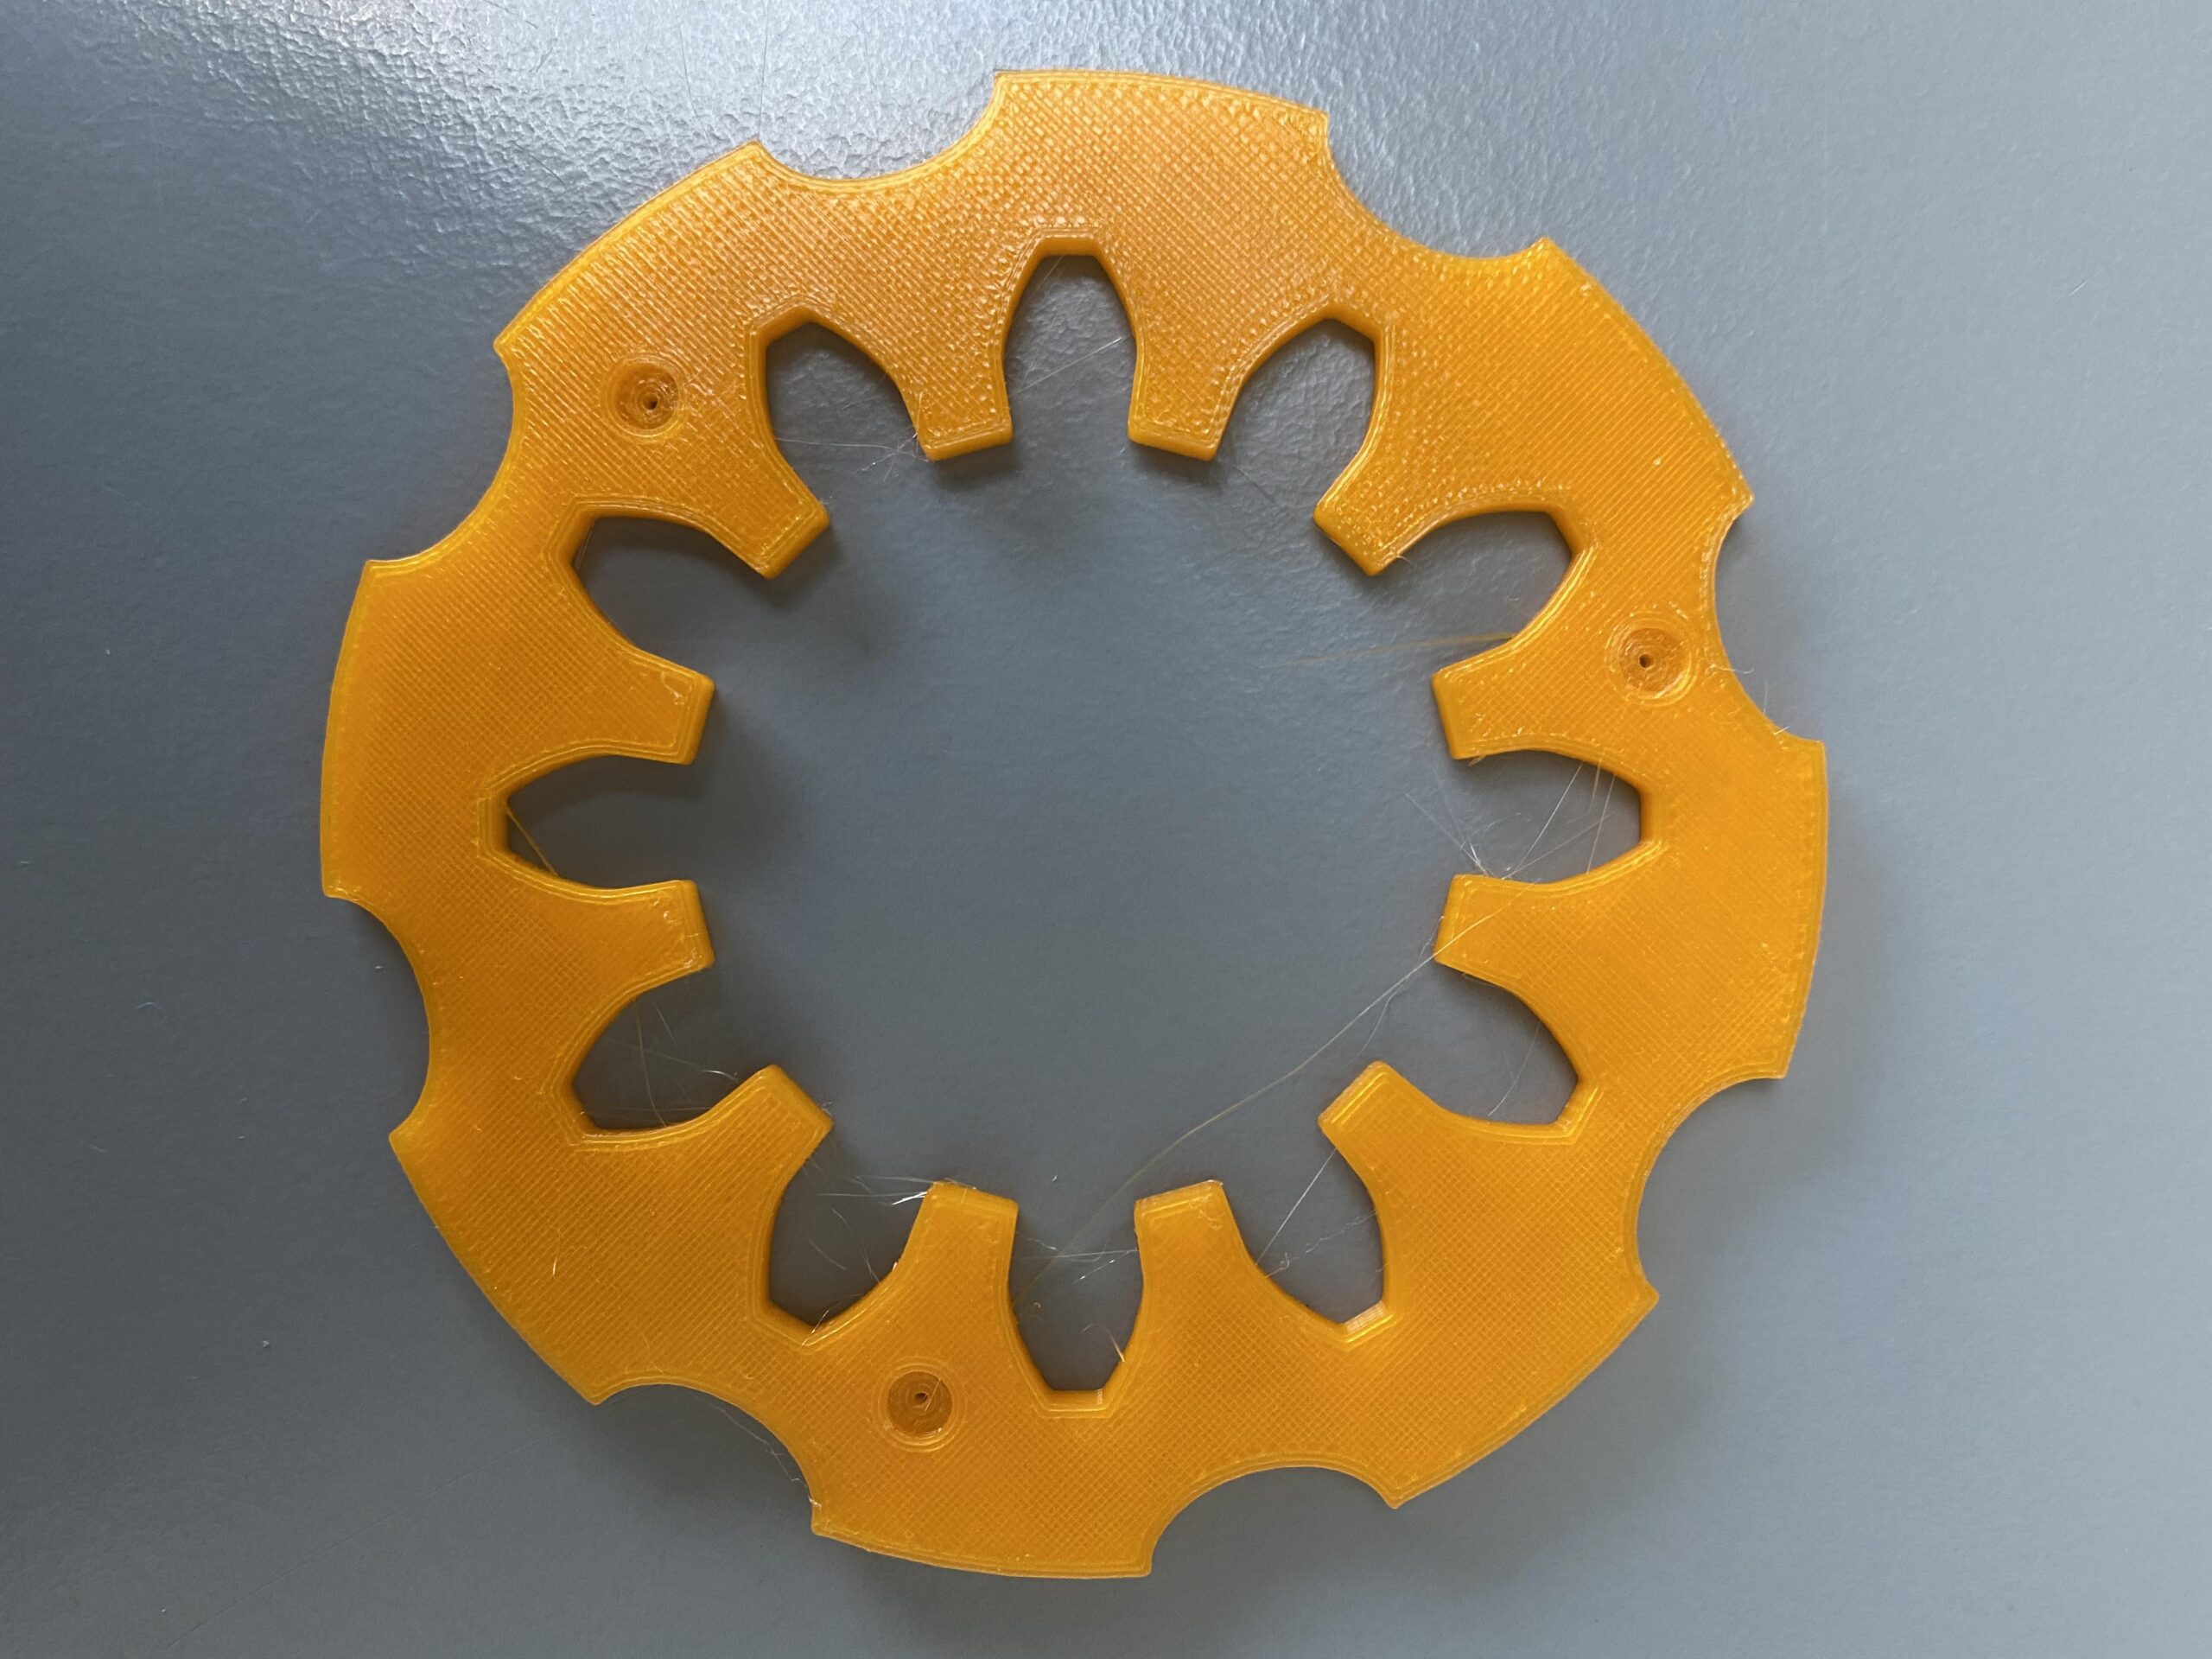
Photo: Spur wheel with 12 teeth (prototype 3D-print)
Detailed description of the spur wheel template
There are different types of spur wheels. This shape represents the mechanical properties with which the force can be maximised. When you interlink two wheels of this type, their teeth always have a point of contact under an angle of 90 degrees when rotating. Although it looks like an arbitrary number of teeth can be placed in a circle, this is not the case.
The wheels in the set have 12 or 15 teeth respectively. The spaces between them – their negative counterparts – are placed on the inside of the round template, so that the drawing result will have its teeth on the outside. The body of the spur wheel has finger fitters in eight positions along the outside for easy lifting or extra grip. You find pushpin markers in the top surface of the body.
Utilising the spur wheel template
The spur wheel is a relative complex tool to use / shape to create. We recommend to use one to two push pins to fixate to tool on the TactiPad. Draw the inner contour of the spur wheel and you have created the first step into the mechanical domain or flower design.
Once you have interlinked two spur wheels, you will experience a complex issue: finding the perfect position for one tooth on the one and two teeth on the other wheel to “bite each other”. This gives you an impression of how delicate spur wheel systems are in mechanics.
Detailed description of the regular polygon template
The set contains templates for regular polygons with five, six, seven, eight and nine corners referred to as pentagon, hexagon, heptagon, octagon and nonagon respectively. The radius of the polygons ranges from two to eight centimetres.
In a regular polygon all corners have the same angle. The corners are interconnected with lines that have all the same length. Another way to describe a polygon: A polygon consists of a number of equal leg triangles where the top corners of all equal legged triangles are at the same position. So they are arranged in a circle like slices of a pie. The distance from all corners to the centre point is the same.
The body of the tool is two centimetres wide. It is shaped as a triangle where one side is not present. It could be described as a jaw hook. The angle between the two sides is less than 90 degrees. Near to the rounded outside corner and near to the tips you find pushpin markers. One side of the polygon tool contains a number of wholes, indicating the number of corners of the particular polygon.
The side with the wholes is referred to as ‘radius side’. This radius side has a centimetre indication in the top surface and indents every half centimetre. The inner side of the side with the finger fitter to the far right is referred to as ‘drawing side’. The drawing side has the same number of indents as found on the radius side.
To construct the polygon, the pen position in the radius side has to correspond with the one in the drawing side, measured starting at the inner corner. As an example, a groove as a visual tactile clue ending at the four centimetre radius indication shows the direction to look for the corresponding indent in the drawing side and/or the respective bisectrix position. The value for the radius is measured starting at the inner sharp corner and increases towards the tip. The once selected position at the radius side is going to be the centre of the polygon.
At the outer side of the drawing side you find indents as well. They indicate the position for the bisectrix of the equal leg triangle. The outside corner in between the radius side and the drawing side is rounded to allow for alignment with the ruler; the distance from the sharp hook to the ruler remains the same when you move/rotate the polygon tool.
Utilising the regular polygon template
The regular polygon tools are mainly used to create these shapes. You can also create mandalas. You have to use at least one pushpin to mark the centre of the polygon. A second pushpin is handy to mark the position to draw to along the drawing side.
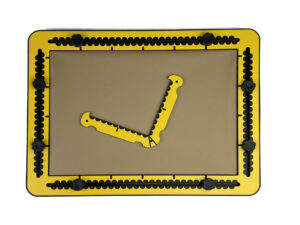
Detailed description of the rectangular hook template
The two sides of the rectangular hook are under an angle of 90 degrees and are 10 centimetres long. The body of the tool is two centimetres wide. The corner between the sides is rounded at the outer side. The sides are ending with a 90 degree hook. Near the rounded corner and near to the tips, you find push pin markers.
You find indents for 30, 45 and 90 degrees at the rounded corner for alignment with the ruler. There are centimetre indicators along the inner side on the top surface. The inner sides have indents every half centimetre. At the outer side you find indents to perform a 30 or 45 degree rotation in reference to the inside angle. On the outer sides, near to the tips you find a finger fitter for easy lifting or extra grip.
Utilising the rectangular hook template
When you drawing along the two sides towards the inner corner you create two lines with a 90 degree angle. When you connect the two endings of the previously created lines you will get an irregular triangle on the TactiPad. By rotating and/or mirroring a triangle, you can create shapes such as diamond or kite.
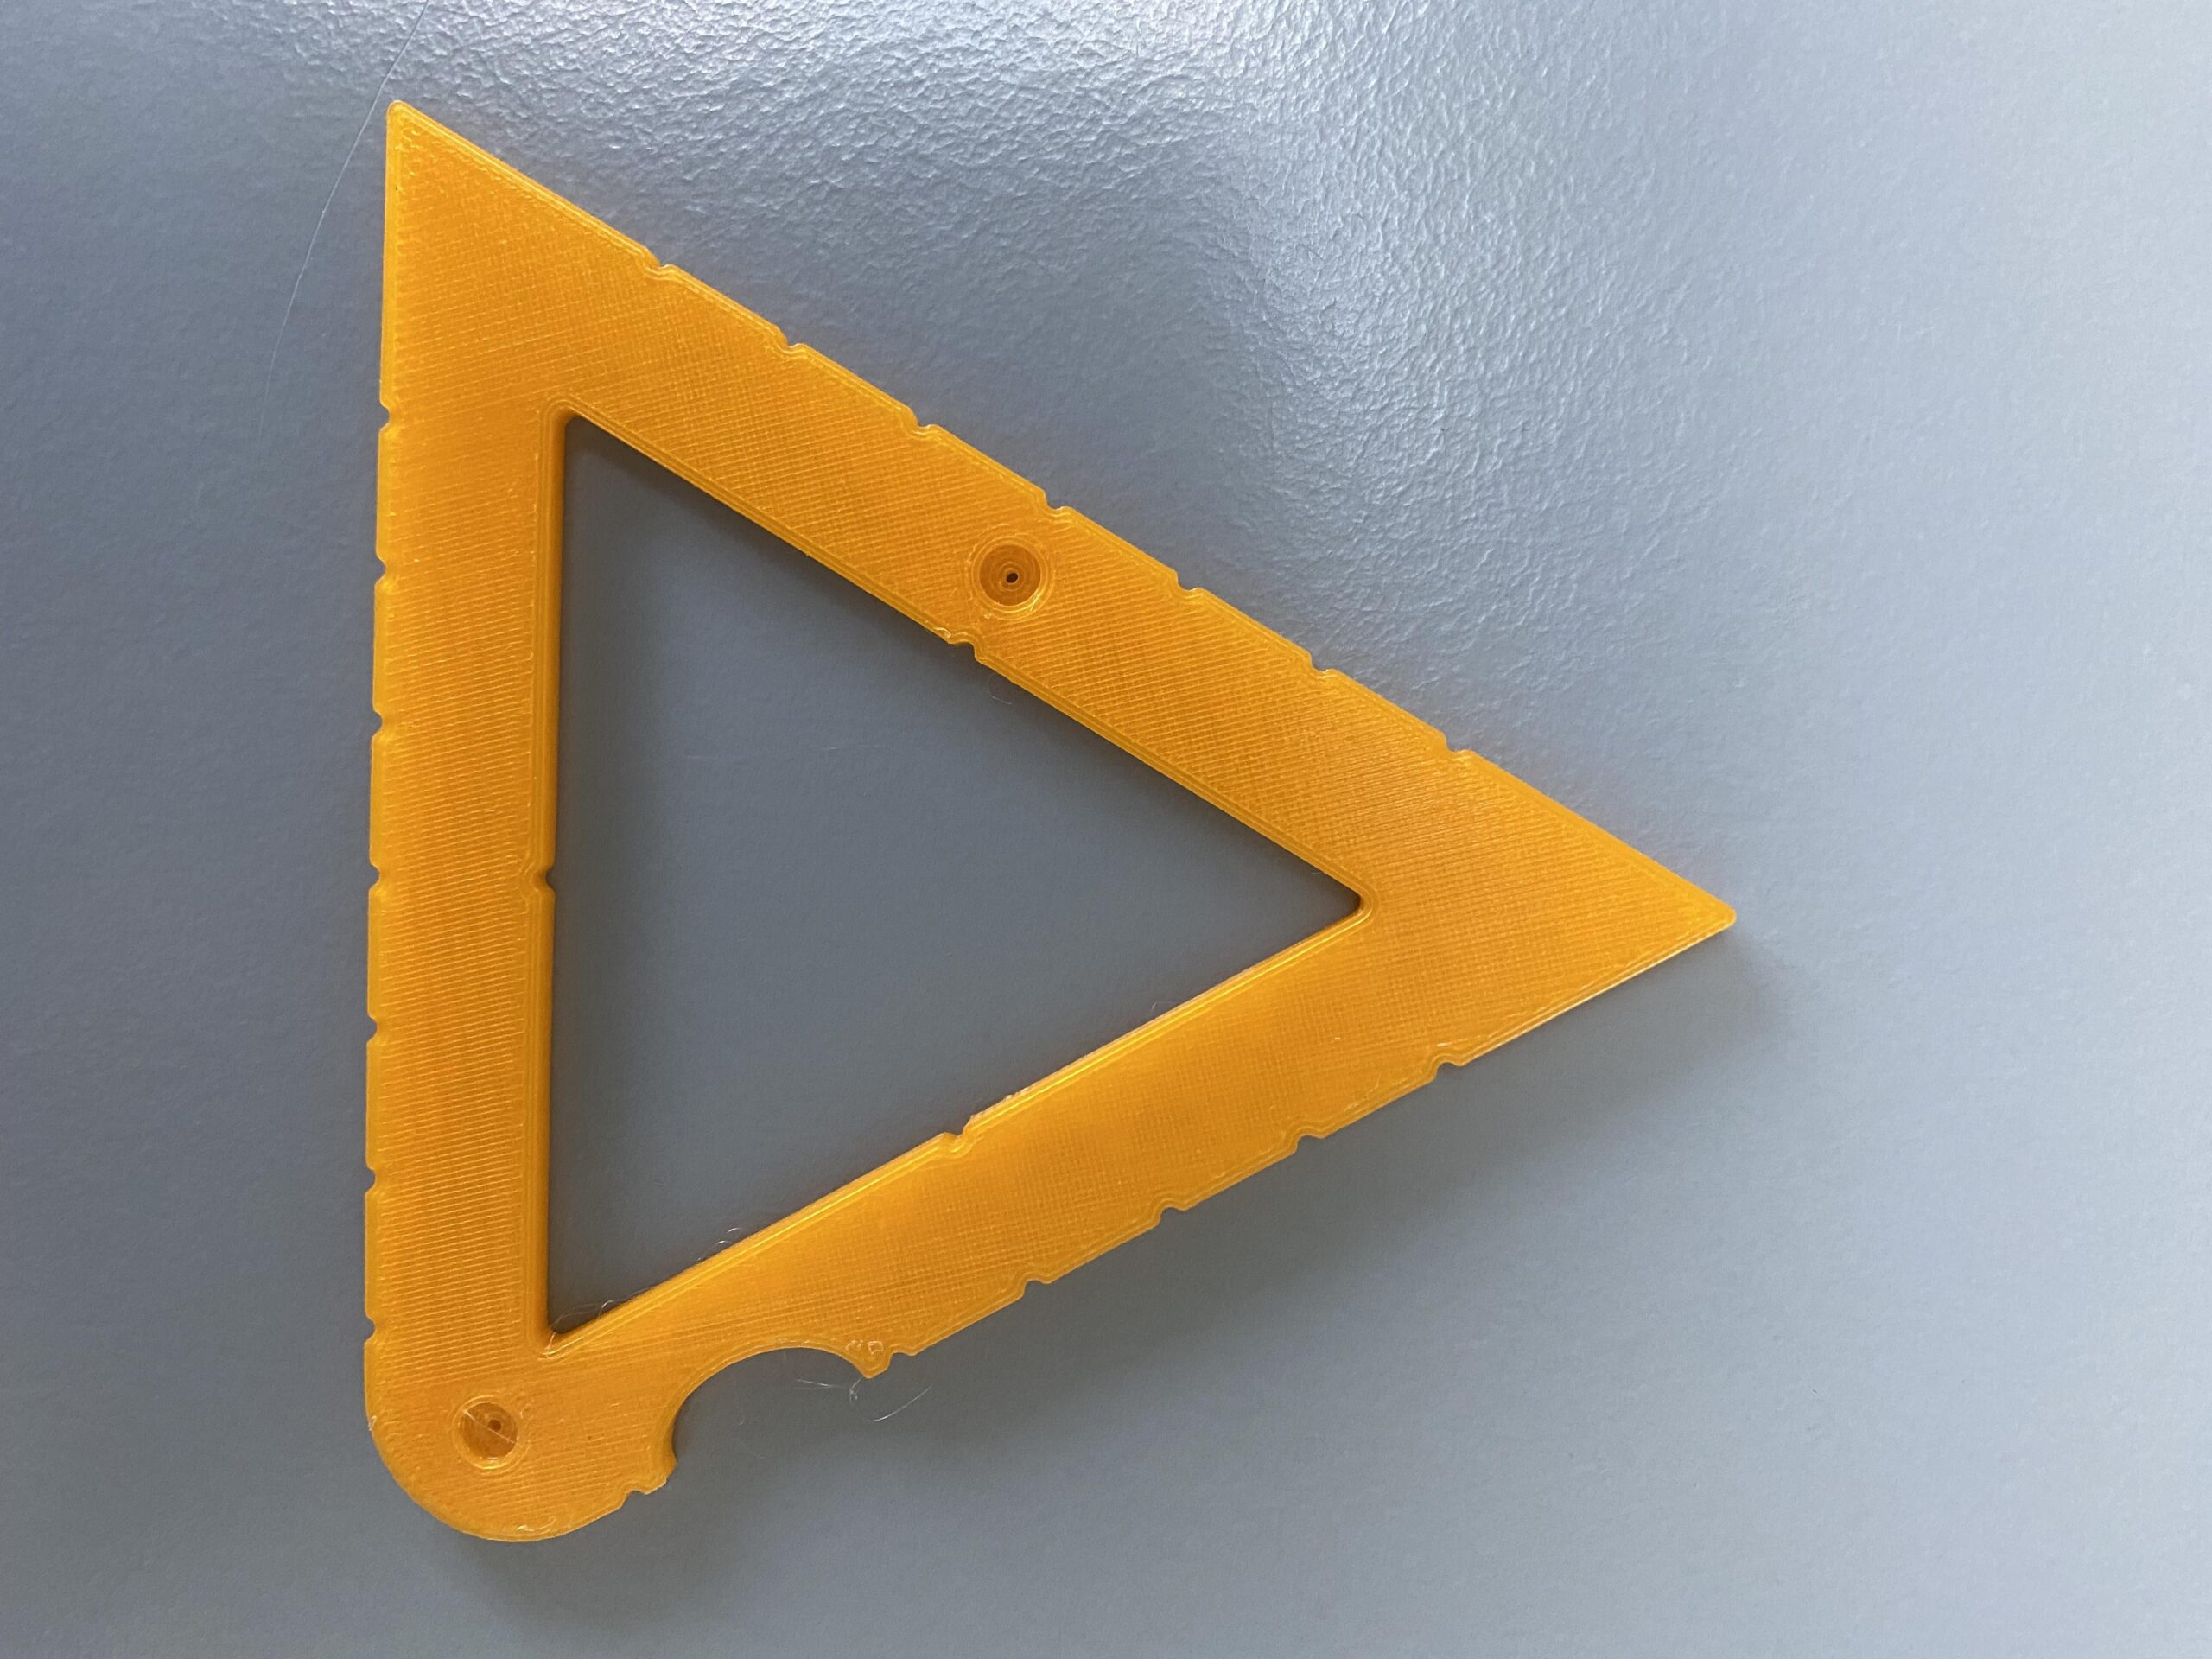
Photo: The six centimetre equal sided triangle of the set (prototype 3D-print)
Detailed description of the triangle template
The templates for the triangles are of the type equal sided triangle. The length of the sides ranges from three to eight centimetres respectively. One outer corner is rounded, the other two are sharp. Along the outside you find indents at every centimetre. They correspond with the corners at the beginning/ending of the inner sides. The body of the triangle is about 12 millimetres wide. On the top surface, you find pushpin markers.
The inner sides have an indent at their halfway position.
On one of the outer sides you find a finger fitter for easy lifting or extra grip.
Utilising the triangle template
When you place the triangle template somewhere on the TactiPad in any orientation and then draw along the inner contour, you create your first triangle.
With the equal sided triangle you can create other shapes: a rectangular triangle of 30, 60 or 90 degrees, a diamond and star.
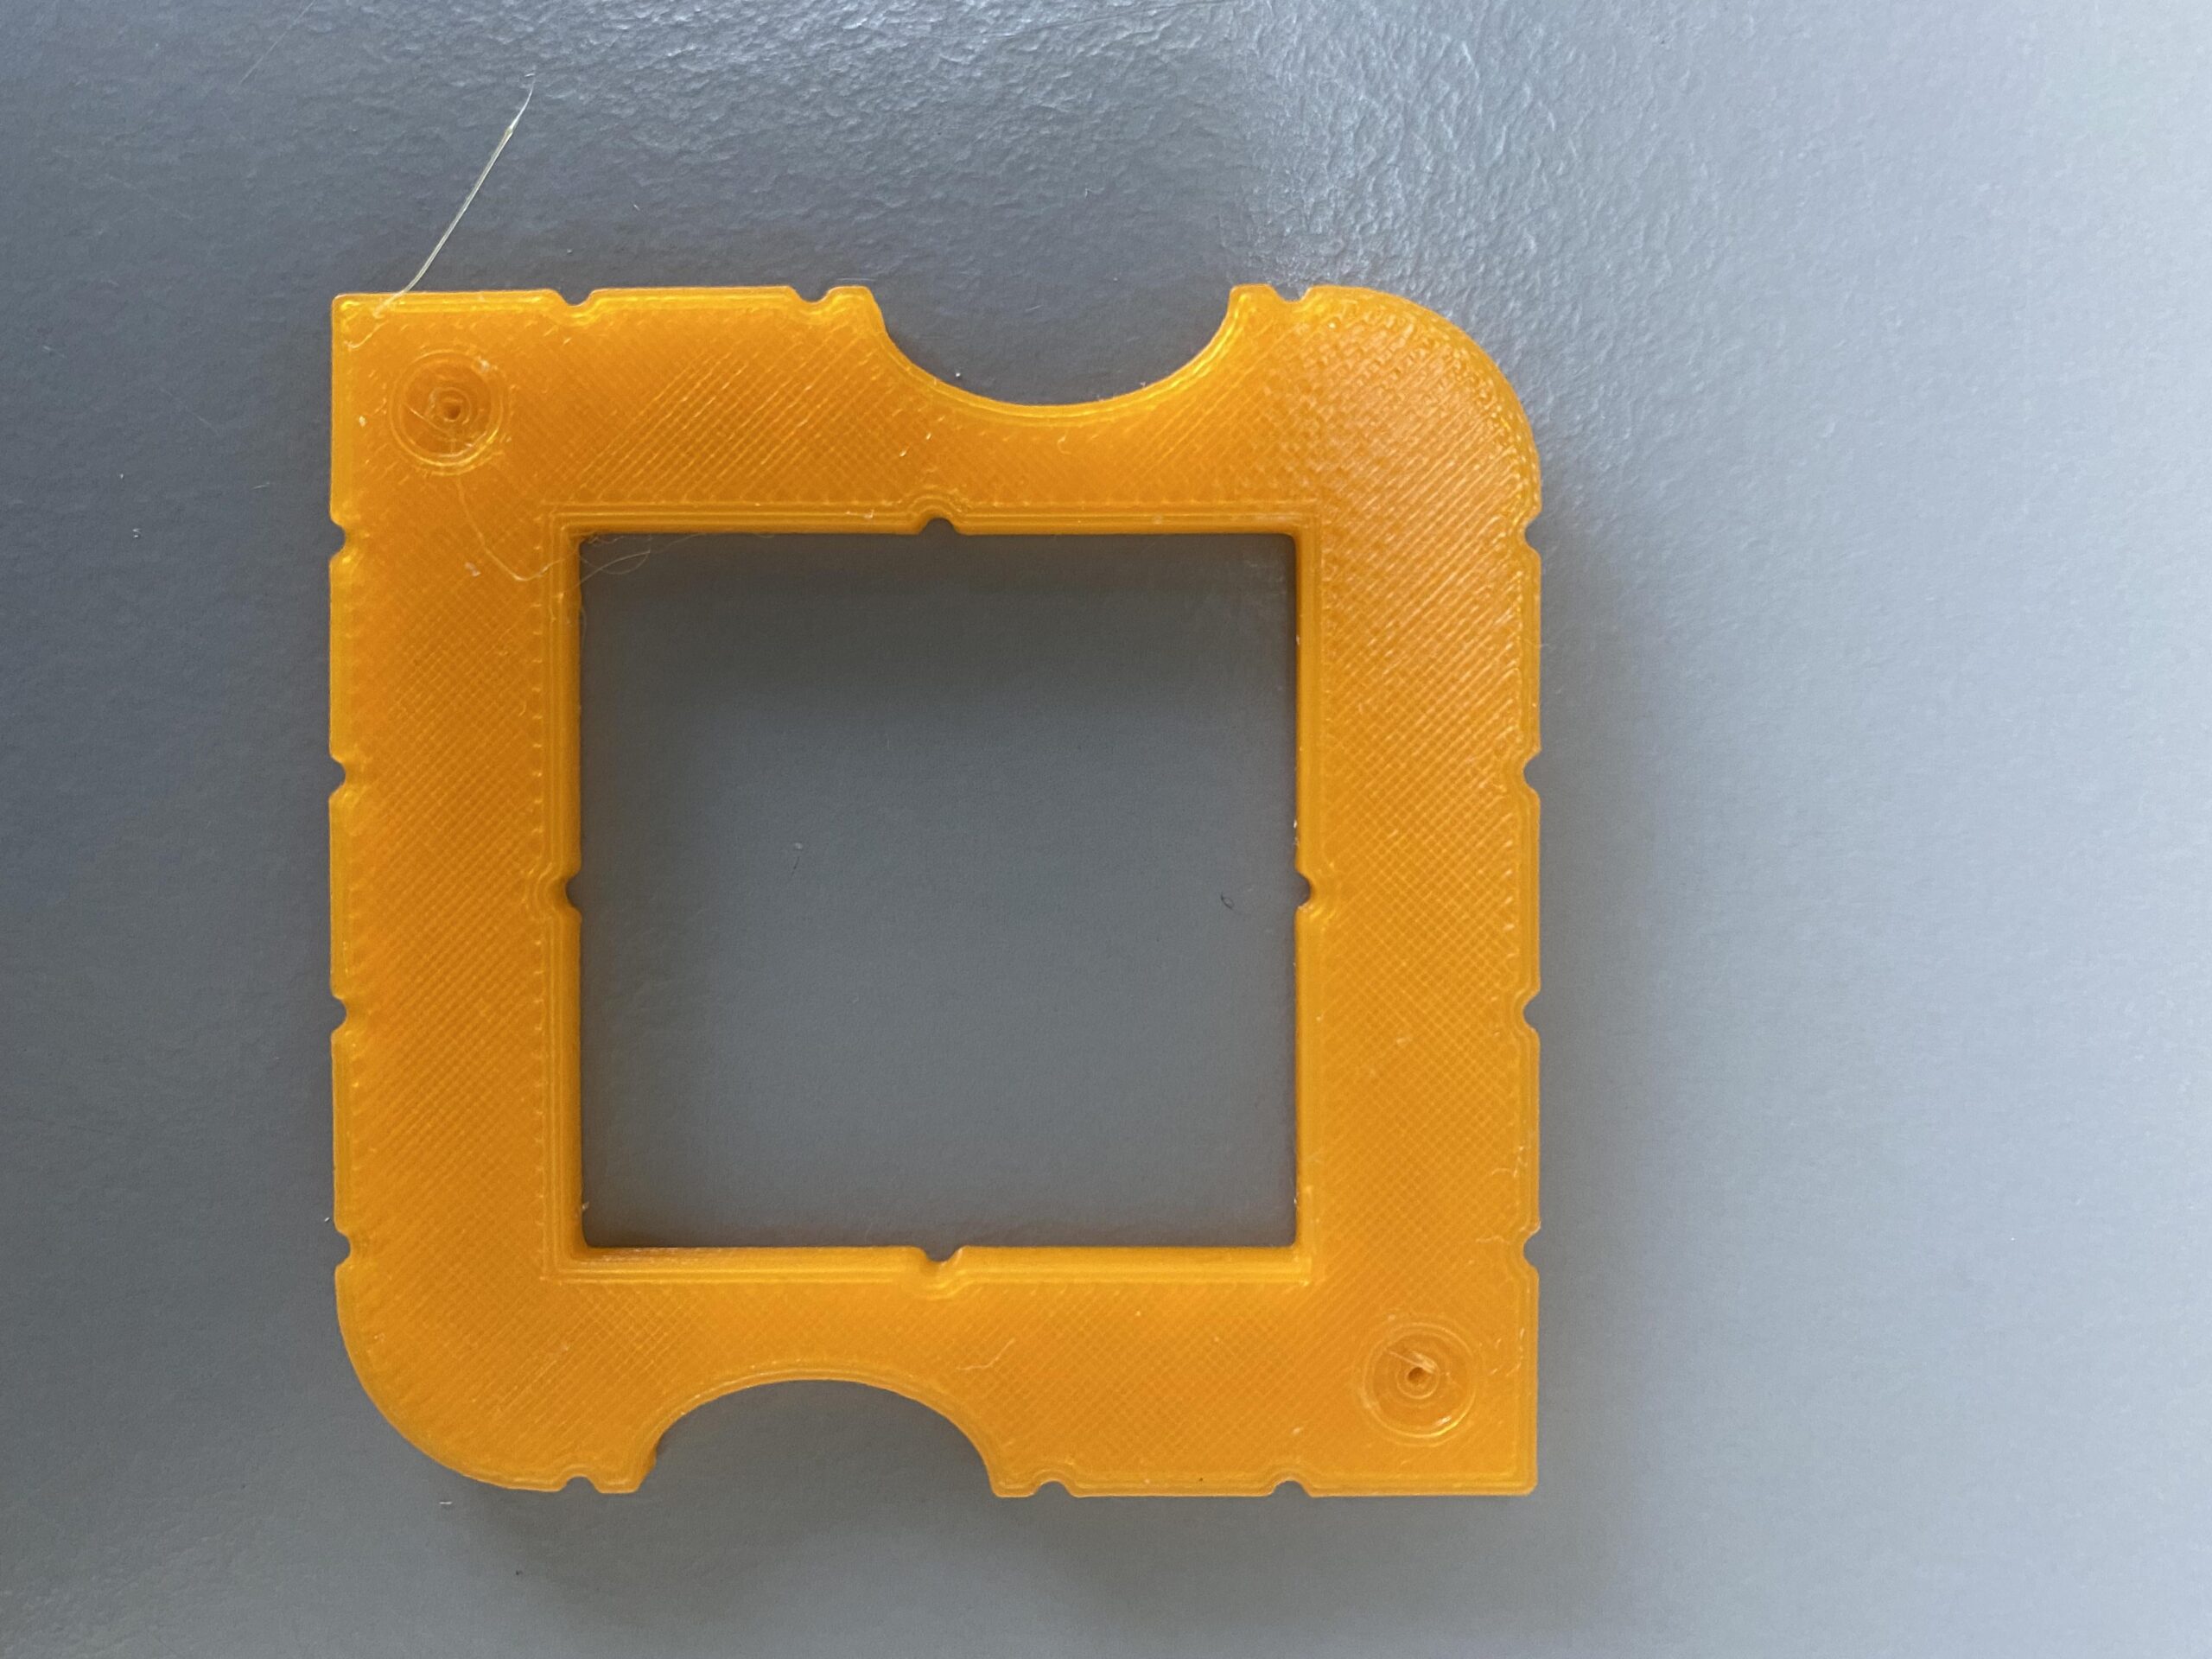
Photo: The four centimetre square of the set (prototype 3D-print)
Detailed description of the square template
The sizes of the squares ranges from two to ten centimetres. The frame that forms the square is one centimetre wide. So a four centimetre squared template has the inner dimension of four centimetres. The outside is six centimetres in square.
Two diagonal opposite outside corners are sharp, there you can find the pushpin. The other two corners are rounded. Along the outside a small indent is provided at every centimetre. The inner side has an indent at the halfway position of each of the four sides. In two of the opposing outer sides you find finger fitters for easy lifting or extra grip.
Utilising the square template
When you position the square somewhere on the TactiPad in any orientation and then draw along the inner contour, you create your first square. With the square template you can create many more shapes such as diamond, parallelogram, trapezium, and also 3D shapes such as pyramid or cube.
 Previous section
 Return to TactiPad manual overview