Skip NavigationMenu

7.01 Differences between the text tools

In TactileView, there are 3 drawing tools that allow you to place tactile texts in your design, each with a distinctly different application:

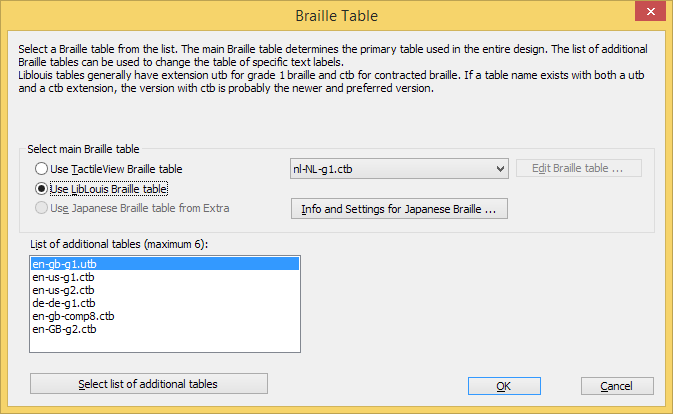
1. Text labels; regular braille texts using one of the following input methods:

  • Computer keyboard input; regular text input converted to braille output
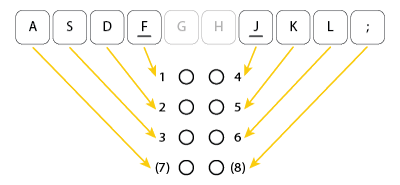
  • Braille keyboard input; direct input of braille characters using Perkins style braille keyboard
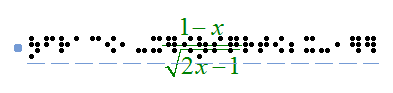
  • Math input; use an equation editor or the keyboard as input for mathematical braille notation

2. Mammoth braille; greatly enlarged braille characters
3. Draw letters and digits; large visual text characters

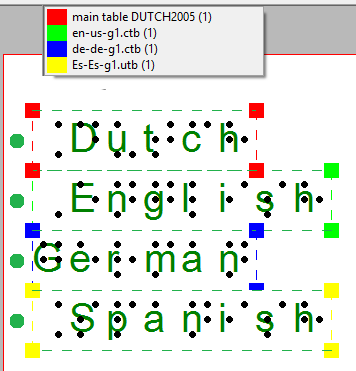
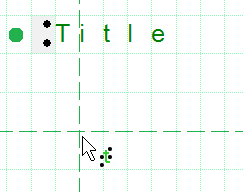
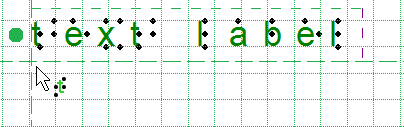
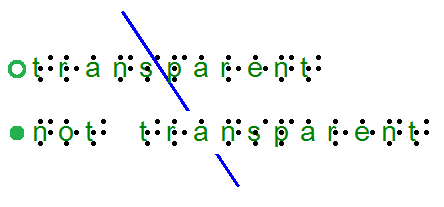
Once a text label is placed in the design it is preceded by a round coloured marker that signifies the input method. Computer keyboard input is signified by a green marker, braille keyboard input with orange and math input with blue-grey. By hovering over the marker with the mouse, a tooltip will show extra information about the text label. A marker with a white centre indicates the label is transparent.

‘Computer keyboard input’ icon: Icon for computer keyboard input
‘Braille keyboard input’ icon: Icon for braille keyboard input
‘Math input’ icon: Icon for math input
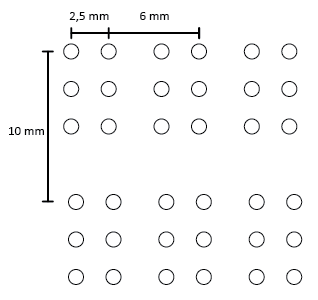
Printing braille text
The braille output differs slightly for each production method (swellpaper or different models of embossers). See the manual sections Printing with a braille embosser or Printing on swellpaper to find out the specific settings for your production method.

7.02 Settings – Braille tables

With the 6 dots of regular braille, only 63 different combinations can be made (not including the space character). However, the languages from around the world use a far larger amount of letters and punctuation marks. To accommodate these differences using only the 63 available braille characters, each language or country uses a specific braille table (sometimes called rule-set, braille code or mapping).

This way, a braille character in one language can have a different meaning in another. It is crucial, therefore, to select the correct braille table for the visual impaired reader.

Once the braille table is chosen, TactileView will automatically produce the correct braille for text labels according to the inherent properties of braille script.

Braille table settings dialog

Via menu Settings > Braille tables, you can select your braille table of choice. There are three sets of braille tables:

– TactileView braille tables: these tables are currently only used for uploading designs to the TactileView catalog, but will be replaced completely in future releases;
– Liblouis braille tables: an open-source braille translator that contains a large number of languages and braille codes.
– Japanese braille table from Extra: a translator for Japanese braille that can be purchased from Extra.

The selected braille table will be your main braille table, which is used as a default for all new text labels that are placed in your design (including the title label). When you change your main braille table, all labels that are designated as such will be changed to the new table.

Braille tables settings dialog

Figure 1. Braille tables settings dialog; click on the image to enlarge.

Choosing which braille table to use

The large list of Liblouis braille tables is recommended over the TactileView tables, as they are now only used for uploading designs to the TactileView catalog or in cases where personal adaptations of a braille table are required.

Liblouis is an open-source braille translator containing an extensive list of braille tables for a wide range of countries and languages. For some there is just a single braille table available, whereas others (most notably English) have several alternatives. In general, they use the following elements in the table names to distinguish them:
– g0 or ‘comp’ for computer braille;
– g1 for uncontracted braille (letter by letter transcription);
– g2 for contracted braille (using abbreviations and contractions);
– g3 for non-standardised personal shorthands (rarely used).

Most of the braille tables without a specified grade will either be grade 1, or a specialised braille table such as mathematical braille notation.

The Japanese braille from Extra is only available once this package has been bought separately.

Once you have chosen your preferred braille table, click ‘OK’ confirm to save the selected main braille table. The main table is also recorded in the document when saved.

Using multiple braille tables in one document

By default, your main braille table is selected for new text labels. However, you can choose to use another braille table for individual text labels. This is useful for example when combining regular text with mathematical equations, or texts in different languages in their corresponding braille tables.

There are two ways of changing the braille table for a selected text label:
– From the properties toolbar or context menu, choose ‘Select braille table’ and select your preferred table from the list; you can choose from your main table, the 5 most recent tables or the complete list of Liblouis tables via ‘More braille tables’;
– Choose the braille table from the list of Liblouis table in the ‘Text and position’ dialog.

To get an overview of all the braille tables that are used in the document, first make sure nothing is selected. Next, choose ‘Show used braille tables’ from the properties toolbar; this option can also be found in the context menu that opens when right clicking in an empty part of the design. When this option is selected, the colour of the markers of all text labels in your design will signify the used tables; the legend near the top left corner shows which colour corresponds with which table.


Colours give an overview of the braille tables in the design

Figure 2. Overview of the braille tables that are used in the design.

Mathematical braille notation

When it comes to mathematical notation in braille, there is a number of additional aspects that come into play. These are also supported in TactileView. For a full overview, read the manual sections ‘Introduction on mathematical notations‘ and ‘Add mathematical label (equation)‘.

Mathematical text label
Figure 3. Mathematical text label.
Text label representation on screen

By default, the braille characters are shown on screen on top of the entered text to give the designer an idea of the occupied space. For better readability, the braille can also be disabled on screen by selecting ‘Hide braille dots on screen’ from the properties toolbar or context menu of the design or a selected text label. Choose ‘Show braille dots on screen’ to make them visible again. Alternatively, the braille can also be disabled via menu Settings > Text label presentation: on screen. See manual section ‘Editing text labels‘.

‘Hide braille dots on screen’ icon: Icon for Hide braille dots on screen
‘Show braille dots on screen’ icon: Show braille dots on screen icon
Opening documents with a different main braille table

When opening a document that was saved using a main table that is different from your current one, you can choose between:
– applying your current braille table to the document;
– use the original braille table in the document;
– use the original braille table and make this your default main braille table.

7.03 Braille tables – Inherent braille properties

In braille, many different conventions and variations are used. Below, you will find an overview of the aspects of braille that are supported in TactileView. By using text labels in TactileView with the correct braille table selected, in-depth knowledge of braille to still produce correct braille texts is not required. However, below you will find a list of the most prominent inherent properties of braille script that determine the layout of braille text labels in your designs.

Braille cell size, white space and composition signs

TactileView automatically ensures the braille is sized correctly (following the most commonly used distance of approx. 2,5 mm = 1/10 inch between braille dots) as well as using the correct distance between braille characters (approx. 6 mm) and lines of text (approx. 10 mm). A white space around the braille makes sure that there is enough space between adjacent objects or texts to ensure they can easily be distinguished with your fingertip. The braille grid can be used as a layout tool for alignment using these standard dimensions, see Braille grid (text alignment).

Other aspects that are specific to braille such as braille composition signs (capital letter sign, number sign, symbols, etc.) are also applied automatically. These composition signs are highlighted on screen with a light grey background. Remember that these composition signs differ significantly between different languages and braille tables.

Braille cell sizes visualised: distance between dots within a character (2,5 mm), width between two characters (6 mm) and two lines of braille text (10 mm).

Figure 1. Braille cell sizes.

Composition signs (capital, number, etc)

Figure 2. Capital sings as an example of composition signs; the rules for these signs vary between different languages and braille tables.

Six dots and eight dots

With the introduction of refreshable braille displays, two extra dots were added to form 8-dot braille. This way, using 255 braille characters are available (not including the space character) instead of the regular 63, allows a larger range of characters to be denoted in braille, such as mathematical symbols. Other notable differences with 6-dot braille are found in the braille composition signs.

For more consistency, braille display users that are familiar with reading 8-dot braille can use an 8-dot braille table producing designs from TactileView as well. Text labels (including the white space behind the braille) will automatically be higher to accommodate the addition of the two extra dots.

Comparison between 6-dot and 8-dot braille

Figure 3. Comparison between 6-dot and 8-dot braille (example: LibLouis tables en-us-g1.ctb and en-us-comp8.ctb).

Uncontracted (grade 1) versus contracted (grade 2) braille tables

To save space in an embossed braille document, frequently used syllables or entire words can be represented by a shorter combination of braille character or even a single character. This is called contracted braille or grade 2 braille.

As an example, the word ‘the’ would be denoted with three braille characters in uncontracted English braille. In contracted braille however, this is shortened to just a single character.

When using a contracted Liblouis table, these contractions and abbreviations are applied automatically. The reader must be familiar with these conventions to be able to read contracted braille. On screen and when the design is also printed in ink, the font size of the visible text is reduced to match the text position with the braille characters.

Comparison between contracted and uncontracted braille

Figure 4. Length difference between contracted and uncontracted braille.

7.04 Text label – Computer keyboard input

To read a tactile diagram with ease, it is very helpful to add text information to the design. For example the different parts of a flower or rooms in a building can be labelled in the design to add descriptive information to the image.

Once the text label is added to your document, it can be edited at any time; see Editing text labels. For the other input methods for text labels, see Text label – Braille keyboard input and Text label – Math input.

Text label placement
To place a text label, click on the ‘Add text label’ icon in the drawing tools, then move the mouse to the desired position in the design and click again. You can start typing right away or use Ctrl+V to paste a copied text.
A text label can be positioned anywhere in the design. Leave enough space around texts labels to ensure the braille dots can be distinguished easily, so make sure that text label are not too close to lines in your design. This way you will maintain optimal tactile usability.

When placing a text label, the width of the text label is automatically adjusted to fit within the sheet of paper or within the alignment frame when this is enabled.

Add Text Label icon: Icon for placing a text label

Text label placement

Figure 1. Click in the design to place a text label.

Precise placement: centre or align (snap)
Two functions in the options toolbar allow for more precise placement of text labels. The ‘Centre’ function will horizontally place the label in the middle of the design.
With ‘Text label alignment’ turned on, text labels can be aligned with previously placed labels. Green dotted lines appear in the design when placing or moving a label close to the vertical or horizontal position of other labels. The text label you are adding or moving will then snap to the green line.

You can also use the braille grid as a layout tool for alignment of text labels throughout the document.

Text label alignment icon: Text label alignment icon
Centre text label icon: Icon for centering the text label

Green lines indicate text label alignment

Figure 2. Text label alignment with green dotted lines.

Adjusting label dimensions using word wrap length
Word wrap length is the maximum number of characters per line of text in a text label. For example, a word wrap length of 10 will divide a text of 25 braille characters into three lines of text. Line breaks will be placed at the position of spaces to avoid breaking up words. The lines of braille text have a fixed height that matches the standardised height of embossed braille text.
The word wrap length can be adjusted by dragging the sides of a text label. The tooltip will display the value of the word wrap length. Alternatively, select ‘Text and position’ from the properties toolbar or context menu of the selected text label to enter a value for the word wrap length.
Adjusting word wrap length by dragging the sides of the text label

Figure 3. Adjusting the word wrap size by dragging the sides of the text label; the tooltip signifies the word wrap length.

 
Text label presentation on screen
The text label is presented on screen by a combination of green characters with black dots that represent the braille characters that will be printed on the braille embosser or on swellpaper. With this setup you are able to have an eye on the braille characters. You can change how text labels are displayed on screen by selecting ‘Text label presentation: on screen’ in the toolbar or via the context menu.
Text label presentation on screen icon: Icon for Text label presentation: on screen
 
Automatically correct braille: braille tables
The guidelines (so-called braille tables) for how texts are displayed in braille differ internationally. By selecting the correct default braille table via Settings > Braille Tables, the braille in your text labels will automatically be correct. This means that you do not need to have any knowledge of braille to get accurate braille in your designs. For example, braille composition signs for capital letters or numbers are automatically included.
.
 
White space behind labels (transparency)
By default, labels have a white space behind and around the braille text to ensure that other design elements do not interfere with the braille. Keep in mind that lines can be covered by the white space if the label is placed too close.
By switching off the white space (making the label transparent) you are able to place the text label on top of lines, but make sure they do not disturb the braille.
‘Add/remove white space’ icon: Add or remove white space

Text label transparency

Figure 4. Difference in text label transparency; notice that the line is visible below the top text label, but is covered by the white space of the second label.

7.05 Text label – Braille keyboard input

There are three input methods for text labels; for the other two input methods, see Text label – Computer keyboard input and Text label – Math input.

The computer keyboard input method is used to enter texts similar to using a Perkins style braille keyboard. This works by simultaneously pressing the keys that represent the 6 or 8 dots of a braille character (see Braille tables – Inherent braille properties).

To place a text label with braille keyboard input, first select ‘Add text label’ from the drawing tools toolbar and choose ‘Text and position: braille keyboard input’ from the properties toolbar or context menu. Next, click on the position in the design where you wish to place the text in braille. You can now type your text directly in your design.

‘Text label: braille keyboard input’ icon: Icon for braille keyboard input

Entering braille text

When entering the braille text, the letter keys f, d and s correspond to braille dots 1, 2 and 3 respectively; keys j, k and l with dots 4, 5 and 6. Keys a and ; can be used to type dots 7 and 8 when using 8-dot braille. The space bar is used for spaces in braille text as well.

Overview of the keyboard keys used for 6-dot or 8-dot braille input

Figure 1. Overview of which letter keys correspond with the dots in a braille character.

To enter a character, press all letter keys simultaneously, then release them at the same time. For example, to enter the letter n in braille containing dots 1345, press f, s, j and k.

The typed text will appear as black braille characters on screen, but without the visual text characters that are shown for text labels with computer keyboard input. The orange dot in front of the text label signifies that the braille keyboard was used as input.

Once the text label is placed in the design, it cannot be converted to another input method.

7.07 Editing text labels (braille)

Any text label placed in the design can still be edited later on. You can change the contents of the label or adjust the size and position in the design.
Please note that labels may only be edited according to the input method used to create them. For example, a text label entered via braille (six-key) input may only be edited using six-key, and a raised print character label may only be edited as a raised print character label. Labels cannot be converted from one type of label to another.

For more details on placing and aligning a text label in the design, see: Add text label or Braille grid (text alignment).

Editing text label content
Text labels may only be edited using the same entry method with which they were created (computer keyboard entry or braille keyboard entry). To edit the content of the computer keyboard entry text label, double-click the label to place the cursor in the text and edit the content as desired directly in the design area. When this edit mode is active, you can drag with the mouse across the text or use the Shift key combined with the Home, End or arrow keys to make a text selection.
You can also right-click the label and choose ‘Text and position: computer keyboard input’ or click on the corresponding icon in the toolbar to bring up a text and position dialog. Make the desired changes and choose ‘OK’ to update the text in the label.

To edit the contents of a braille keyboard (six-key) entry label, double-click on the label to edit it directly in the design. Alternatively, you can right-click and choose ‘Text and position: braille keyboard input’ to bring up the text and position dialog. Edit the label content as desired using six-key entry. When you are finished, deselect the label when editing in the design or choose ‘OK’ to close the dialog and update the label.

Editing the contents of a text label in the edit mode on screen

Figure 1. Double click on a text label for direct editing.

Adjusting word wrap length
Word wrap length is the maximum number of characters per line of text in a text label. For example, a word wrap length of 10 will divide a text of 25 braille characters into three lines of text. Line breaks will be placed at the position of spaces to avoid breaking up words. The lines of braille text have a fixed height that matches the standardised height of embossed braille text.
The word wrap length can be adjusted by dragging the sides of a text label. The tooltip will display the value of the word wrap length. Alternatively, select ‘Text and position’ from the properties toolbar or context menu of the selected text label to enter a value for the word wrap length.

With the alignment frame enabled, the word wrap length will only be automatically be adjusted when placing a new label. If the label should fit within the limits of the alignment frame once placed in the design, the wrap length will have to be changed manually in the design or via the option ‘Automatically adjust word wrap length’ in the ‘Text and position’ dialog.

Adjusting word wrap length by dragging the sides of the text label

Figure 3. Adjusting the word wrap size by dragging the sides of the text label; the tooltip signifies the word wrap length.

Text label presentation on screen
The braille component of text labels can be hidden on screen for better readability. To view only the text of the labels in your document, select a text label and choose ‘Hide braille dots on screen’ from the properties toolbar. This setting will be applied to all text labels in the document. Choose ‘Show braille dots on screen’ to show braille on screen again.
For a complete list of settings for the way text labels are displayed on screen, select ‘Text label presentation: on screen’ either from the properties toolbar of a selected text label, or from the Settings menu. You can adjust the font colour, enable enlarged text for selected text labels and hide the text or braille component of text labels.

Note: Braille dots for text labels can be disabled on print seperately via ‘Text label presentation: on print’.

‘Text label presentation on screen’ icon: Icon for Text label presentation: on screen
‘Show/Hide braille dots on screen’ icons: Icon for Show braille dots on screen Icon for Hide braille dots on screen
Additional line spacing
You can choose to use extra line spacing between lines of text throughout the document. For example, a value of 0.5 will add an empty space of half the height of a braille character between two lines of text.
This can be selected by choosing ‘Additional line spacing’ from the properties toolbar or context menu of a selected text label.

Cutting, copying, pasting and deleting labels (all label types)
The fastest way to copy, cut, paste or delete a label is using hotkeys. To cut a label, select it and press CTRL+X on the keyboard. Cutting the label removes it from the file but stores it on the clipboard allowing you to paste it elsewhere in the file. The cut label can only be pasted until you cut or copy a different label or object.
To copy a label, select it and press CTRL+C. Copying leaves the original label but keeps a copy of it that you can paste somewhere else in the file. To paste a cut or copied label, press CTRL+V. To delete a selected label, press the Delete key on the keyboard.

Moving labels (all label types)
Once your label is selected, you can move it by clicking the center and dragging it to a new position. A four pointed arrow cursor indicates you can move the label.
You can also easily move the label to the center of the design area by right-clicking it and selecting Center from the context menu. You can move it only horizontally or only vertically by right-clicking it, selecting ‘Move the label or object only horizontally or vertically’ and then dragging it up or down to move it vertically without changing its horizontal position, or left or right to move it horizontally without changing its vertical position.

Moving a text label

Figure 3. The cursor with four arrows indicates the text label will be moved when dragged.

‘Centre text label’ icon: Centre text label icon
‘Move horizontally/vertically’ icon: Move horizontally or vertically icon

Resizing labels (mammoth braille labels and raised print character labels only)
You can resize a mammoth braille label in one of two ways. The first way is to scale a mammoth braille label manually. To do this, select it, then click a purple marker in one of the corners of the label and drag it diagonally until the label is the desired size. This resizes the mammoth braille inside the label to fit the new label size. The other way to resize a mammoth braille label is to right-click it and choose ‘Braille dot size’, which brings up a dialog on which you can specify the size of the mammoth braille relative to standard braille as a percentage. The default percentage is 300, which means the mammoth braille is three times larger than standard braille. Enter the desired size of the mammoth braille and choose OK to close the dialog, adjust the mammoth braille size and automatically resize the label to fit the new size of the mammoth braille.

Raised print character labels may also be resized in one of two ways. The first way is the same as for mammoth braille labels; select the raised print character label, then click a purple square in one of the corners of the label and drag it diagonally until the label is the desired size. This resizes the raised print characters inside the label. The other way is to right-click the raised print character label and choose ‘Font type’ and size from the context menu. This launches a dialog that allows you to choose any font on your computer for the label, to specify any available font style for that font and to define the desired font size. Once you have finished making selections, choose OK on this dialog to apply your choices to the label text. The raised print character label will be resized to fit the new size of the text.

NOTE:
Because braille characters have a fixed size, text labels created using either computer keyboard entry or braille keyboard entry may not be resized. However, you can determine the width of the text by adjusting the word wrap length of the text label. Read more >

Resize mammoth braille using the purple markers

Figure 4. Mammoth braille or letters and digits can be resized using the purple markers.

Rotating labels (all label types)
To rotate a label, right-click it and then choose ‘Rotation’ from the context menu or click the icon in the toolbar of the selected label. On the dialog that appears, enter the desired angle of rotation in degrees and choose OK to rotate the label. You can also use SHIFT+scroll wheel on a mouse to rotate a selected label.

Please keep in mind that embossers that print in a fixed grid of braille dots are not suitable for printing braille characters at an angle.

‘Rotation’ icon: Rotation icon:
Editing letters and digits
To edit the content of a raised print character label, simply double click on it to open the edit dialog. Alternatively, choose ‘Text and position’ from the context menu or properties toolbar. Edit the label content as desired, then choose ‘OK’ to close the dialog and update the text.
 
Editing mammoth braille
To edit the content of a mammoth braille label, simply double click on it to open the edit dialog. Alternatively, choose ‘Text and position’ from the context menu or properties toolbar. Edit the label content as desired, then choose ‘OK’ to close the dialog and update the mammoth braille label.