 Previous section
 Return to TactileView manual overview
Any text label placed in the design can still be edited later on. You can change the contents of the label or adjust the size and position in the design.
Please note that labels may only be edited according to the input method used to create them. For example, a text label entered via braille (six-key) input may only be edited using six-key, and a raised print character label may only be edited as a raised print character label. Labels cannot be converted from one type of label to another.
For more details on placing and aligning a text label in the design, see: Add text label or Braille grid (text alignment).
Text labels may only be edited using the same entry method with which they were created (computer keyboard entry or braille keyboard entry). To edit the content of the computer keyboard entry text label, double-click the label to place the cursor in the text and edit the content as desired directly in the design area. When this edit mode is active, you can drag with the mouse across the text or use the Shift key combined with the Home, End or arrow keys to make a text selection.
You can also right-click the label and choose ‘Text and position: computer keyboard input’ or click on the corresponding icon in the toolbar to bring up a text and position dialog. Make the desired changes and choose ‘OK’ to update the text in the label.
To edit the contents of a braille keyboard (six-key) entry label, double-click on the label to edit it directly in the design. Alternatively, you can right-click and choose ‘Text and position: braille keyboard input’ to bring up the text and position dialog. Edit the label content as desired using six-key entry. When you are finished, deselect the label when editing in the design or choose ‘OK’ to close the dialog and update the label.
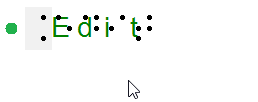
Figure 1. Double click on a text label for direct editing.
Word wrap length is the maximum number of characters per line of text in a text label. For example, a word wrap length of 10 will divide a text of 25 braille characters into three lines of text. Line breaks will be placed at the position of spaces to avoid breaking up words. The lines of braille text have a fixed height that matches the standardised height of embossed braille text.
The word wrap length can be adjusted by dragging the sides of a text label. The tooltip will display the value of the word wrap length. Alternatively, select ‘Text and position’ from the properties toolbar or context menu of the selected text label to enter a value for the word wrap length.
With the alignment frame enabled, the word wrap length will only be automatically be adjusted when placing a new label. If the label should fit within the limits of the alignment frame once placed in the design, the wrap length will have to be changed manually in the design or via the option ‘Automatically adjust word wrap length’ in the ‘Text and position’ dialog.
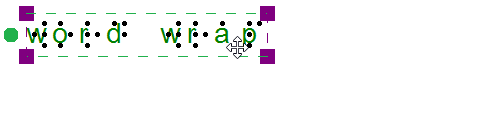
Figure 3. Adjusting the word wrap size by dragging the sides of the text label; the tooltip signifies the word wrap length.
The braille component of text labels can be hidden on screen for better readability. To view only the text of the labels in your document, select a text label and choose ‘Hide braille dots on screen’ from the properties toolbar. This setting will be applied to all text labels in the document. Choose ‘Show braille dots on screen’ to show braille on screen again.
For a complete list of settings for the way text labels are displayed on screen, select ‘Text label presentation: on screen’ either from the properties toolbar of a selected text label, or from the Settings menu. You can adjust the font colour, enable enlarged text for selected text labels and hide the text or braille component of text labels.
Note: Braille dots for text labels can be disabled on print seperately via ‘Text label presentation: on print’.
‘Show/Hide braille dots on screen’ icons:
You can choose to use extra line spacing between lines of text throughout the document. For example, a value of 0.5 will add an empty space of half the height of a braille character between two lines of text.
This can be selected by choosing ‘Additional line spacing’ from the properties toolbar or context menu of a selected text label.
The fastest way to copy, cut, paste or delete a label is using hotkeys. To cut a label, select it and press CTRL+X on the keyboard. Cutting the label removes it from the file but stores it on the clipboard allowing you to paste it elsewhere in the file. The cut label can only be pasted until you cut or copy a different label or object.
To copy a label, select it and press CTRL+C. Copying leaves the original label but keeps a copy of it that you can paste somewhere else in the file. To paste a cut or copied label, press CTRL+V. To delete a selected label, press the Delete key on the keyboard.
Once your label is selected, you can move it by clicking the center and dragging it to a new position. A four pointed arrow cursor indicates you can move the label.
You can also easily move the label to the center of the design area by right-clicking it and selecting Center from the context menu. You can move it only horizontally or only vertically by right-clicking it, selecting ‘Move the label or object only horizontally or vertically’ and then dragging it up or down to move it vertically without changing its horizontal position, or left or right to move it horizontally without changing its vertical position.

Figure 3. The cursor with four arrows indicates the text label will be moved when dragged.
‘Centre text label’ icon: ![]()
‘Move horizontally/vertically’ icon: ![]()
You can resize a mammoth braille label in one of two ways. The first way is to scale a mammoth braille label manually. To do this, select it, then click a purple marker in one of the corners of the label and drag it diagonally until the label is the desired size. This resizes the mammoth braille inside the label to fit the new label size. The other way to resize a mammoth braille label is to right-click it and choose ‘Braille dot size’, which brings up a dialog on which you can specify the size of the mammoth braille relative to standard braille as a percentage. The default percentage is 300, which means the mammoth braille is three times larger than standard braille. Enter the desired size of the mammoth braille and choose OK to close the dialog, adjust the mammoth braille size and automatically resize the label to fit the new size of the mammoth braille.
Raised print character labels may also be resized in one of two ways. The first way is the same as for mammoth braille labels; select the raised print character label, then click a purple square in one of the corners of the label and drag it diagonally until the label is the desired size. This resizes the raised print characters inside the label. The other way is to right-click the raised print character label and choose ‘Font type’ and size from the context menu. This launches a dialog that allows you to choose any font on your computer for the label, to specify any available font style for that font and to define the desired font size. Once you have finished making selections, choose OK on this dialog to apply your choices to the label text. The raised print character label will be resized to fit the new size of the text.
NOTE:
Because braille characters have a fixed size, text labels created using either computer keyboard entry or braille keyboard entry may not be resized. However, you can determine the width of the text by adjusting the word wrap length of the text label. Read more >

Figure 4. Mammoth braille or letters and digits can be resized using the purple markers.
To rotate a label, right-click it and then choose ‘Rotation’ from the context menu or click the icon in the toolbar of the selected label. On the dialog that appears, enter the desired angle of rotation in degrees and choose OK to rotate the label. You can also use SHIFT+scroll wheel on a mouse to rotate a selected label.
Please keep in mind that embossers that print in a fixed grid of braille dots are not suitable for printing braille characters at an angle.
To edit the content of a raised print character label, simply double click on it to open the edit dialog. Alternatively, choose ‘Text and position’ from the context menu or properties toolbar. Edit the label content as desired, then choose ‘OK’ to close the dialog and update the text.
Editing mammoth braille
To edit the content of a mammoth braille label, simply double click on it to open the edit dialog. Alternatively, choose ‘Text and position’ from the context menu or properties toolbar. Edit the label content as desired, then choose ‘OK’ to close the dialog and update the mammoth braille label.