 Previous section
 Return to TactileView manual overview
TactileView includes a number of tools for drawing and working with tables. Most editing commands for tables are the same as for other drawing objects, including the methods with which to move, center or delete a table, change its line or fill style, add audio labels or fuse it to the bitmap. For more information on these topics, please refer to Editing object properties, Adding audio styles and Working with fused bitmaps. The features and commands described in this tutorial are specific to tables.
To add a table to your file, choose the ‘Draw table’ icon from the toolbar on the left side of the screen, then click and drag the mouse in the design to insert a table into your document. Your table will be created with the default number of rows and columns, but you can add and/or remove rows and columns as desired after the table has been inserted.
Another way to add a table to your file is to select ‘Draw table’ from the Drawing Tools menu. This launches a dialog, allowing you finer control over how the table is initially created.
To insert a table using this method, enter the desired location of the upper left corner of the table, then specify the size parameters, the number of rows desired and the number of columns desired. When setting the size, choose the ‘Enlarge/reduce’ radio button if you would like the cells in your table to be square, or choose the ‘Stretch’ radio button to allow adjustment of the height and width independently. Enter the desired cell width (and the height, if using the ‘Stretch’ option), the desired number of rows and the desired number of columns, then choose ‘OK’ to close the dialog and insert the table into your drawing.
Figure 1. Drawing a table in the design with the mouse.
‘Draw table’ icon: ![]()
Once you have inserted the table into your drawing, you can adjust the overall table size. The objects and text labels that are placed within the table will be repositioned automatically so they remain positioned in the same cell (see below).
To adjust the size of the table, select the table so that purple squares appear along the outside edges of the table. To scale the table and preserve the height to width ratio, click a purple square in one of the corners of the table and drag it until the table is the desired size. The cells in the table will be scaled up or down automatically with the table and will maintain their height to width ratios.
To adjust the overall table width, click the center purple square on the right or left edge of the table and drag it until the table is the desired width. The cells in the table will be scaled automatically to maintain equal widths. Similarly, you can adjust the overall table height by clicking the center purple square on the top or bottom edge of the table and dragging it until the table is the desired height. The cells in the table will be scaled automatically to maintain equal heights.
By default, a new table has three columns and three rows; however, you can always adjust the number of rows and columns by inserting or deleting them. To do so, select ‘Insert or delete rows and columns’ from the properties toolbar or context menu.
In the dialog that appears, first make a selection whether you wish to add or remove rows or columns. Next, you need to specify which row(s)/column(s) should be deleted or at what position the row(s)/column(s) should be inserted.
– In the case of inserting, you can choose to place them ‘In front’ (i.e. on the left side of the table in the case of columns, on top for rows), ‘At the end’ (i.e. on the right or bottom) or after the specified column/row number (i.e. inside the table). You can choose to add a single or multiple rows or columns.
– In the case of deleting, you have the choice between ‘First’ (again, the leftmost column or top row), ‘Last’ (rightmost column or bottom row) or after the specified row/column number. Again, you can choose to remove multiple rows at a time.
Finally, you have to select if either:
– the table dimensions need to remain constant, i.e. the outer dimensions of the table remain the same but the cell size is adjusted to accomodate the new number of rows/columns; or
– the cell dimensions remain constant, i.e. the table size is adjusted to add or remove space for the new number of rows/columns.
Once you have made all selections, choose ‘OK’ to confirm.
At any point after creating your table, you can enter contents into the cells. You can use the drawing tools from the left vertical toolbar or Drawing tool menu to place text labels or objects in the table. Objects inserted into a table may be edited just like objects that are not part of table contents (for more information, please refer to the ‘Drawing tools’ section of the manual). Inserting an object into the table contents will anchor it to the table, so that if you later move, stretch or scale the table, the object stays linked to the correct cell in the table.
As an alternative to drawing the object with the mouse, select the table and choose the ‘Table contents’ icon from the properties toolbar, or right-click the table and choose ‘Table contents’ from the context menu. This launches a dialog from which you can control the table content.
When you select an object type from this menu, a dialog will come up allowing you to give further information about the object you want to create. What is on the dialog will vary depending on which type of object you select. A size and position dialog will appear for straight lines, squares/rectangles, circles/ellipses, triangles, polygons, freehand lines/closed shapes, dots and tables. For the other objects, a dialog will appear in which the contents can be entered (e.g. text labels) or selected (e.g. figures).
The dialogs are very similar to the ones that appear when you access the drawing tools from the Drawing Tools menu, except that they also have edit boxes that allow you to select which cell to place the object in by specifying the desired row and column for the object.
This is the size and position dialog for inserting a square, but since it is being inserted into a table it has ‘Row in table’ and ‘Column in table’ edit boxes at the bottom. Make the desired selections to create your object and place it in the appropriate cell, then choose ‘OK’ to close the dialog and insert the object into the table. It will also appear as a listing in the table contents menu.
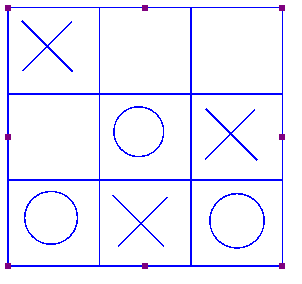
Figure 2. Scaling or moving a table will automatically reposition the contents in the table.
‘Table contents’ icon: ![]()