Skip NavigationMenu

02. TactiPad – Drawing tools – The Ruler

The ruler

The ruler’s width is 4 centimeters, and it reaches 43 centimeters long. With this length,  it stretches diagonally all the way over the entire drawing surface. At one end of the ruler, a 2 centimeter wide round hole is made. In the rest of the ruler there’s a 2 centimeter wide groove. The hole and groove function to fixate the ruler in any direction across the drawing surface, by screwing the knobs.

Using the round hole and grooves, the ruler can be fixated around the knobs

The groove gets interrupted twice; for solidity and as recognizable points two little ‘bridges’ have been made which cross the groove each at a distance of 10 centimeters.

Little slots indicate the 5 centimeter distance in between. The ruler has a measure designation on both sides, for a length of 35 centimeters. When horizontally or vertically placed, with the hole over a knob, the zero of the ruler is on the edge of the sheet. For drawing a line at a precise position, take in account that the rulers edge is 1 centimeter wide.

When horizontally or vertically placed, the zero is on the edge of the sheet

03. TactiPad – Drawing tools – The set square

The set square

The rectangular 45-degrees triangle has the same measure designation as the drawing board. The two short sides have a measure designation of 10 centimeters, while the long side has a measure designation of 14 centimeters. An indication on the middle of the long side makes it easy to draw a perpendicular.
There are four holes in the set square for fixing it over the knobs. The round hole in the 90 degree corner fits around a knob.
By putting one of the short sides of the triangle aligned with the edge of the frame, the set square creates two angles on the board, one of 90 and one of 45 degrees.

Met de korte zijde langs de rand van het bord vormt de driehoek hoeken van 45 en 90 graden

On one centimeter distance of the edge, in the middle of the long side of the set square, a round hole is made. To the left and right are two oblong holes. When putting the middle hole and one of the others over a knob, an angle of 30 or 60 degrees can be made by turning the set square to its extreme position.
By alligning the short side with the frame, the set square makes a 45 and 90 degrees angle

04. TactiPad – Drawing tools – Protractor

Protractor

The protractor makes half a circle with a 7 centimeter radius. In the middle of the straight side a 2 centimeter wide semi-circular hole has been made, to easily place the protractor on a line, or combine it with the ruler or a knob. On the round side, there are little indication points per 10 degrees. At each 10 degree point around the edge there is also a small notch, to help you precisely place your pen. Little slots on the top surface indicate the usual 30, 45, 60 and 90 degrees angles.
The protractor has five round holes of 0.5, 1, 1.5, 2 and 2.5 centimeters in diameter, to easily draw circles.

You can place the protractor with the semi-circular hole against a knob

05. TactiPad – Drawing tools – Compasses

Compasses

The compasses are made out of two main parts: a beam and a base. The beam has a turning point on one side and a pointy shape for drawing circles on the other. You can put the turning point, which will be the center of the circle in the base. The base, which has three strong magnets, keeps the compass in place on the TactiPad board, which has a metal layer below the drawing surface. The beam can be moved around the base clockwise and counterclockwise just above the sheet. The beam has as special ball mounting, so you can slightly tilt the beam. This makes it easier to draw a circle with the pointy shape.

Positioning the center

The base has a semi-circle shape with a diameter of almost 6 centimeters, with three little legs pointing out. It looks a bit like a round capital E. The middle leg has the shape of a triangular arrowhead of which one corner has been cut out. The arrowhead can be used to precisely place the center of a circle on a specific point in the drawing.

The two parts of the compasses: the magnetic base and the beam
The magnetic base keeps the compass in place on the drawing surface

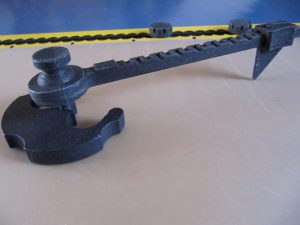
If you place the corners of the arrowhead on two crossing lines, the compass spike is exactly in the middle. Along the outer edge of the base, three semi-circular hollows have been made which can be used to quickly and precisely position the center of the circle on a line.

The compass base positioned on two intersecting lines

Adjusting the radius

The pointy shape which is used to draw the circles can slide along the beam. The beam has a measure designation per 0.5 centimeters. Using this indication you can set the radius with 0.5 centimeter increments. The smallest possible circle you can draw is 3 centimeters, whilst the largest is 12 centimeters.


Measure designation on the beam
.

Tactile center indication

The bottom end of the turning point has three very small spikes. When you press and turn the knob on top, without moving the whole beam, a small tactile circle is created. This way you can indicate the center of the circle drawn.