Skip NavigationMenu

13. Digital Pen – Exploring audio-tactile images with speech and sound – Explore mode

Tactile diagrams that have been made with the TactileView software can be enriched with audio-information, so that the diagram becomes an audio-tactile diagram. This diagram needs to be placed on the TactileView ClickPad or the TactiPad, so that the physical position you click on matches with the position in the corresponding file. The pen is used to indicate the location, and the software then automatically checks in the matching file if there is audio information available at this position. After a short click, the audio is played.
To be able to hear the audio information, the software needs to operate in the explore mode.
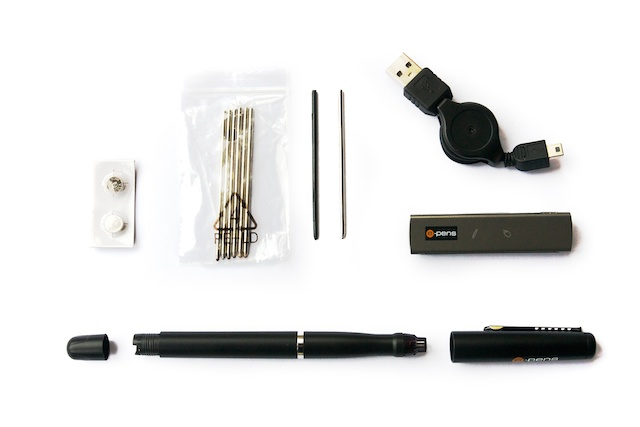
Once more, a long click in the explore mode opens a context menu. In this menu, various options can be chosen that are of importance for exploring the diagram, like opening the digital file matching a different tactile diagram, selecting a text to speech voice or calibrating the TactileView digital pen.

12. Digital Pen – Creating a tactile diagram – Design mode

Combined with the TactiPad, the digital pen can be used to create a tactile diagram in the TactileView software. To do this, the pen has to be assigned to one of the drawing tool functions, just like the mouse would. When a drawing tool is activated, it can be used to make a digital drawing.
The option ‘Drawing tools’ in the context menu of the design mode gives access to all the tools. Every drawing tool is made to achieve specific results, such as drawing a line or square, placing a text label and more. These are placed as so called objects in the diagram.
Tactile recognizable points or a tactile diagram on the TactiPad can be used as a reference for easy drawing. The results are described by spoken messages.

Every drawing tool has a number of options, by which the drawing tool can be adjusted via a context menu. For example, when drawing a line, one can choose the line thickness and style. It is virtually impossible to draw a steady thick dotted line by hand with the pen; instead, the software can easily create this by defining a starting and ending point and providing the line in between with the desired properties.
When an object is placed with the drawing tools, one can always adjust this object later on via the context menu of the used drawing tool or object.

11. Digital Pen – Explore mode and design mode

The software starts in the design mode. In this mode, all drawing functions are available. Using the ‘Drawing tools’ menu or the TactileView digital pen, you can start drawing by selecting one of the drawing tools.
To explore a diagram with speech and sound, the program needs to be switched to explore mode. This is done using the context menu in design mode or using the hotkey Ctrl+E. As long as the software is in explore mode, the design cannot be adjusted.

10 Digital Pen – Opening a context menu and selecting options

The context menus of the TactileView software can be opened by clicking with the pen on any position on the drawing surface during approximately one second. An ascending piano sound indicates that the menu is being opened. When the pen is released or moved before the fifth note is played, opening the menu is cancelled to prevent interrupting a drawing activity.

For selecting and activating the options in the context menu the software uses the pen’s last clicked (‘current’) position. By using this point as starting position, the next click lands on a certain position related to this point. Every position related to this starting position has a specific result.

By shortly clicking with the pen on the same, ‘current’ position again, the next option in the newly opened context menu is selected. These clicks can be repeated endlessly to cycle through the context menu: after the last option is shown, the first option in the list is shown again.

By clicking about 1 centimetre above the current position, the previous option in the list is shown, and the presentation sequence is inverted. Clicking on this higher position again then shows the previous option, instead of the next. By clicking on the initial position, about 1 centimetre below this current higher position, the next option is shown again and the presentation sequence is changed back to normal.

By clicking 1 centimetre to the right of the last clicked position, the selected option in the menu is activated, just like using the ‘enter’ key. When the chosen option also includes a list of options, you can click on the current position to show all options of this submenu. Once more, clicking 1 centimetre to the right activates an option from the submenu.

By clicking left of the current position, the menu or submenu is cancelled, just like using the ‘escape’ key.

09. Digital Pen – The pen in stand-by

The software always responds to pen contact when the receiver is connected and the pen functions correctly. Upon starting the software the pen does not have a drawing function yet, to prevent unintentional drawing. The pen stays stand-by until a drawing function is assigned to the pen. The pen’s function can be set at any time, using the context menus.
The basic moves of the pen are those where the pen is pressed down for a long or short time on the same position on the drawing surface. Pressing down and releasing without moving results in a short or long pen click. When the pen is pressed down and the tip is meanwhile moved on the drawing surface, there is pen contact and simultaneous movement (drawing).
The context menu containing the current options for the pen (which options are available depends on the user’s previous actions) is opened using a long pen click, or when the pen does not move whilst pressing down for approximately one second. Short pen clicks are used to select an option in an opened menu. The option to put the pen back to stand-by can be found in nearly every context menu.

07. Digital Pen – Calibration

To draw a digital diagram or to explore an audio-tactile diagram it is strictly necessary to have the physical position matching that same position in the related file in the TactileView software. The process of matching the physical and digital positions is called ‘calibration’. Guided by spoken messages, this calibration process can be executed from the menu ‘Settings > TactileView digital pen’.
Every design is made either in landscape or portrait orientation. Upon opening a new file or switching between design mode and explore mode, the orientation is announced, so that the user can choose the easiest position for the receiver. Depending on page orientation and drawing preferences, the receiver can be placed on one of the three positions on the TactiPad or the TactileView ClickPad. This way, left-handed use of the pen has been taken into account.
The base position for the receiver can be chosen in the menu ‘Settings > TactileView digital pen’.

06. Digital Pen – TactileView software

Preferably, the receiver is connected to the computer by a USB-cable before the TactileView software is launched. A notification reports this. When the software has informed that the receiver is connected, it does not necessarily mean that the digital pen transmits a signal when its tip is pressed. Place the pen on the drawing surface and lightly press down. A tinkling sound is played when the pen has made contact. This sounds indicates the pen being ‘stand-by’. When there is no sound played while pressing the pen, its batteries could be empty or the receiver cannot receive the pen’s signal.
From the menu ‘Settings > TactileView digital pen’ the pen function can be checked using the option ‘Test’.

02. Digital pen – Parts

The TactileView digital pen consists of three parts: a digital pen, a receiver and a holder for the receiver.
The tip of the digital pen is an exchangeable pin. Upon drawing, the tip gets pushed slightly into the pen, activating a tiny transmitter in the pen. Two small batteries in the pen power the transmitter.
The holder, which keeps the receiver of the digital pen in place, magnetically clicks to the side of the TactiPad or the TactileView ClickPad. The receiver is connected to the computer with a USB cable and sends the pen’s signal to the TactileView software. The software on the computer processes the pen’s position every time it clicks or moves.

05. Digital Pen – Specification of the pen

A cover at the end of the pen closes the batteries and can be removed. The batteries have a flat side and a rounded side. They have to be placed flat side up in the battery compartment.
The pen’s filling is replaceable. A plastic filling and a normal filling are included with the pen. These fillings are placed in the pen’s top and firmly lock in place. Quite some strength is needed to pull them out again.
The plastic tip can be used best when exploring an audio-tactile diagram, to prevent ink from spilling on the diagram. The normal ballpoint tip is advisable for drawing tactile lines on the TactiPad, so these lines instantly become visible.
The button on the side of the pen does not have any function. Every option of the TactileView software can be operated with the pen, using only short and long clicks.