Skip NavigationMenu

12.01 Printing with a braille embosser

Before printing a file from TactileView, ensure that the driver for your embosser has been installed on the computer; see Properties of different braille embossers for instructions for each supported embosser model or Embosser driver installation for an overview of the tactile properties of the embossers.

To check if your embosser is ready for printing, go to the Windows Control Panel and select ‘Devices and printers’. If the embosser is installed correctly, you should see it online in the list of available printers.

Online and offline printer icons in Windows Control panel

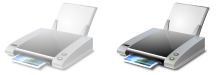
Figure 1. Offline (left) and online printer icons in Windows Control panel.

Print setup
Once you have verified that the printer driver is installed on the computer, select ‘Print setup’ from the file menu. In the dialog that opens, select your embosser from the printer name list. Next, select the paper size you want to emboss on, and choose the print orientation. Click ‘OK’ to apply your settings to the document and close the dialog.
If you changed any of the options on the screen, this will affect how the active document will be printed. Depending on the size of your design and the selected paper size and orientation, the design may not make full use of the available space on the paper, or the design may run over onto a second page; see the manual sections Paper size vs. design size and Changing design orientation and size.

Print preview
Check how your document will print by selecting ‘Print preview’ from the File menu or the corresponding icon in the top horizontal icon bar. This will open a preview of how your document will print and represents the exact embossed and/or printed output.
You can use the buttons above the preview to examine the document as it will be printed, including the number of pages and ink version if applicable.

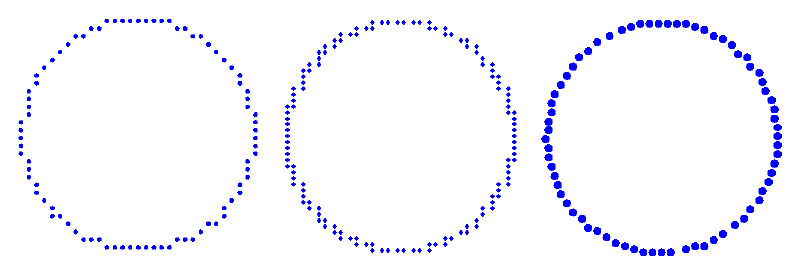
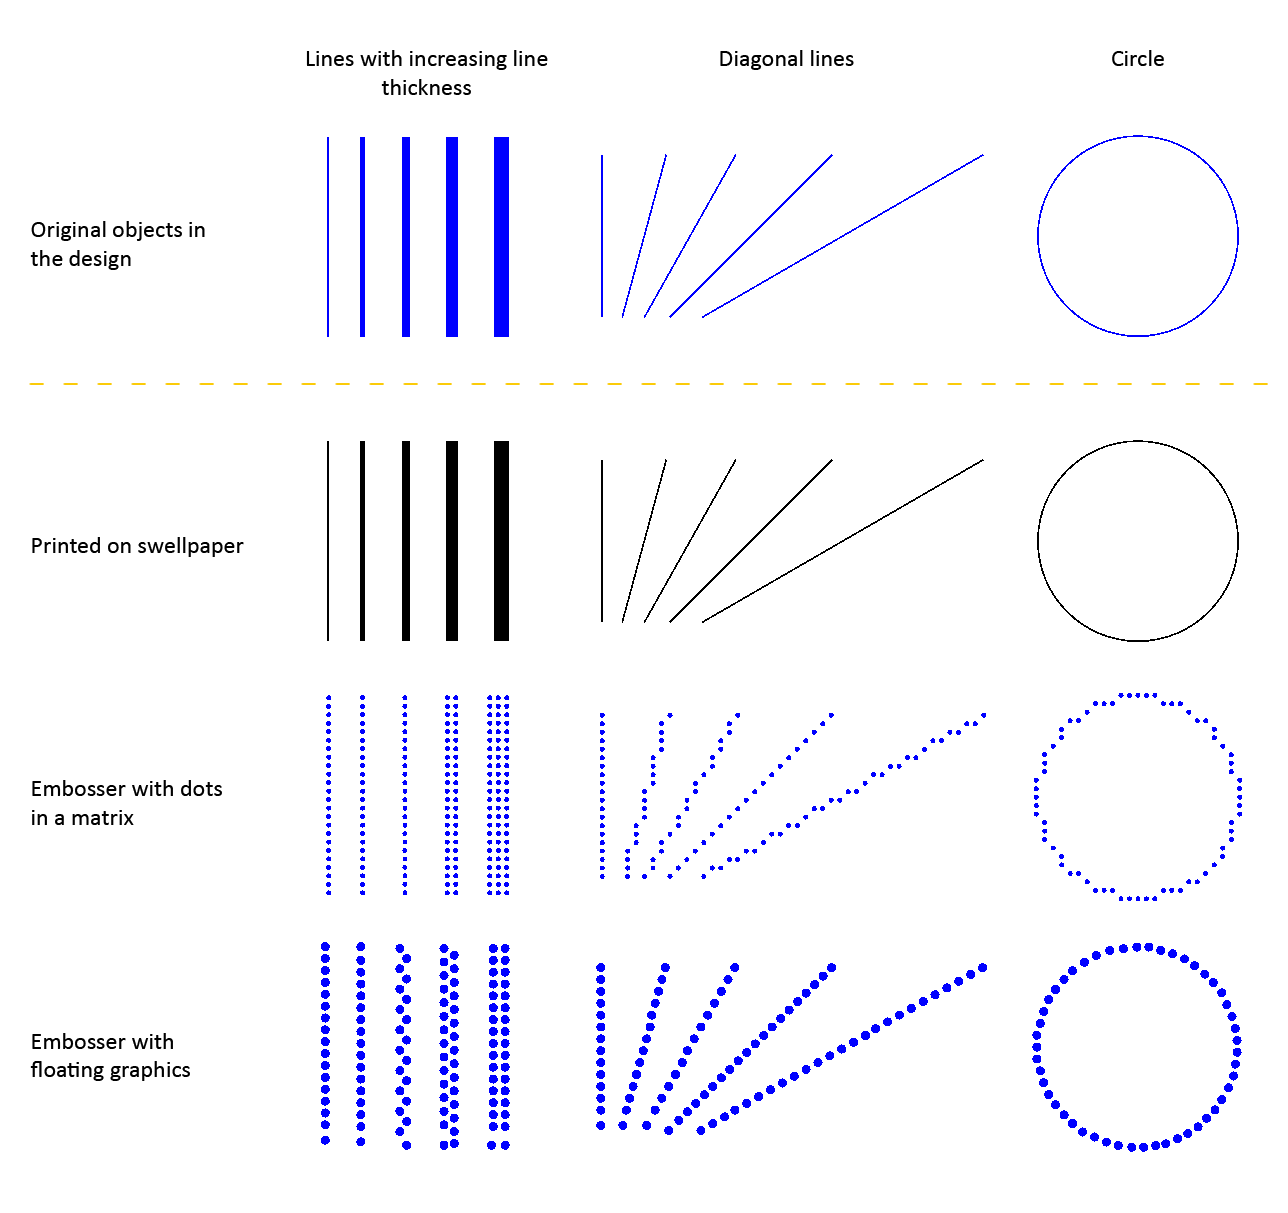
When you wish to get a preview of the dot placement directly in your design, active the Design mode: dot view from the second horizontal toolbar.


‘Print preview’ icon: Print preview icon
‘Print’ icon: Print icon

Print document
When your document appears in the preview the way you want it to print, select ‘Print’ from the File menu or press CTRL+P to bring up the Print dialog. This is a standard Windows print dialog, which allows you to select which pages to print and how many copies. Make the desired selections, then choose the ‘OK’ button to close the dialog and print the file.

‘Print’ icon: Print icon

12.02 Properties of different braille embossers

Below, you will find an overview of the braille embossers that are supported in TactileView. Some embossers on the market are only capable of printing braille texts, whereas these all support printing both text and graphics.

An overview of the installation instructions for all embosser models can be found in the manual section Embosser driver installation.

The embossers from different manufacturers are produced with varying technical specifications. For example, the shape and size of the braille dots varies, as well as the possibilities for dot placement on the paper. This results in differences in the tactile properties of the graphics that can be produced. The specific properties for the selected embosser can be viewed in TactileView by enabling ‘Design mode: dot view’; see: Design mode: dot view/line view.

For a more extensive list of the technical specifications such as printing speed or supported paper sizes, visit the respective websites of the listed manufacturers.

Differences in printing methods: dot matrix vs. floating point

One of the most notable differences between the various embosser models is the way the dots are positioned to create the tactile graphics. The majority of embossers will place the dots in a fixed matrix. Any curves in the image will be built up of small interconnected horizontal and/or vertical line segments. The resolution of this two-dimensional matrix of dots determines the level of detail that can be achieved in the tactile image.

In some cases, the dots are not evenly spaced in the horizontal direction of the dot matrix. This is derived from the positions of the dots in braille characters, where no dots have to be placed in between two characters. This results in a less continuous dot spacing when printing graphics.

Other models are not restricted to a fixed matrix of dots, but instead can freely place dots at any position on the page. This is often called ‘floating point’ graphics. As a result, the images have much more continuous, smooth curves allowing for a relatively high level of detail and accuracy.

Comparison of print techniques: dot matrix (left), non-uniform dot matrix (middle) and floating point graphics (right).

Figure 1. A comparison of different embossing techniques: dot matrix (left), non-uniform dot matrix (middle; note the difference in horizontal and vertical dot placement) and floating point (right).


Embosser manufacturers overview

We support models from diverse manufacturers, such as:
APH, BrailleTec, Enabling, Harpo, HumanWare, Index, Irie AT, Nippon TeleSoft, ViewPlus.
For a comprehensive list of supported models and their properties see our List of Supported Embossers.

Design aspects in TactileView for different embossers

Below, you will find a list of the effects on a TactileView design of the printing properties of the different embossers.

Viewplus

All models support variable dot height, which can be set individually for the lines, surface and texture of all blue objects in TactileView. These dot heights are shown on screen in different shades of blue.
See also: Using variable relief height

The SpotDot (previously called EmPrint) and EmFuse models support printing in braille as well as black or coloured ink. In TactileView, the ‘Design mode: line view’ will show the design as it will be printed in ink, whereas the ‘Design mode: dot view’ will show the tactile output.

Index Braille

The floating point method that is used in the Index embosser models allows for smooth curves and a relatively high level of detail in your designs.

Brailletec

The floating point method that is used in the Brailletec embosser models allows for smooth curves and a relatively high level of detail in your designs.

Enabling Technologies
The following discontinued models are still supported in TactileView: Juliet, Romeo Pro and Romeo Attaché.

For the Juliet (discontinued) and Phoenix embossers, you have the option to select the embossing resolution by selecting ‘Print setup’ from the File menu.

Nippon Telesoft

The dot matrix for the Gemini embosser is based on the positions of the dots in braille text. The matrix therefore has a relatively low resolution and will not be uniform in horizontal direction; keep in mind that this allows you to use a limited level of detail when creating your designs.

Harpo

The dot matrix for the Mountbatten Brailler is based on the positions of the dots in braille text. The matrix therefore has a relatively low resolution and will not be uniform in horizontal direction; keep in mind that this allows you to use a limited level of detail when creating your designs.

12.03 Embosser driver installation

In TactileView, a wide variety of different braille embossers is supported (for an overview of their embossing properties, see Properties of different braille embossers).

It is essential to install the corresponding printer driver for your embosser model in order to produce the correct tactile graphics. The two steps of the ‘Embosser driver installation’ dialog will guide you through the installation of the correct driver.

TactileView driver versus manufacturer supplied driver

Some embossers require installing a driver that is supplied by the manufacturer. For the remaining supported embossers, TactileView supplies a specialised graphics driver.
To install the correct driver for your embosser model, open the dialog by selecting menu File > Install printer driver. In the first step you will be prompted with the list of supported braille embossers. Choose your particular model from the list, then click ‘Next’. In the second step, depending on your embosser type, you can either directly install the TactileView driver, or follow the written instructions to install a driver supplied by the manufacturer.

Option 1 – Driver supplied by TactileView

Some embossers are capable of creating tactile graphics, but are not supplied with a driver that supports this by default. In these cases, TactileView supplies a separate driver that needs to be installed via step 2 of the ‘Embosser driver installation’ dialog.
Please note that some models require additional settings, such as language selection. If required, this will be presented in the dialog.

Option 2 – Driver supplied by manufacturer

For a number of embossers, the driver that is supplied by the manufacturer also supports producing tactile graphics with TactileView. In this case, the driver will not be installed via TactileView, but using an installer file (.exe) that you receive with your embosser or download from the supplier’s website.
You will find complete instructions in step 2 of the ‘Embosser driver installation’ dialog for the installing driver and selecting the embosser in TactileView.

12.04 Effect of printing properties on tactile usability

The tactile characteristics vary significantly between the different printing methods that are supported in TactileView. These differences have major influence on the tactile usability (how easily elements can be distinguished) of a design.

The printing methods can be divided into three broad groups: embossers with dots in a fixed matrix pattern, embossers with floating graphics and swellpaper. See Properties of different braille embossers for an overview of the properties of each supported embosser model.

Read the Drawing tools section in the TactileView manual to learn how to adjust the properties of the drawing tools, such as filters, retouching tools and the line thickness, line style and textures of objects.

Printing properties - effects on tactile usability

Figure 1. Comparison between the tactile properties of different printing methods.

Embossers with fixed dot matrix

In many braille embossers, the positioning of the dots that form the tactile graphic is limited to a matrix pattern of braille dots with a fixed distance between the rows/columns dots. The tactile graphics are limited to a comparatively low resolution because of the minimum size of a braille dot and their placement in the matrix. An empty space of at least 1 braille dot (or preferably more) is required to distinguish between neighbouring lines and shapes.

Line thickness Limited to a multiple of dots with a minimum of 1 braille dot
Diagonal lines and curves Composed of small  vertical and horizontal line sections
Distance between lines Minimum of 1 braille dot between neighbouring lines
Line styles Limited to relatively coarse line styles, as the gaps and dashes in the line pattern need to be at least the size of 1 braille dot
Textures Limited to coarse textures due to the matrix pattern and minimum size of texture lines/elements and the empty space between them

Embossers with free dot positioning

A number of braille embossers do not have a fixed dot matrix but instead allow the dots to be placed anywhere on the page with high accuracy. This way, the dots can follow curves very accurately. The size of the braille dots still limits the level of detail to a certain degree in order to avoid overlap with adjacent dots.

Line thickness Minimum thickness of 1 braille dot, with undulating ('zigzag') lines or multiple
Diagonal lines and curves Perfect diagonal lines and curves due to the floating point positioning
Distance between lines Can be positioned freely, but an empty space of at least the thickness of a braille dot is recommended
Line styles Limited to relatively coarse line styles, as the gaps and dashed in the line pattern have to be at least the size of 1 braille dot
Textures The minimum size of texture lines/elements and the distance between them results in a relatively coarse texture

Swellpaper

When printing on swellpaper, the TactileView design is printed directly in ink without any reduction in resolution (in contrast to the lower resolution of braille dots). This enables you to use fine details that are still distinguishable by touch.

Line thickness Can be varied in steps of 1 pixel
Diagonal lines and curves Perfect curves without limitations
Distance between lines Relatively small gaps between adjacent lines can still be distinguished due to the high resolution
Line styles Detailed line styles can be used as the minimum size of gaps and line segments can be very small
Textures Detailed textures can be used as the minimum size of the texture lines/elements and the empty space in between can be very small

Variable relief height for enhanced tactile usability

Some embossers support variable dot height as an additional method of distinguishing the lines in your design. For example, a lower dot height is applied to the grid lines in a graph in order to discriminate them from the axes and formula line.

This functionality is only available when supported by your embosser; see Properties of different braille embossers for an overview of embossers that support variable dot height and Editing object properties to find out how to apply variable dot height.

12.05 Printing on swellpaper (microcapsule paper)

Swellpaper (also called microcapsule, puff or fuser paper) is a heat sensitive paper and contains chemical ingredients that swell up to form a raised texture. Whereas braille embossers will use lines made up of individual braille dots, designs printed on swellpaper have more fluid, continuous lines that retain more detail.
Once the design has been printed with an inkjet printer, the paper has to be heated in a special oven in order to produce the braille texts and tactile images. In this process, any areas on the paper with black ink will swell to form the relief.
Laser printers are not recommended for swellpaper as the high-temperature environment can cause the paper to swell inside the printer, resulting in a serious paper jam.

Optimise braille dot diameter
Swell-paper produced by various companies (such as Tangible Magic Paper, ZyTex, Flexi-Paper and Matsumoto) are all suitable for tactile graphics. Each brand has slightly different properties in terms of the required temperature and duration of heating. It takes some experience to find the optimal settings for the particular paper that you are using, so make sure do some thorough tests to find out which combination of temperature and heating time works best.
Depending on the oven temperature, the braille dots might raise either too much or not sufficiently, making them no longer distinguishable as individual braille dots. To compensate for this effect, the diameter of the dots can be adjusted by choosing ‘Text label presentation: on print’ from the Settings menu and increasing or decreasing the size of braille dots.

Printing text combining visual font with braille
The normal font (visual characters) of braille labels can be printed in a lighter colour. To avoid the text being raised when heated in the oven, make sure to select a colour other than black in ‘Text label presentation: on print’ as the ‘Text colour on print’. For example, a green or blue works well for visual readability.

12.06 Printing multiple designs; booklet

TactileView includes a convenient tool that allows you to consecutively print multiple designs. This option can be accessed by choosing ‘Print multiple designs’ from the File menu.

Tip: a bound booklet can already signify the page orientation, so in some cases it may be beneficial to switch off the right-up marker for the document.

Preparing the print list as a TXT file

In a few steps, you can easily create a print list. You can choose between a direct selection of the printed files (1a) or preparing the print list in advance (1b).

1a. Multiple file selection

In the dialog that opens, you can select the files that you wish to include in your print list. Hold down Ctrl to add single designs to the selection, or hold Shift to add consecutive files. Once you have all the files selected, click ‘Open’.

The next dialog allows you to save the file selection as a .txt print list. This list needs to be saved in the same folder that contains the selected designs. Enter a file name and click ‘Save’ to confirm. If you do not wish to use the print list again later on you can also skip by clicking ‘Cancel’.

1b. Use a previously prepared print list (TXT file)

You can create a print list in advance with any text editor such as Word or Notepad, or select a print list that was created previously following the steps in 1a.

Each line in the print list must contain one file name, including the .bpx file extension. If the file is located in a subfolder, include this before the file name, followed by a forward slash. Make sure that all file names are correct, including any spaces or punctuation marks. Designs can be included multiple times if necessary. Your print list should look like this:

file name 1.bpx
subfoldername/file name 2.bpx
file name 3.bpx

Save your print list as a .txt file in the folder that contains the TactileView designs. In TactileView, select ‘Print multiple designs’ from the file menu, then choose ‘Single selection: list with file names (*.txt)’ and select your saved print list. Click ‘Open’ to continue.

2. Select print order

In the next dialog, you can select the order in which the designs should be printed. You can choose ‘Original order’ to print the designs in the order in which they are included in the print list. ‘Reversed original order’ can be used to ensure the last file in the print list is on the bottom of the stack. ‘Alphabetical order’ and ‘Reversed alphabetical order’ can be especially useful is the file names already include ordered numbering.

Any files in the list that cannot be located will not be printed. The print job will continue with the next file name in the list.

Text and graphics combination

TactileView has the option to embed designs in a text document that was created with the Duxbury Braille Translator (DBT). When using DBT, you can use more advanced lay-out features such as page numbering, headers and footers, etc.

See: Inserting graphics in Duxbury Braille Translator

12.07 Troubleshooting common printing issues

This page collects the most common errors that can occur when embossing TactileView designs.

Index embossers – Paper length settings in Index firmware (Error 213)

When printing a TactileView design using Index V4 embossers with firmware version 1.5.3 or earlier, the embosser may prompt you with an audible ‘Error 213’ message. This is caused by an incorrect maximum number of lines per page in the firmware of the embosser. For example, the firmware uses 26 instead of the correct 27 lines for letter or 11 inch paper, or 28 instead of 29 lines for A4 paper.

Read more

When you select an Index V4 embosser in File > Print setup, you will be prompted with a ‘Paper length settings in Index firmware’ dialog that allows you to avoid or solve this error. You can also access this dialog via Help > Configuration wizard, then proceed to step 2.

To test whether you will encounter this error when embossing, first make sure to select the same paper size in TactileView and in the embosser. Next, click the button ‘Test printer for error 213’ and wait at least 10 seconds. If you hear no error message from the embosser, you do not have to take any further action and will not encounter the error when embossing a design. If you are prompted with error 213 however, press the ‘Off’ button on the embosser control panel and follow these steps:

1. Update the embosser firmware to firmware version 1.5.4 or higher. Check the Index website for availability and instructions.

2. If updating the firmware is not possible, follow the instructions on the Index website on ‘Error 213 – How to adjust to fit DBT lines/page’.

3. If step 1 and 2 do not resolve the problem, you can temporarily reduce the number of lines per page in your TactileView designs. To do this, select ‘Reduce TactileView design height by 1 line per page’ in the ‘Paper length settings in Index firmware’ dialog. Important: if you execute step 1 or 2 later on, you will have to make sure the reduced design height option is no longer selected.

Index embossers – Error caused by mismatched paper size settings

When printing on an Index braille embosser, it is important to match both the design size and settings in the embosser with the size of paper you wish to print on. If these settings do not match each other, the embosser will report an error and the document will not be embossed correctly or will not be printed at all.

Read more

To solve this problem, check whether all paper size settings are set to the correct paper size. In TactileView, go to File > Print Setup and select the desired paper size.

Please read the Index Braille manual for your embosser for specific instructions on entering the right page formatting settings in your embosser model.